A basketball shot, a turning bicycle, the hands on a clock, and the corner of a book all have something in common: they all involve angles. Angles are everywhere, and measuring them helps people build houses, design roads, and even aim a soccer ball. When you learn how to measure angles with a protractor, you are learning how to describe how much something turns or opens.
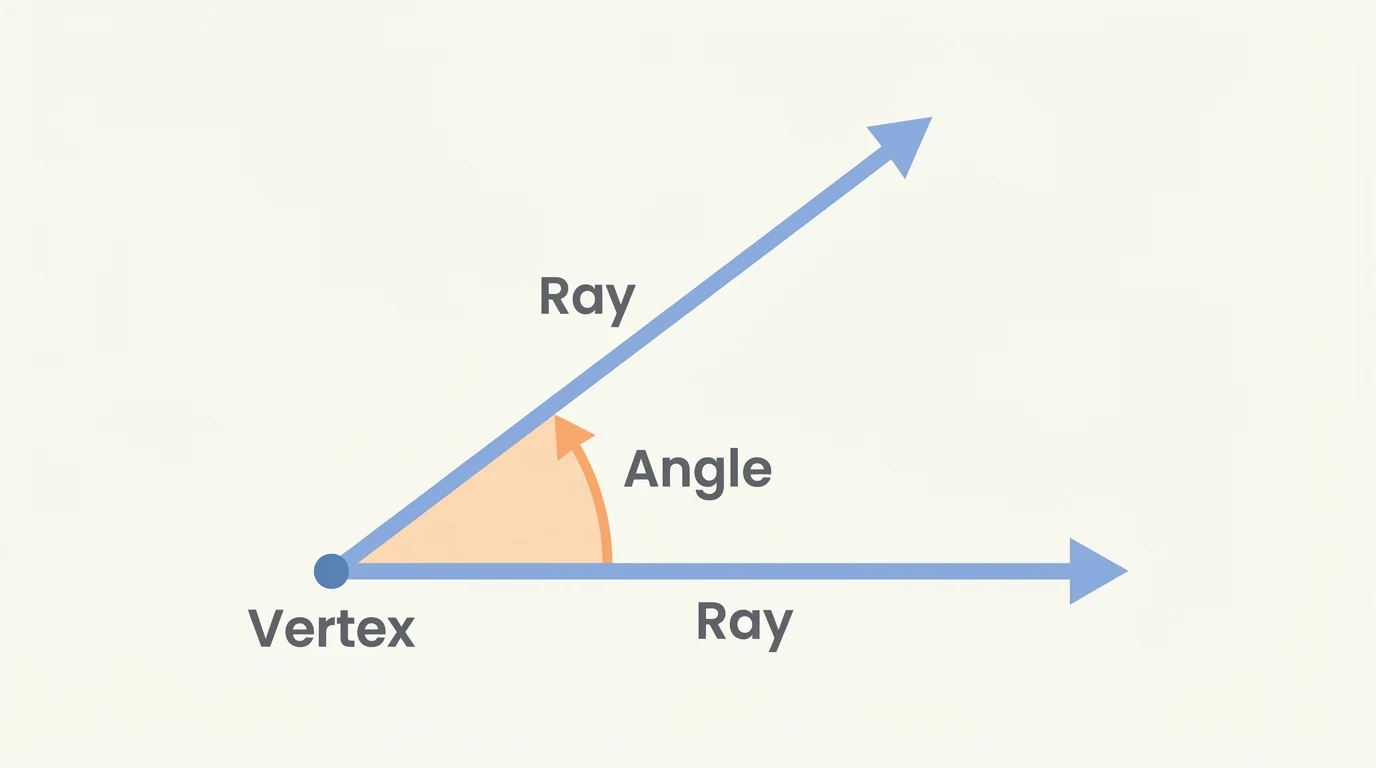
An angle is formed when two rays share a common endpoint. A ray is a straight path that starts at one point and goes on in one direction. The amount of opening between the two rays is the angle. A small opening makes a small angle, and a larger opening makes a larger angle.
You can think of an angle as a turn. If you stand facing forward and turn a little, you make a small angle. If you turn more, you make a larger angle. Angles tell us how much turning there is.
Angle is the space between two rays that share the same endpoint. That shared endpoint is called the vertex.
Degree is the unit used to measure an angle. The degree symbol is written as °, and in math we write measures such as \(45^\circ\) or \(120^\circ\).
A full turn all the way around is divided into \(360\) equal parts called degrees. So if something turns halfway around, that is \(180^\circ\). If it turns one quarter of the way around, that is \(90^\circ\).
An angle has important parts, as [Figure 1] shows. The point where the two rays meet is the vertex. The two straight sides are called rays. When we measure an angle, we are measuring the opening between those two rays, not the length of the rays.
That last idea is very important. A long ray and a short ray can still make the same angle if the opening is the same. The size of the angle depends on the turn, not on how long the sides are.
Sometimes angles are named with letters. For example, angle \(ABC\) means the vertex is at point \(B\). The middle letter tells you where the vertex is. If the angle is simple and there is no confusion, it may also be named by just its vertex.
Angles are measured in degrees. A degree is a very small part of a full turn. Since a full circle is \(360^\circ\), every angle measure tells how much of that full turn we have.
There are several common types of angles. Knowing these types helps you estimate before you measure.
| Type of angle | Measure | Description |
|---|---|---|
| Acute angle | Less than \(90^\circ\) | A small opening |
| Right angle | Exactly \(90^\circ\) | A square corner |
| Obtuse angle | Greater than \(90^\circ\) and less than \(180^\circ\) | A wide opening |
| Straight angle | Exactly \(180^\circ\) | A straight line |
Table 1. Common types of angles and their degree measures.
For example, \(35^\circ\) is acute, \(90^\circ\) is right, \(125^\circ\) is obtuse, and \(180^\circ\) is straight. If you estimate first, you are more likely to catch mistakes when using a protractor.
A clock is a great angle machine. When the minute hand moves from the \(12\) to the \(3\), it turns \(90^\circ\), which is a right angle.
When you look at the corner of a sheet of paper, you usually see a right angle. When a door is opened just a little, it makes an acute angle. When it opens wider than a square corner but not all the way flat, it often makes an obtuse angle.
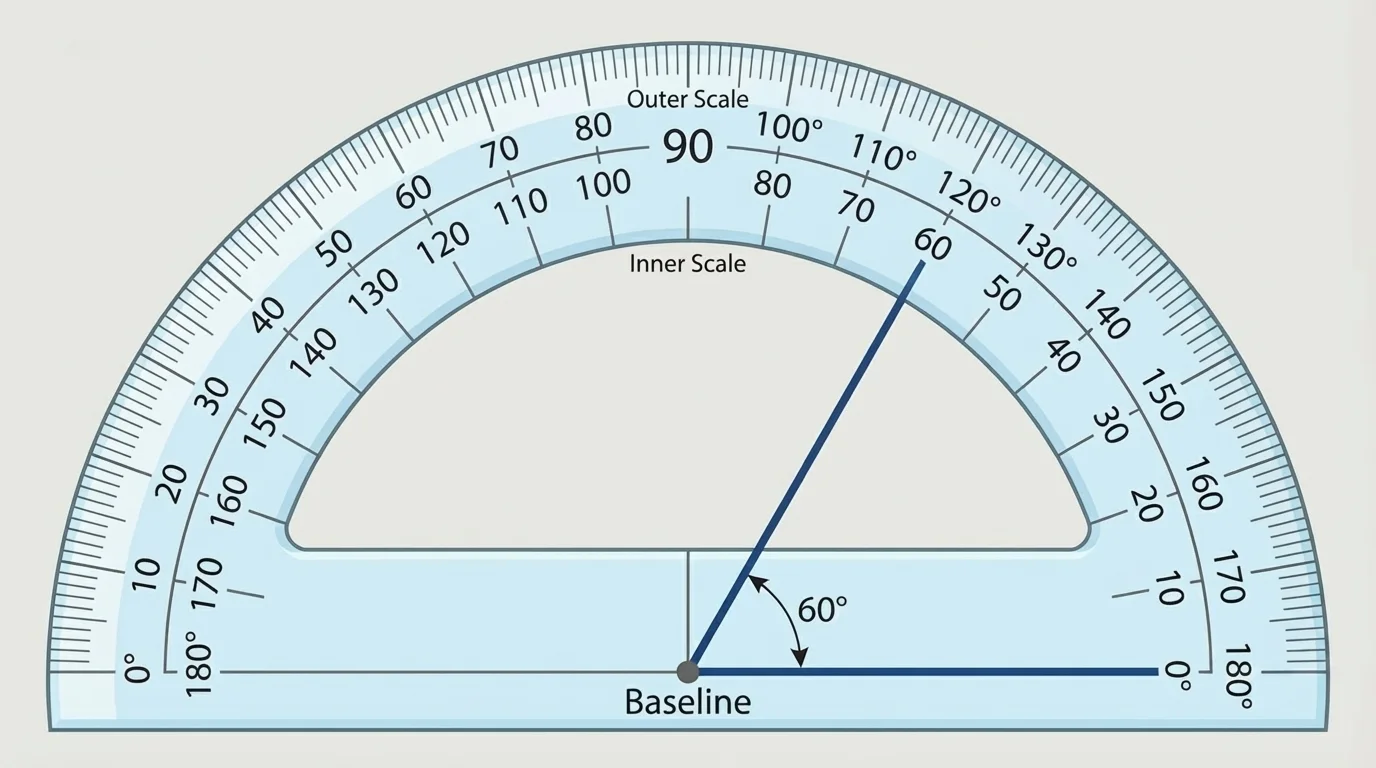
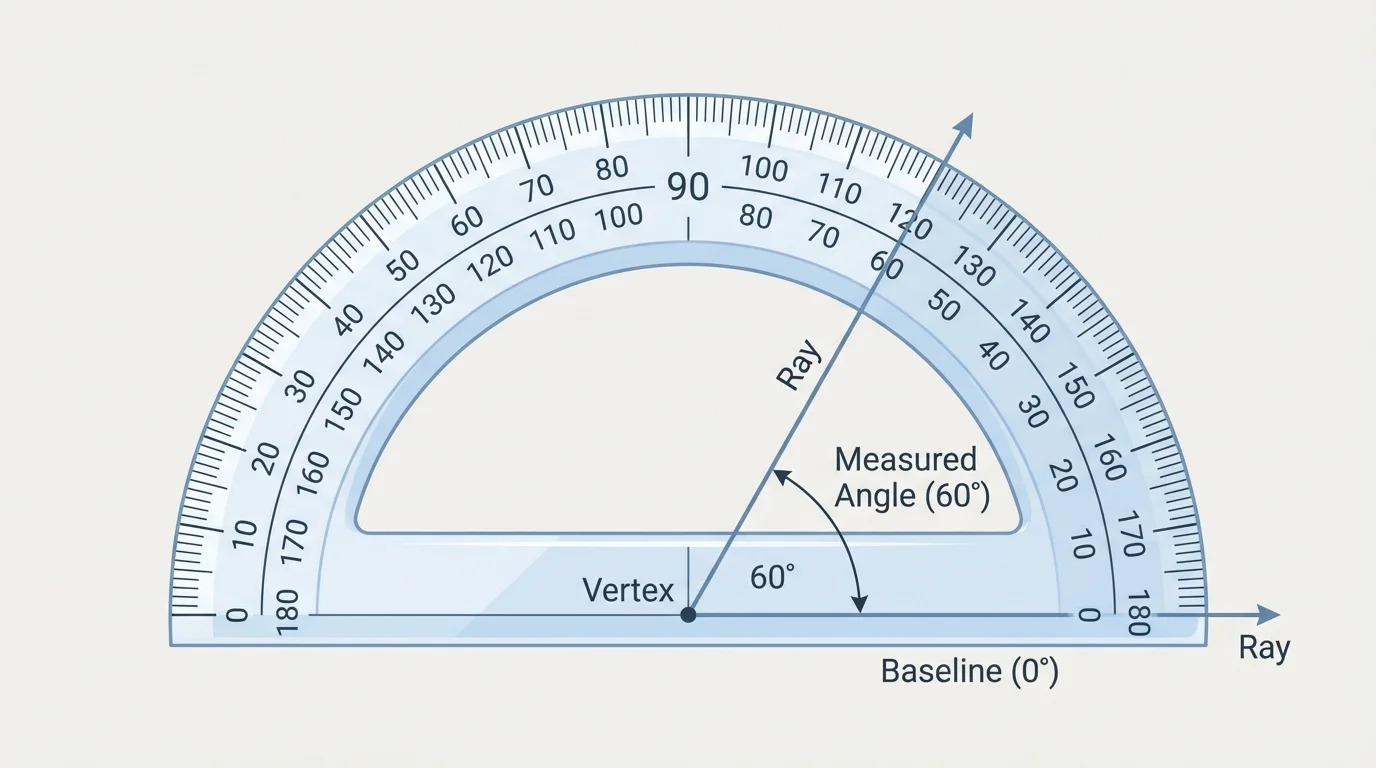
A protractor is a tool used to measure and draw angles, and [Figure 2] shows its most important parts. Most classroom protractors are shaped like a half-circle. They are marked from \(0^\circ\) to \(180^\circ\).
A protractor has a center mark or small hole at the bottom middle. That center point must be placed exactly on the vertex of the angle. It also has a straight bottom edge called the baseline. One ray of the angle should line up with that baseline.
Many protractors have two number scales. One scale starts with \(0^\circ\) on the left, and the other starts with \(0^\circ\) on the right. This helps you measure angles that face in different directions, but it also means you must choose the correct scale.
If the ray you lined up starts at the right-side \(0^\circ\), then read the scale that begins there. If the ray you lined up starts at the left-side \(0^\circ\), then read the scale that begins on the left. A quick estimate helps: if the angle looks acute, the answer should be less than \(90^\circ\).
When you measure length with a ruler, you start at the zero mark, not just at the edge of the ruler. A protractor works in a similar way: you must line up the vertex with the center mark and start reading from the correct \(0^\circ\).
Some protractors are full circles instead of half-circles, but the idea is the same. You match the center to the vertex, line up one ray, and read where the other ray points.
[Figure 3] Measuring carefully matters because even a small mistake can change the answer. The protractor must be lined up correctly before you read the degree number.
Step 1: Find the vertex of the angle.
Step 2: Put the center mark of the protractor exactly on the vertex.
Step 3: Line up one ray of the angle with the protractor's baseline so it matches \(0^\circ\).
Step 4: Look where the other ray crosses the numbered scale.
Step 5: Read the correct scale and write the angle measure in degrees.
Suppose one ray lines up with \(0^\circ\) on the right side. Then you follow the numbers that begin with \(0^\circ\) on the right. If the other ray crosses at \(70^\circ\), then the angle measures \(70^\circ\).
If you accidentally read the other scale, you might say \(110^\circ\) instead. But if the angle looks acute, \(110^\circ\) cannot be correct because that would be obtuse. Estimating first helps you catch this mistake.
Why estimation helps
Before measuring, decide whether the angle looks acute, right, obtuse, or straight. Then compare your protractor reading to that estimate. If the picture looks like an acute angle but your answer is more than \(90^\circ\), you probably read the wrong scale or lined up the protractor incorrectly.
The vertex placement is also very important. If the center mark is not exactly on the vertex, the reading will not be accurate. The same is true if the baseline is tilted away from the ray.
Worked examples help show exactly how to use the steps.
Worked example 1: Measuring an acute angle
A protractor is placed on an angle. One ray is lined up with \(0^\circ\) on the left scale, and the other ray crosses the left scale at \(45^\circ\). What is the angle measure?
Step 1: Check which scale starts at the aligned ray.
The ray is lined up with \(0^\circ\) on the left scale, so we must read the left scale.
Step 2: Read where the other ray crosses.
The other ray crosses at \(45^\circ\).
Step 3: Write the answer.
The angle measures \(45^\circ\).
This is an acute angle because \(45^\circ < 90^\circ\).
Notice that the estimate agrees with the measurement. That is a good sign.
Worked example 2: Measuring an obtuse angle
One ray of an angle is lined up with \(0^\circ\) on the right scale. The other ray crosses the protractor at \(120^\circ\) on that same scale. What is the angle measure?
Step 1: Start from the scale that begins at the aligned \(0^\circ\).
Since the aligned ray starts on the right, read the right scale.
Step 2: Read the crossing point.
The second ray crosses at \(120^\circ\).
Step 3: State the measure.
The angle measures \(120^\circ\).
This is an obtuse angle because it is greater than \(90^\circ\) and less than \(180^\circ\).
Angles larger than a right angle often make students pause, but the same method still works.
Worked example 3: Choosing the correct scale
A ray is lined up with \(0^\circ\) on the left. The other ray crosses one scale at \(30^\circ\) and the other at \(150^\circ\). Which measure is correct?
Step 1: Decide which scale to use.
Because the starting ray is lined up with \(0^\circ\) on the left, we read the left-starting scale.
Step 2: Read the correct number.
The correct reading is \(30^\circ\), not \(150^\circ\).
Step 3: Check by estimating.
The angle looks small, so an acute angle makes sense. \(30^\circ\) matches the picture, but \(150^\circ\) does not.
The angle measures \(30^\circ\).
As seen earlier in [Figure 3], the scale you read depends on which side begins at \(0^\circ\).
[Figure 4] Sketching an angle means drawing one with a certain measure. To do this, you use a ruler or straightedge and a protractor.
Step 1: Draw one ray. This is your starting side.
Step 2: Mark the endpoint of that ray. This point is the vertex.
Step 3: Place the center mark of the protractor on the vertex and line up the baseline with the ray you drew.
Step 4: Find the desired angle measure on the correct scale and make a small dot there.
Step 5: Remove the protractor and draw a second ray from the vertex through the dot.
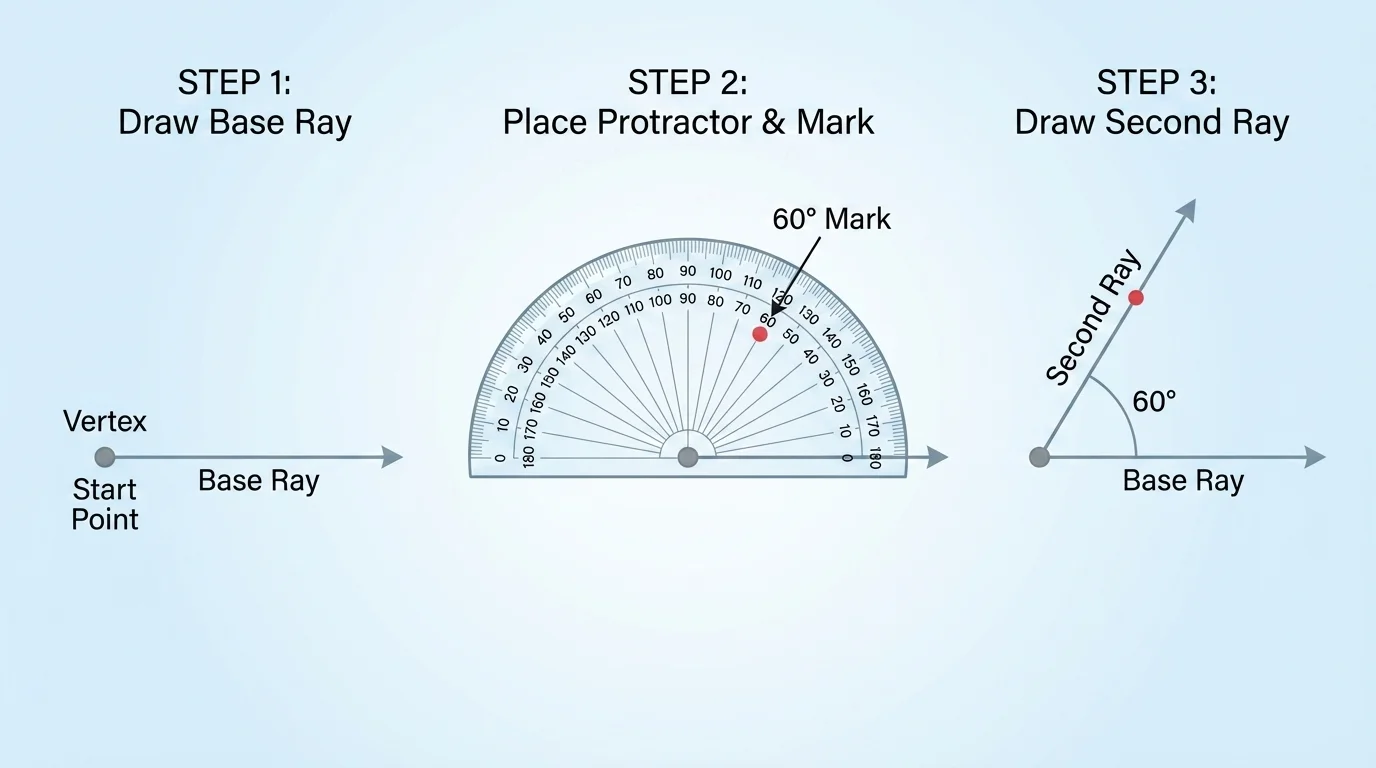
For example, if you want to sketch \(60^\circ\), line up the protractor with the first ray, find \(60^\circ\), mark a dot, and then draw the second ray through that dot. The opening between the rays is \(60^\circ\).
You can sketch angles that open upward, downward, left, or right. The direction does not change the measure. A \(90^\circ\) angle is still a right angle no matter how it is turned.
These examples show how to draw angles with given measures.
Worked example 4: Sketch \(90^\circ\)
Draw an angle that measures \(90^\circ\).
Step 1: Draw a base ray.
Draw one ray pointing to the right.
Step 2: Place the protractor.
Put the center mark on the vertex and line up the baseline with the ray.
Step 3: Mark \(90^\circ\).
Find \(90^\circ\) on the scale and make a small dot.
Step 4: Draw the second ray.
Use the dot to draw a ray from the vertex.
The finished angle is a right angle, and it measures \(90^\circ\).
A square corner is a helpful check for this drawing because a right angle should look like the corner of a paper.
Worked example 5: Sketch \(135^\circ\)
Draw an angle that measures \(135^\circ\).
Step 1: Draw the first ray and mark the vertex.
Let the ray point to the right.
Step 2: Align the protractor.
Center the protractor on the vertex and match the baseline to the first ray.
Step 3: Find \(135^\circ\) on the correct scale.
Make a small dot at \(135^\circ\).
Step 4: Draw the second ray through the dot.
This creates an obtuse angle.
The finished drawing shows an angle that measures \(135^\circ\).
Because \(135^\circ\) is greater than \(90^\circ\), the angle should open wider than a right angle.
Worked example 6: Sketch \(30^\circ\)
Draw an angle that measures \(30^\circ\).
Step 1: Draw one ray.
Use it as the starting side.
Step 2: Position the protractor.
Place the center at the vertex and line up the baseline.
Step 3: Mark \(30^\circ\).
Make a dot at \(30^\circ\) on the correct scale.
Step 4: Draw the second ray.
Connect the vertex to the dot with a straight ray.
The finished angle is acute, and it measures \(30^\circ\).
As shown in [Figure 4], the key step is marking the degree first and then drawing the second ray through that mark.
One common mistake is placing the center mark of the protractor somewhere near the vertex instead of exactly on it. Even a small shift can change the answer.
Another common mistake is forgetting to line up one ray with the \(0^\circ\) baseline. If the ray is slanted away from the baseline, the reading will be wrong.
A third common mistake is reading the wrong scale. For example, a student may read \(140^\circ\) when the angle clearly looks acute. Estimation can help fix this.
Some students also measure from the edge of the protractor instead of the center. Remember that the center mark is the starting point for the angle, just like \(0\) on a ruler is the starting point for length.
Measure the opening, not the side length.
That short idea is worth remembering. Long rays do not mean a larger angle. The opening tells the size.
Angles matter in everyday life. Builders check right angles so walls and floors fit together correctly. Road designers use angles when planning turns and intersections. Artists use angles to draw shapes and buildings that look realistic.
In sports, angles can change the path of a ball. A basketball bank shot uses the angle of the ball against the backboard. In soccer, the angle of a kick affects where the ball travels. In skateboarding or biking, the angle of a ramp changes how steep it feels.
Clocks are full of angle ideas. If the minute hand moves from the \(12\) to the \(6\), it turns \(180^\circ\). If it moves from the \(12\) to the \(9\), it turns \(270^\circ\), which is three quarters of a full turn.
When you use directions on a map, turn a game controller, or open a laptop screen, you are working with angles whether you notice it or not.