Have you ever tried to build something from directions that were all mixed up? It can feel impossible. Writing works the same way. If an author jumps from one idea to another, the reader gets confused. But when a writer introduces the topic clearly, groups related ideas together, and adds helpful headings or pictures, the writing becomes much easier to follow.
Informative writing is writing that teaches. Its job is to explain a topic using facts, definitions, concrete details, and clear language. A reader should finish an informative piece feeling smarter than before. That only happens when the writer is organized and careful.
Writers do not just collect information and pour it onto the page. They make choices. They decide what the reader needs first, what ideas belong together, and what tools will make the meaning clearer. Those tools can include paragraphs, sections, headings, labels, bold words, illustrations, charts, or even short multimedia parts such as audio or video when those truly help the topic make sense.
Informative writing explains a topic by teaching the reader with facts, definitions, and details.
Paragraph is a group of sentences about one main idea.
Section is a larger part of a piece of writing that includes a heading and one or more paragraphs about a subtopic.
Heading is a title for a section that tells what that part will be about.
Good informative writing is like a well-organized room. Books are on the bookshelf, shoes are by the door, and toys are in the toy box. In writing, facts that belong together should stay together too.
Readers need a path to follow. If a report begins with one fact about an animal, then jumps to where it lives, then to what it eats, then back to its body parts, the information feels scattered. Clear organization helps the reader hold ideas in the right order.
When writers organize information well, they help readers notice connections. For example, in a piece about volcanoes, one paragraph might explain what volcanoes are, another might explain how they erupt, and another might describe where volcanoes are found. Each part builds understanding.
Clear organization also helps the writer. Instead of trying to say everything at once, the writer can focus on one part at a time. That makes the piece stronger and easier to revise.
Many nonfiction books, websites, and magazines use the same text features you use in class: titles, headings, captions, diagrams, and bold vocabulary words. Professional writers depend on organization too.
Informative writing is not only for school reports. People use it to make recipe cards, museum signs, game instructions, science explanations, and articles about weather, sports, and health. In each case, the writer wants the reader to understand something clearly.
The first job of an introduction is to name the topic clearly. A reader should know right away what the piece is about. If your topic is sea turtles, your opening should quickly make that clear.
A strong introduction often does three things. First, it gets the reader interested. Second, it tells the topic. Third, it gives a hint about what information will come next. This helps the reader prepare for the rest of the piece.
Here is a weak introduction: There are many interesting things in the world. Some of them live in water. This opening is too vague. The reader does not know the topic yet.
Here is a stronger introduction: Sea turtles are ocean animals that have lived on Earth for millions of years. These reptiles travel long distances, return to beaches to lay eggs, and face dangers from pollution and predators. This introduction names the topic and previews important ideas.
What an introduction does
An introduction is like opening the door for your reader. It should welcome the reader into the topic, tell what the topic is, and point toward the important subtopics that will appear later. It should not try to explain every detail at once.
Sometimes writers begin with a surprising fact, a thoughtful question, or a strong observation. That can make the reader curious. But the opening still must stay focused. A fun beginning is only useful if it leads directly into the topic.
For example, if you are writing about thunderstorms, you might begin with: A thunderstorm can build in less than an hour, yet it can produce lightning hot enough to heat the air in a flash. That opening grabs attention, but it also stays on topic.
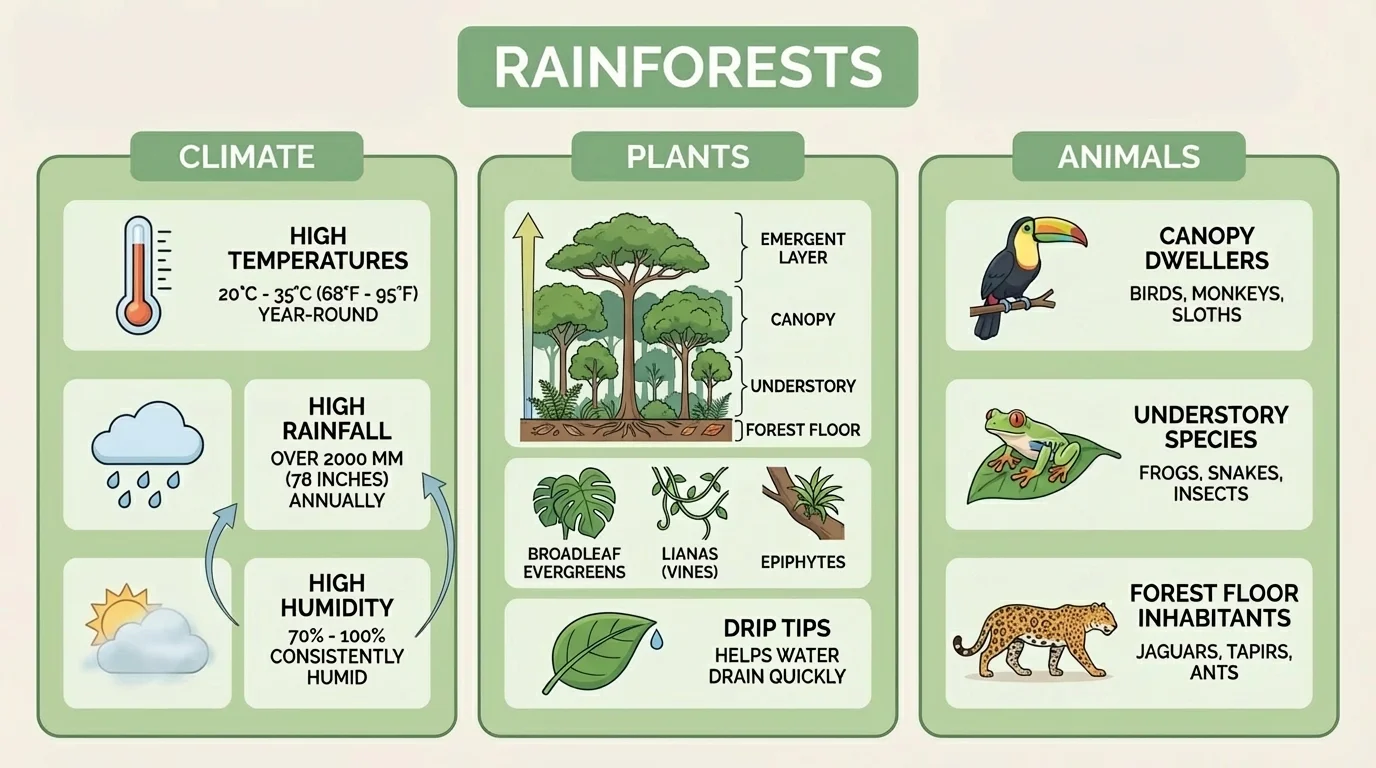
Once the topic is introduced, the writer needs to sort ideas into groups. This kind of organization is part of text structure, or the way information is arranged so readers can follow it. In informative writing, one very important structure is grouping related information into paragraphs, as [Figure 1] shows with details sorted by subtopic.
Each paragraph should focus on one main idea. If you are writing about rainforests, one paragraph might be about the climate, another about plants, and another about animals. The details in each paragraph should match that paragraph's main idea.
A paragraph usually begins with a sentence that introduces its main point. The rest of the sentences add facts, definitions, examples, or details. When every sentence fits the same main idea, the paragraph feels strong and clear.
Look at this example. Topic: frogs. A mixed-up paragraph might mention that frogs lay eggs, frogs can be green, frogs eat insects, and frogs can live near ponds, all in random order. A better version would group body features in one paragraph, habitat in another, and life cycle in another.
Writers can sort details before drafting. They might make small note cards or a list and ask, "Which details belong together?" This helps prevent a paragraph from drifting into a new topic by accident.
Grouping related information also helps the reader remember what they learned. Instead of meeting a pile of facts, the reader sees organized parts. That makes the topic easier to understand and easier to review later.
When you reread your own writing, check each paragraph. Ask: What is this paragraph mostly about? If the answer is unclear, the paragraph may need to be divided, moved, or rewritten.
Example: Grouping information for a report about penguins
Step 1: Choose subtopics.
The writer chooses three subtopics: body features, habitat, and food.
Step 2: Sort details.
Body features: feathers, flippers, blubber. Habitat: Antarctica, icy waters, colonies. Food: fish, krill, squid.
Step 3: Write one paragraph for each group.
Each paragraph stays focused on one subtopic instead of mixing all details together.
The result is a report that is much easier to follow.
The same idea from [Figure 1] works for almost any topic. Whether you are writing about planets, inventions, or community helpers, details make more sense when they are sorted into clear groups.
When a piece of writing is longer, paragraphs may be grouped into sections. A section is a larger part of the writing that covers one subtopic. Each section usually has a heading, and that heading tells the reader what that part is about.
Headings act like signposts. If a reader sees the heading Habitat, that reader expects to learn where the animal lives. If the heading says How Volcanoes Form, the reader expects an explanation of the process.
Good headings are short, clear, and matched to the writing underneath them. A weak heading such as More Stuff does not help. A strong heading such as What Beavers Eat tells exactly what the section covers.
Sections are useful because they break a large topic into smaller parts. As [Figure 2] shows, a report called The Water Cycle might include sections such as Evaporation, Condensation, and Precipitation. Each section teaches one stage, and together they explain the whole cycle.
Titles and headings are not decorations. They are part of the meaning. They show how the writer has organized ideas and guide the reader from one part to the next.
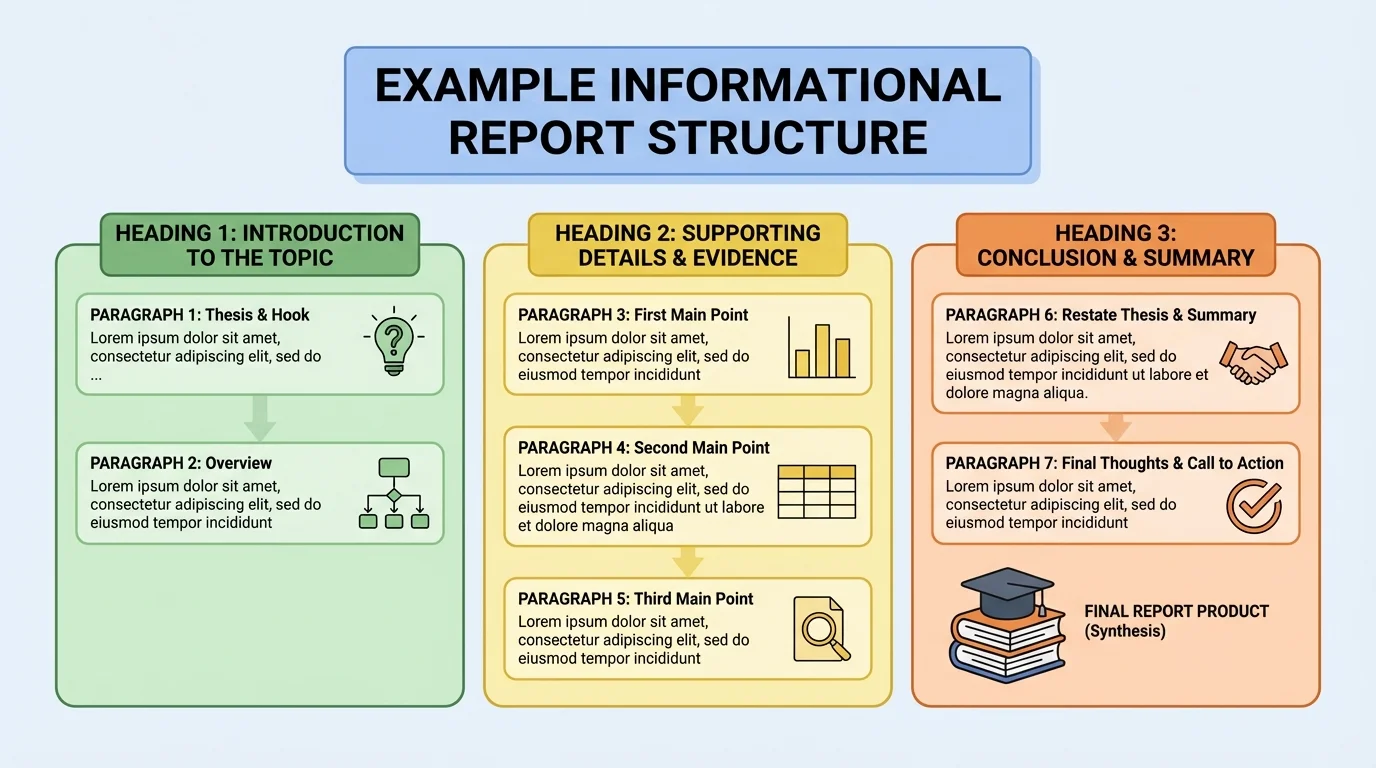
As the page layout in [Figure 2] makes clear, headings also help when a reader wants to find one part again. Instead of rereading the whole piece, the reader can scan the headings and jump to the needed section.
Many nonfiction books also use subheadings, sidebars, and labels. These features organize information even more carefully. Writers choose them when they truly help the reader, not just to make the page look busy.
| Feature | What it does | Example |
|---|---|---|
| Title | Names the whole piece | All About Tornadoes |
| Heading | Names one section | How Tornadoes Form |
| Paragraph | Explains one main idea | A paragraph about rotating air |
| Caption | Explains an image | A sentence under a diagram |
Table 1. Common text features and how each one helps organize informative writing.
Organized writing still needs strong information. Readers learn best when writers include true facts, clear definitions, and concrete details. Concrete details are details a reader can picture, hear, or clearly understand.
For example, in a report about honeybees, saying Honeybees are useful is too general. Saying Honeybees pollinate flowers and crops, helping many plants make seeds and fruit is much stronger. It tells exactly how honeybees are useful.
Definitions are important when a topic includes words the reader may not know. If you write about earthquakes, you might define magnitude as the strength of an earthquake. A short, clear definition can keep the reader from getting lost.
Remember that every fact should match the topic and the section. Even an interesting fact does not belong if it does not help explain the main idea.
Writers should also use precise language. Precise language means choosing exact words instead of vague ones. Compare these two sentences: The storm was bad. and The storm brought heavy rain, strong wind, and lightning. The second sentence is more precise, so the reader learns more.
Domain-specific vocabulary means words that belong especially to one topic or subject. In a space report, words like orbit and astronaut are domain-specific. In a plant report, words like stem and germination are domain-specific. These words help writing sound accurate, but the writer may need to explain them if readers are unfamiliar with them.
Good informative writing balances clear explanations with strong topic words. It should teach new language without becoming hard to understand.
Formatting is the way writing looks on the page or screen. It includes titles, headings, spacing, bullet lists, bold words, captions, and labels. Good formatting helps readers notice important information quickly.
For instance, if you are writing about the parts of a plant, a bold label such as Roots can help readers spot that subtopic. A short bulleted list can help when you want to show several related items clearly, such as what plants need to grow.
Formatting should support understanding, not distract from it. If every word is bold, bold stops being helpful. If a page has too many different colors, boxes, and labels, the reader may feel overwhelmed.
Example: Turning a crowded paragraph into clearer formatting
Step 1: Find the big ideas.
A writer notices that a paragraph about recycling includes materials, steps, and benefits all mixed together.
Step 2: Separate the information.
The writer creates headings such as What Can Be Recycled, How Recycling Works, and Why Recycling Matters.
Step 3: Add formatting where needed.
A short list names recyclable items, and a caption explains a recycling diagram.
The information becomes easier to scan and understand.
Captions are especially useful when an image appears. A caption tells the reader what the image is showing and why it matters. Labels can point to parts of a diagram. These features connect the visual information to the written explanation.
On a screen, writers may also use hyperlinks, tabs, or buttons, but the same rule stays true: every format choice should help the reader learn the topic more clearly.
Some ideas are easier to understand when words work together with visuals or media. An illustration can show shape, size, parts, or steps. A diagram of a butterfly life cycle, as [Figure 3] shows, helps readers see how the stages connect. A short audio clip of bird calls might help in a piece about songbirds. A brief video may help explain how a machine moves.
But visuals and multimedia should be used only when they truly add understanding. A close-up picture of a butterfly does not teach much if the writing is about migration routes. In that case, a map or diagram would be more useful than a decorative image.
When choosing an image or media support, ask three questions. First, what exactly does the reader need help understanding? Second, does this visual match that idea? Third, is the visual explained with a caption, label, or nearby text?
Illustrations are most helpful when they teach something the words alone may not show easily. This includes body parts, life cycles, maps, timelines, and step-by-step changes. Multimedia can be helpful for sound, movement, or process.
Writers must also place visuals carefully. The text should explain the idea, and the visual should support that explanation. The reader should not have to guess why the visual is there.
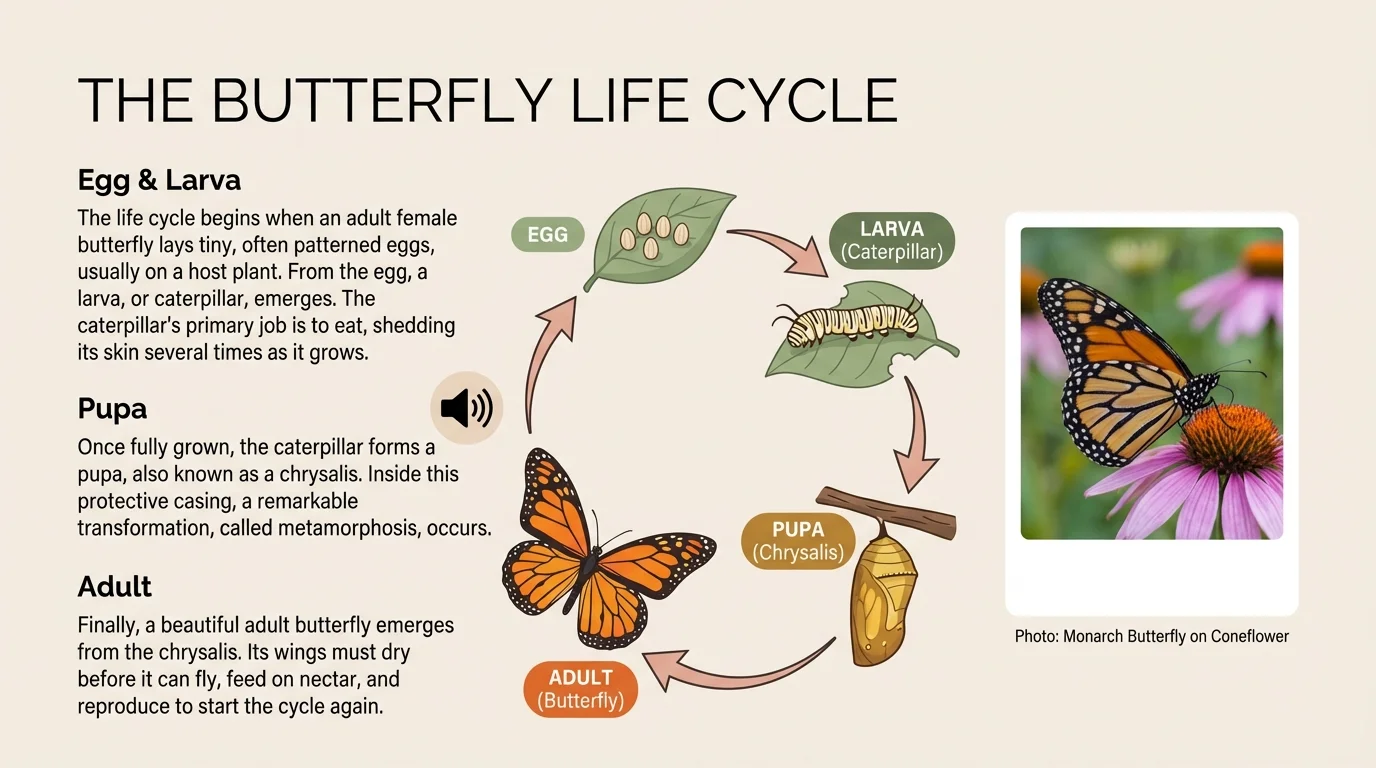
As [Figure 3] makes clear, the best visuals are connected to exact parts of the writing. The reader can move from the paragraph to the diagram and back again without confusion.
Useful visual support versus decoration
A useful visual teaches. It may label parts, compare sizes, show steps, or make a process easier to picture. Decoration only fills space. In informative writing, visuals should earn their place by helping the reader understand the topic better.
For example, in a report about the solar system, a labeled diagram comparing planet sizes can be useful. A pretty star background is decorative, but it does not teach much. Good writers know the difference.
Before drafting, many writers make a simple plan. Planning helps them decide how to introduce the topic and how to divide the information into parts.
A useful plan might look like this:
Topic: Bats
Introduction: Tell what bats are and why they are interesting.
Section 1: Body features
Section 2: Habitat
Section 3: Food and hunting
Section 4: Why bats matter
This kind of plan keeps the writing focused. The writer can collect facts for each section and avoid mixing ideas. It also makes revision easier because the writer can check one section at a time.
Example: From topic to organized report
Step 1: Name the topic clearly.
The writer chooses school gardens.
Step 2: Decide on subtopics.
The writer selects benefits, what students grow, and how gardens are cared for.
Step 3: Draft an introduction.
School gardens are outdoor spaces where students grow plants and learn about nature, food, and responsibility.
Step 4: Write one section for each subtopic.
Each section gets a heading and includes facts and examples that match it.
The report feels organized because every part has a job.
Planning does not have to be fancy. Some writers use boxes, some use lists, and some use a web. What matters is that the plan helps the writer see the structure before writing a full draft.
Here is a short model of organized informative writing:
Title: How Coral Reefs Help Ocean Life
Introduction: Coral reefs are colorful underwater ecosystems that support many sea animals. They provide shelter, food, and safe spaces for life in the ocean.
Section: Homes in the Reef Many fish and small animals hide in coral to stay safe from predators. The reef's tiny spaces act like underwater apartments.
Section: Food and Balance Coral reefs support food chains by giving animals places to feed and live. When reefs stay healthy, ocean life can stay more balanced.
Section: Threats to Reefs Pollution, warming water, and damage from human activity can harm reefs. Protecting reefs helps protect ocean ecosystems.
This model works because the introduction names the topic and previews the main idea. Each section stays focused. The headings guide the reader. The details match the topic.
Revision is when writers improve their drafts. During revision, a writer might add a better heading, move a sentence into a different paragraph, or replace a vague word with a more precise one. Revision is not just fixing spelling. It is improving meaning and organization.
A good revision checklist for informative writing might ask: Does the introduction clearly name the topic? Does each paragraph stay on one main idea? Do headings match the sections? Are the facts accurate? Would a picture, diagram, or label help the reader understand more?
"Good writing is clear thinking made visible."
When writers organize their ideas well, they show the reader exactly how to learn from the text. That is one of the most powerful skills a writer can have.