If two people tell you the same amazing fact, how do you know whether it is really true? One clue is whether they can tell you where they learned it. Strong researchers do not just collect facts. They also show where those facts came from. When you document your sources, you act like a careful detective: you show your evidence, give credit to the original creator, and help your reader trust your work.
When you write a report, slideshow, poster, or article, you may use information from books, websites, magazines, videos, interviews, or your own notes from experience. Listing those sources is an important part of research. It shows honesty, because you are not pretending the ideas are all your own. It also shows responsibility, because someone reading your work can go back and find the same information.
Source documentation is not just a rule for school. Adults use it too. Journalists name their sources. Scientists describe where their data came from. Authors include bibliographies. Even a person making a museum display or a nature guide needs to show where the information was found.
A source is the place where information comes from. If you learn a fact from a book about rain forests, that book is your source. If you learn it from a park ranger during an interview, the interview is your source. If you learn it from a trusted website, the website is your source.
Giving credit to sources matters for several reasons. First, it helps readers know your information is based on research. Second, it protects you from plagiarism, which means copying someone else's words or ideas and acting as if they are your own. Third, it helps you stay organized while you work. If you later want to check a fact, your source list helps you find it again.
Suppose you are writing about sea turtles. You may learn that some sea turtles travel thousands of miles. That is interesting, but your teacher and your readers need to know where the fact came from. Was it from a science book? A zoo website? A video by marine biologists? Without the source, the fact is harder to trust.
Many nonfiction books have pages at the back called bibliography, works cited, or sources. Those pages let readers trace the information all the way back to where the author found it.
When you provide sources, you are also showing respect. Writers, photographers, researchers, and experts work hard to create information. Naming their work is a way of saying, "This idea came from you, and I used it honestly."
Sources can be print sources or digital sources. Print sources include books, encyclopedias, newspapers, magazines, and printed articles. Digital sources include websites, online articles, online encyclopedias, digital books, educational videos, and online databases.
Some projects may also use personal sources, such as an interview, a speech, a class guest speaker, or your own observations from an experiment or field trip. If you learned important information from one of these, it should be documented too, if your teacher asks for it.
Not all sources are equally strong. A book from a library, an article from a science magazine, or a website from a museum, university, or government agency is often more reliable than an anonymous webpage with no author and no date. Good researchers ask questions such as: Who wrote this? When was it made? Does it seem accurate? Can I trust it?
You already know how to find facts in books and online texts. Documentation adds one more job: while you gather facts, you also gather the details about each source so you can list them later.
This is why it is smart to record source details right away. If you wait until the end, you may forget the author, lose the web address, or mix up which fact came from which source.
As you research, you should not copy huge chunks of text into your project. Instead, take notes. A summary is a short version of the main ideas. A paraphrase is information rewritten in your own words while keeping the original meaning.
For example, a book might say, "Emperor penguins huddle in large groups during Antarctic storms to conserve heat." A summary might be: "Emperor penguins stay warm by gathering together during storms." A paraphrase might be: "When dangerous cold weather hits Antarctica, emperor penguins press close in groups to keep body heat." Both versions are shorter or reworded, but the idea still came from the source, so the source must still be listed.
Taking notes in your own words helps you understand the topic better. It also reduces the chance of accidental plagiarism. But even when you paraphrase, you are still borrowing information, so you must document the source.
Own words do not mean your own idea. If you change the wording of a fact, explanation, or idea that came from a source, you still need to give credit. Documentation is about where the information came from, not just whether the exact words were copied.
A useful habit is to make a note card, chart, or digital note for each source. At the top, write the source number or title. Under that, write your facts, summaries, and paraphrases. This way, each fact stays connected to its source from the beginning.
Documentation means recording and presenting information about the sources you used. In grade 5, this usually means creating a simple source list at the end of your work. Sometimes it can also include a note in the project that tells which source a fact came from.
A source list is not just a random pile of titles. It should include enough information so another person can locate the same source. That is why source entries usually include parts such as the author, title, publisher or website name, date, and web address when needed.
Source list is a list of the books, websites, articles, interviews, and other sources used in a project.
Citation is the information that identifies one source.
URL is the web address for an online source.
You do not need the same details for every kind of source. A book and a website are different, so their entries will look a little different. Still, the goal is the same: make it easy for readers to know what you used.
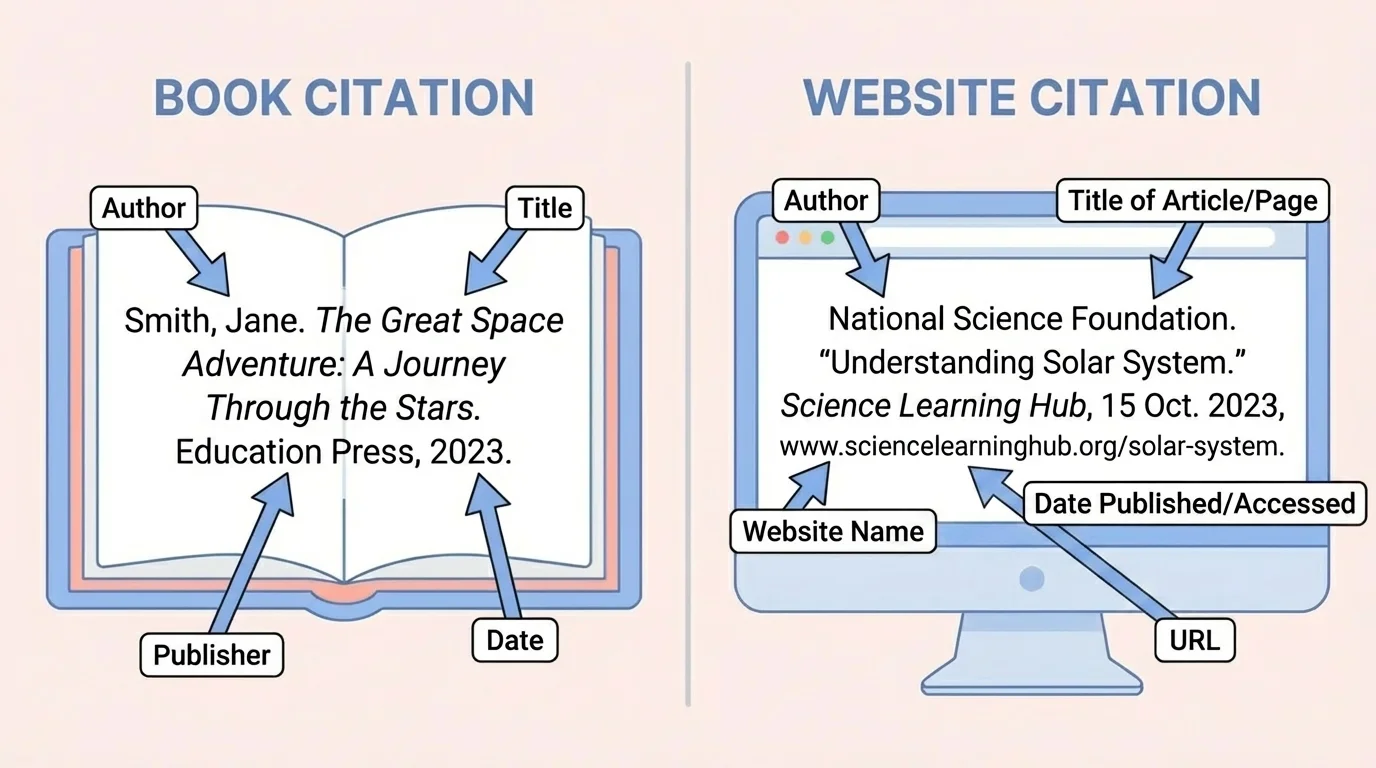
The main parts of a citation include the pieces students most often need for books and websites. [Figure 1] If you can spot these parts while you research, building your source list becomes much easier.
For a book, the most common parts are the author, the title, the publisher, and the year of publication. For a website, the common parts are the author or organization, the title of the page or article, the website name, the date, and the URL.
Sometimes a source does not have every part. A website may not list an author. In that case, you can often use the name of the organization instead. For example, if an article about volcanoes is published by the National Geographic Kids website and no person is named, you may begin with the organization name.
The title should be copied carefully. A small mistake in the title can make the source harder to find. Dates matter too, especially online, because websites can change over time. The URL should be complete enough to lead back to the exact page you used.
Think of a source entry like a mailing address for information. If one part is missing, the reader may not be able to "deliver" themselves back to the source. Each part has a job, and together they identify the source clearly.
In elementary school, source formats are usually kept simple and clear. You are not expected to memorize every professional citation rule. Instead, you should learn a consistent, readable way to list the sources you used.
Here are sample formats that are appropriate for grade 5. Notice that each one includes the most important identifying details.
| Type of source | Simple format |
|---|---|
| Book | Author last name, first name. Book Title. Publisher, Year. |
| Website article | Author or Organization. "Page or Article Title." Website Name, Date, URL. |
| Encyclopedia article | Author or Organization. "Article Title." Encyclopedia Name, Date if given. |
| Magazine or newspaper article | Author. "Article Title." Magazine or Newspaper Name, Date. |
| Interview | Person interviewed. Interview by student name, Date. |
Table 1. Simple, grade-appropriate source formats for common print and digital sources.
Now look at specific examples.
Example source entries
Book: Carle, Eric. Animals Animals. Philomel Books, 1989.
Website: National Geographic Kids. "Sea Turtles." National Geographic Kids, URL.
Interview: Ms. Lopez. Interview by Jordan Smith, 12 March 2026.
These models are simple, but they still tell the reader what source was used and where to find it.
If your teacher gives you a class format, use that format every time. Being consistent matters. A clear, neat source list is better than a messy list with mixed styles.
Many source lists are arranged in alphabetical order by the first word in each entry, often the author's last name or the organization name. Alphabetical order helps readers scan the list quickly.
Organized note-taking connects facts to sources through labeled notes that lead directly to a finished source list. [Figure 2] This system saves time and prevents confusion later.
One easy method is to number your sources. For example, write Source 1 for a book about volcanoes and Source 2 for a museum website. Then, on each note card or digital note, label facts with the matching source number.
Example: If you write "Magma below Earth's surface is called lava after it erupts," you might mark it with S1 if it came from Source 1. If another fact about famous eruptions came from Source 2, you mark it with S2. Then, when you create your final source list, you know exactly which sources belong there.

This method also helps if you decide not to use some notes. Only the sources that actually helped your final work should usually appear on your list, unless your teacher says to include every source you consulted.
Later, when you review your project, this organization becomes especially helpful. You can trace a fact back to its original source instead of guessing where it came from.
One common mistake is forgetting to write source details when you first find the source. Students sometimes save facts but not the title, author, or URL. The fix is simple: each time you use a new source, pause and record the details right away.
Another mistake is copying and pasting text without quotation marks or without rewriting it in your own words. If you use exact words from a source, your teacher may want quotation marks. If you paraphrase, make sure you truly change the wording and sentence structure, not just a word or two.
A third mistake is including incomplete entries. For example, writing only "Penguin website" is not enough. Which website? Which page? Who created it? Good documentation gives enough details to identify the exact source.
Fixing weak entries
Too weak: Penguins book
Better: Stevens, Carla. Penguins of the World. Bright Sky Press, 2021.
Too weak: Turtle website
Better: Ocean Service. "Sea Turtle Facts." NOAA, 8 June 2024, URL.
The stronger versions tell a reader exactly what was used.
Also check spelling, capitalization, and punctuation. While perfect punctuation is less important than including the right information, neat entries make your work easier to read and more professional.
Documentation is not only for facts in paragraphs. If you use an image, chart, map, or diagram from another source, that source may need credit too. If you get information from a video or interview, that should also be documented when it helped your final work.
Suppose you make a slideshow about earthquakes. You use one library book, one government science website, and one diagram from a museum page. Your final slide or last page should include all of those sources in a clear list. That way, your audience knows where both your facts and your visual information came from.
"A good researcher does not just find information. A good researcher shows where it came from."
Responsible use of sources builds trust. If your reader wants to learn more, your source list becomes a guide. It points the way to more reading, stronger evidence, and deeper learning.
Before you turn in your work, check your source list carefully. Ask yourself: Did I include every source I used? Did I spell the titles correctly? Did I include authors or organizations when possible? Did I include dates and URLs for online sources when needed?
You should also check whether your entries follow one clear style. If one book entry starts with the author's last name, all book entries should be written in a similar way. If your teacher asked for alphabetical order, make sure your list is arranged that way.
A strong final source list is clear, complete, and helpful. It proves that your project is based on real research, shows respect for other creators, and helps your readers learn more by following the same path you used.