Have you ever shined a flashlight on a wall and then put your hand in front of it? Suddenly, a dark shape appears. But if you place a clear plastic cup in the light, the light still gets through. That is a big science idea: different materials change light in different ways.
Light helps us see. A beam of light is a path of light traveling from something like a flashlight or lamp. When an object is placed in the path of the light, we can observe what the light does. It may go through, go through a little, or be blocked.
When a flashlight is on, light travels outward. If nothing blocks it, the light can make a bright spot on a wall or paper. If something moves into the beam, the light changes. We may see a bright spot, a dim spot, or a shadow.
A shadow forms when light is blocked. You see shadows outdoors from trees, people, and playground equipment. You can also see shadows indoors with a lamp or flashlight. Looking at shadows helps us learn how light and objects work together.
You already know that our eyes need light to see things. If a room is very dark, it is hard to see. When light is added, objects become easier to notice.
Scientists learn by asking questions and then doing careful tests. One good question is: What happens when we place objects made of different materials in the path of a beam of light? We can answer this by planning and doing an investigation.
Some materials let light pass through easily, as [Figure 1] shows. A transparent material is one you can see through clearly, like clean glass or clear plastic. These materials let most of the light pass through.
Some materials let only some light through. A translucent material is not fully clear. Wax paper, thin tissue paper, or some shower curtains are examples. Light can pass through them, but the image looks blurry, not clear.
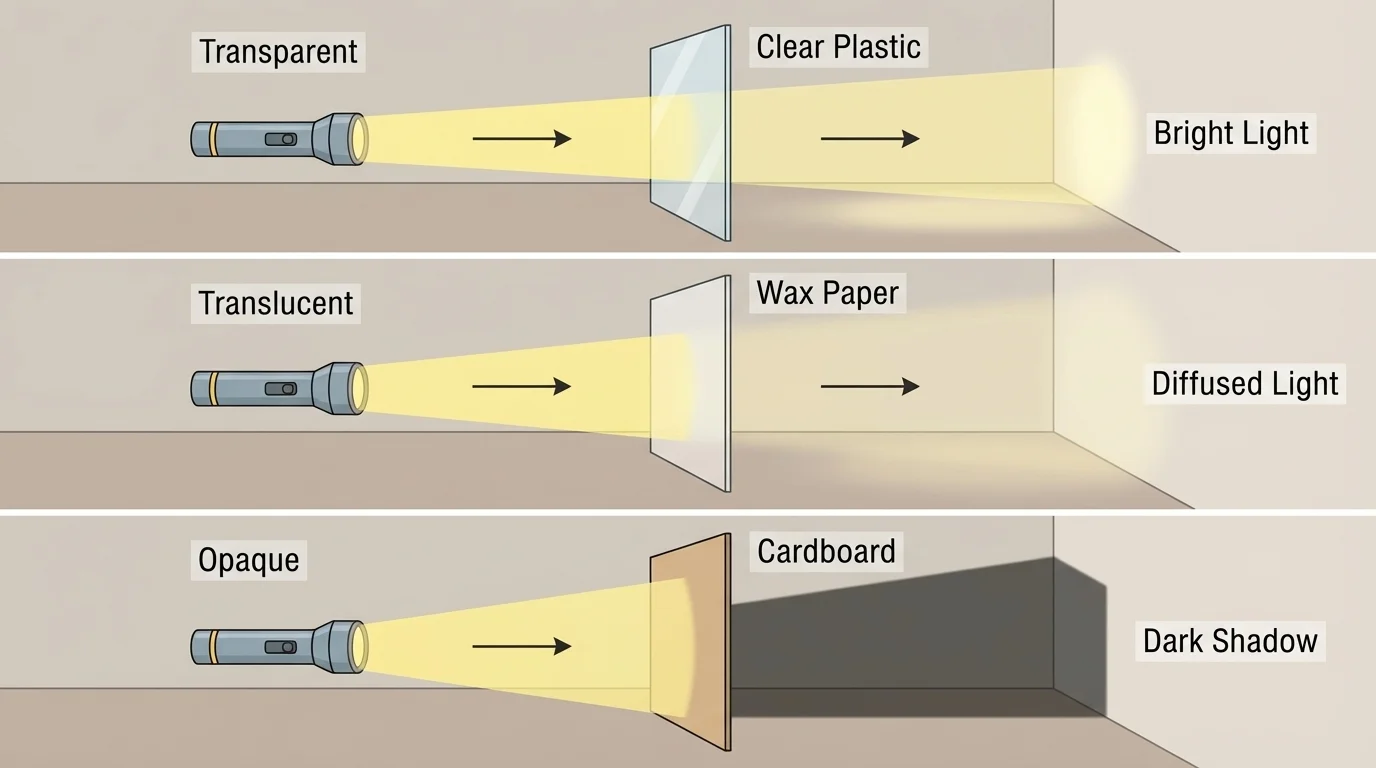
Some materials block light. An opaque material does not let light pass through. Cardboard, wood, and a book are good examples. When light hits an opaque object, a darker shadow often appears behind it.
Transparent means light passes through clearly.
Translucent means some light passes through, but not clearly.
Opaque means light is blocked.
These words help us describe what we observe. If a clear plastic folder lets the flashlight beam stay bright, it is transparent. If a tissue makes the beam look dim and blurry, it is translucent. If a block or book makes a dark shadow, it is opaque.
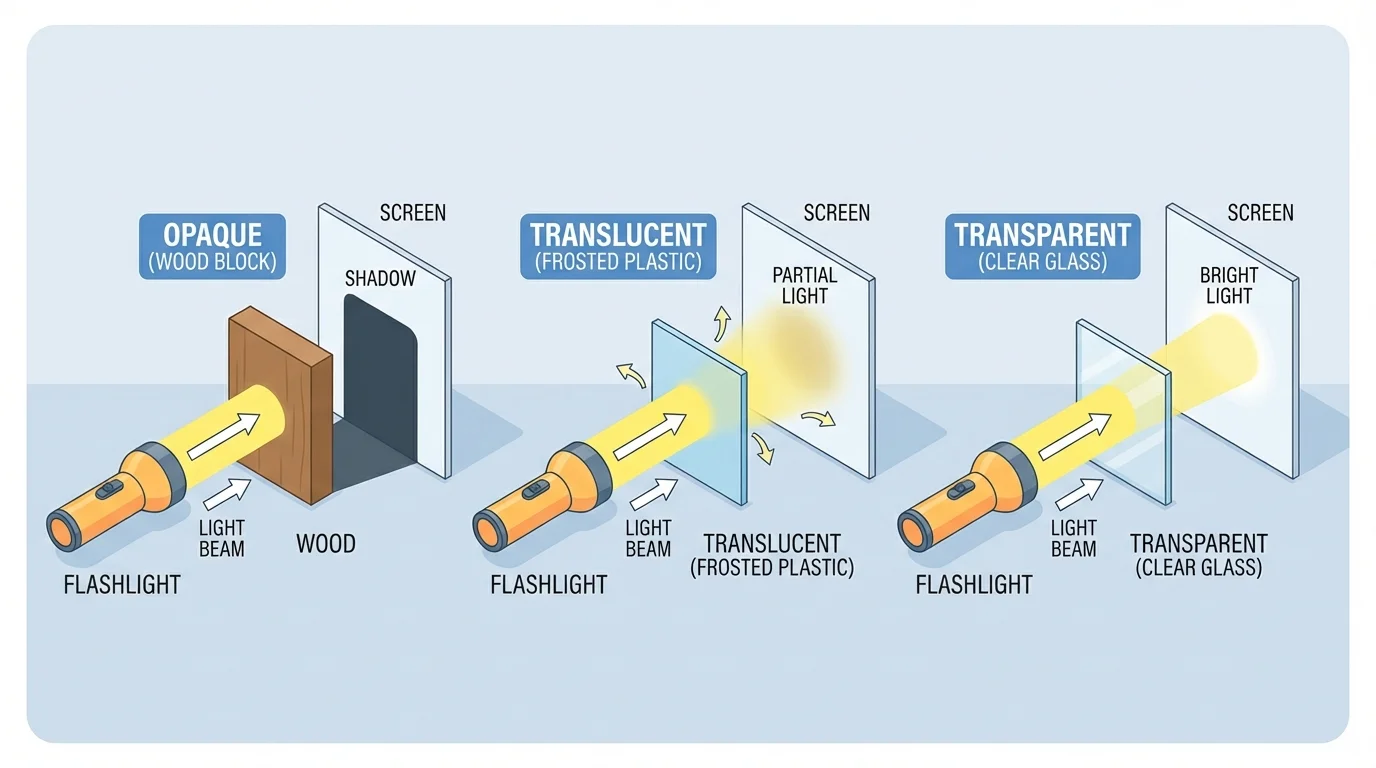
Planning means thinking ahead about what to test and how to test it. In a light investigation, we choose objects made from different materials, such as clear plastic, wax paper, fabric, cardboard, foil, or wood. The setup in [Figure 2] helps us keep the test organized so we can compare results.
A good investigation starts with a question. Then we make a prediction. A prediction is what we think will happen. For example, you might predict that clear plastic will let the most light through, tissue will let some light through, and cardboard will block the light.
Keeping a test fair
To make a fair test, try to change only one thing at a time. In this investigation, the one thing you change is the material in the light beam. Keep other things the same, such as using the same flashlight, placing the objects at the same distance from the light, and shining the beam at the same wall or paper.
We also need a simple procedure. For example, shine the flashlight at the same spot each time. Put one object into the beam. Observe what happens. Then try the next object. Look carefully at how bright or dark the light appears on the other side.
Careful scientists use their senses and simple tools to collect information. In this investigation, your eyes help you observe the light. You may notice that one material makes a bright spot, one makes a dim spot, and one makes a strong shadow.
It is important to stay safe. Never shine a flashlight into anyone's eyes. Point the light at a wall, paper, or screen instead. Safe science helps everyone learn well.
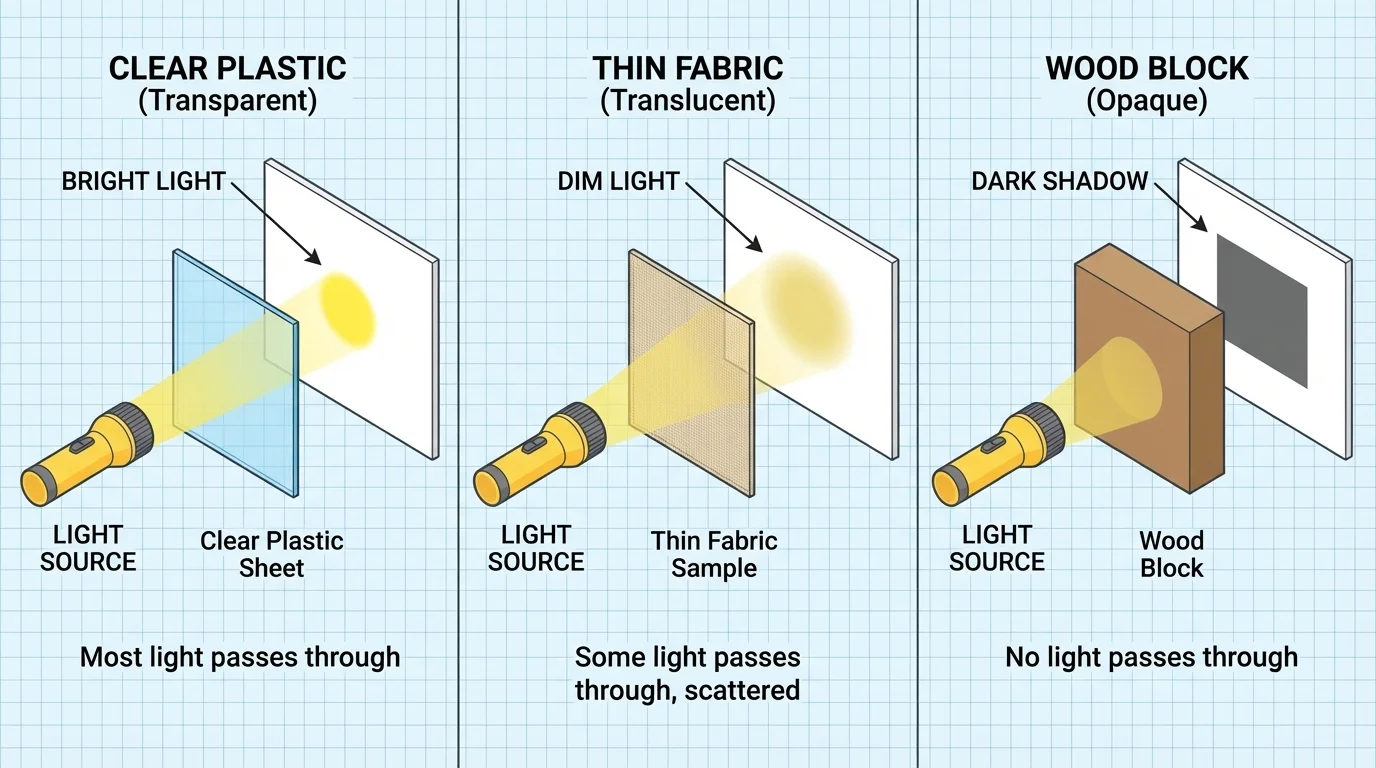
Results tell what happened in the investigation. Scientists often record results with words or pictures, and [Figure 3] illustrates a simple way to compare materials. A student might say, "The clear lid let lots of light through," or "The cardboard made a dark shadow."
You can compare materials by what you observe. If the beam stays bright, the material lets a lot of light through. If the beam looks weak or fuzzy, only some light is getting through. If you mostly see a dark shadow behind the object, the material is blocking the light.
| Material | Effect on the light | Kind of material |
|---|---|---|
| Clear plastic | Most light goes through | Transparent |
| Wax paper | Some light goes through | Translucent |
| Cardboard | Light is blocked | Opaque |
Table 1. A simple comparison of three materials and how they affect a beam of light.
When scientists compare results, they look for patterns. A pattern is something that happens again and again. If many clear objects let lots of light through, that is a pattern. If many thick solid objects block the light, that is also a pattern.
Example investigation
A class tests three objects: a plastic bag, a napkin, and a small book.
Step 1: Shine one flashlight at the same wall each time.
Step 2: Place the plastic bag in the beam and observe that the light still looks bright.
Step 3: Place the napkin in the beam and observe that some light goes through, but it looks dim.
Step 4: Place the book in the beam and observe a dark shadow.
The class concludes that the plastic bag is transparent, the napkin is translucent, and the book is opaque.
Sometimes two objects seem similar, but they do not act exactly the same. A thin white cloth may let more light through than thick wax paper. That is why we test and observe instead of guessing only from how something looks.
People choose materials because of how they affect light. Windows are often made of transparent glass so we can see outside and let sunlight in. Lampshades may be translucent so they soften the light instead of blocking it completely. Bedroom curtains may be opaque to keep a room dark for sleeping.
Sunglasses are another example. They let some light through, but they reduce how much reaches your eyes. Car headlights need covers that allow light to pass through. A movie theater uses darkness, created by blocking light, so the screen is easier to see.
Some animals use shadows to hide. A shadow can help an animal blend into a dark place, while sunlight can make it easier to spot.
When you think back to the materials comparison in [Figure 1], you can see why each material has a special job. Clear materials are useful when we want light and a clear view. Translucent materials are helpful when we want softer light. Opaque materials are useful when we want to block light.
The careful setup from [Figure 2] also matters in real life. Builders, designers, and engineers test materials before using them in homes, schools, cars, and tools. Testing helps them choose the right material for the job.
Good science means looking closely, telling what you really observe, and repeating tests when needed. If one material seems confusing, test it again in the same way. Using the same steps each time makes the results more trustworthy.
The results chart in [Figure 3] reminds us that recording observations helps us compare materials clearly. Scientists often write, draw, or sort results so patterns are easy to see.
By planning a fair test and observing carefully, we can learn how different materials affect a beam of light. That helps us understand shadows, windows, lamps, curtains, and many other things we use every day.