A tiny pebble dropped into water can make rings spread outward. A single shake of a jump rope can send a bump racing to the other end. Even sound from a speaker can make nearby objects tremble. These are all examples of waves, and they show something important: a wave can travel and transfer energy, causing motion along the way.
A wave is a repeating pattern of motion that carries energy from one place to another. When a wave moves, the medium of the wave often does not travel all the way with it. Instead, the material usually moves back and forth, up and down, or in another repeated way while the energy travels on.
Think about a cork floating on water. When a water wave passes, the cork may bob up and down, but it does not ride all the way across the pond with the wave. The wave carries energy through the water, and that energy can make the cork move.
Waves are often called regular patterns of motion because they repeat in a predictable way. You can look for the same shape or movement happening again and again. That repeating pattern helps scientists and students describe waves using models.
Wave means a repeating motion that transfers energy. Energy is the ability to cause change, such as making something move. A model is a drawing, object, or idea that helps us understand something in the real world.
Models are useful because real waves can be fast, large, or hard to see clearly. A sketch of a wave, a slinky, a rope, or a tray of water can all help us notice the same important features.
When we study the shape of a wave, we look at repeated parts of the pattern. In a simple wave drawing, as shown in [Figure 1], the high points and low points repeat over and over. These repeated parts help us describe what kind of wave pattern we are seeing.
The top of a wave is called a crest. The bottom of a wave is called a trough. Many wave models also show a middle line called the rest position. This is where the material would be if it were not disturbed.
The amplitude of a wave tells how far the wave moves away from its rest position. If the wave rises far above the rest position, it has a larger amplitude. If it only moves a little above and below the rest position, it has a smaller amplitude.
The wavelength of a wave is the distance from one repeating part of the wave to the next matching part. For example, it can be the distance from one crest to the next crest, or from one trough to the next trough.
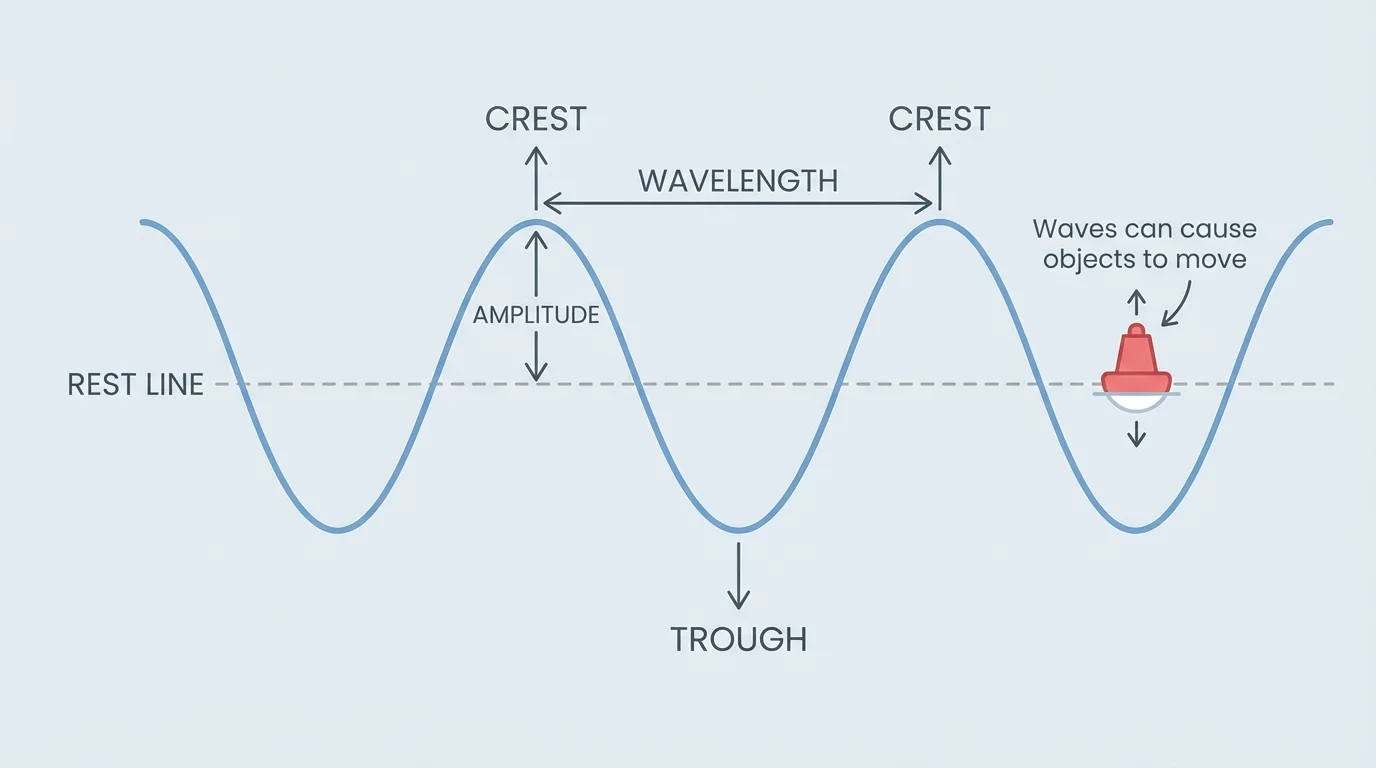
Amplitude tells us about the size of the wave's motion. Wavelength tells us about the spacing of the wave's pattern. These are two of the most important ways to describe waves.
If two waves have the same spacing but one is taller, they have different amplitudes. If two waves have the same height but one has crests closer together, they have different wavelengths. Looking at these differences helps us compare wave patterns in a clear way.
How a wave pattern repeats
A wave is easier to describe when you look for the part that repeats. One crest followed by the next crest shows one full repeat of the pattern. Measuring how tall the motion is gives the amplitude, and measuring how far apart matching parts are gives the wavelength.
These ideas are not just for drawings. You can notice them in real waves too. Ocean waves can have bigger or smaller amplitudes, and the distance between wave tops can be longer or shorter.
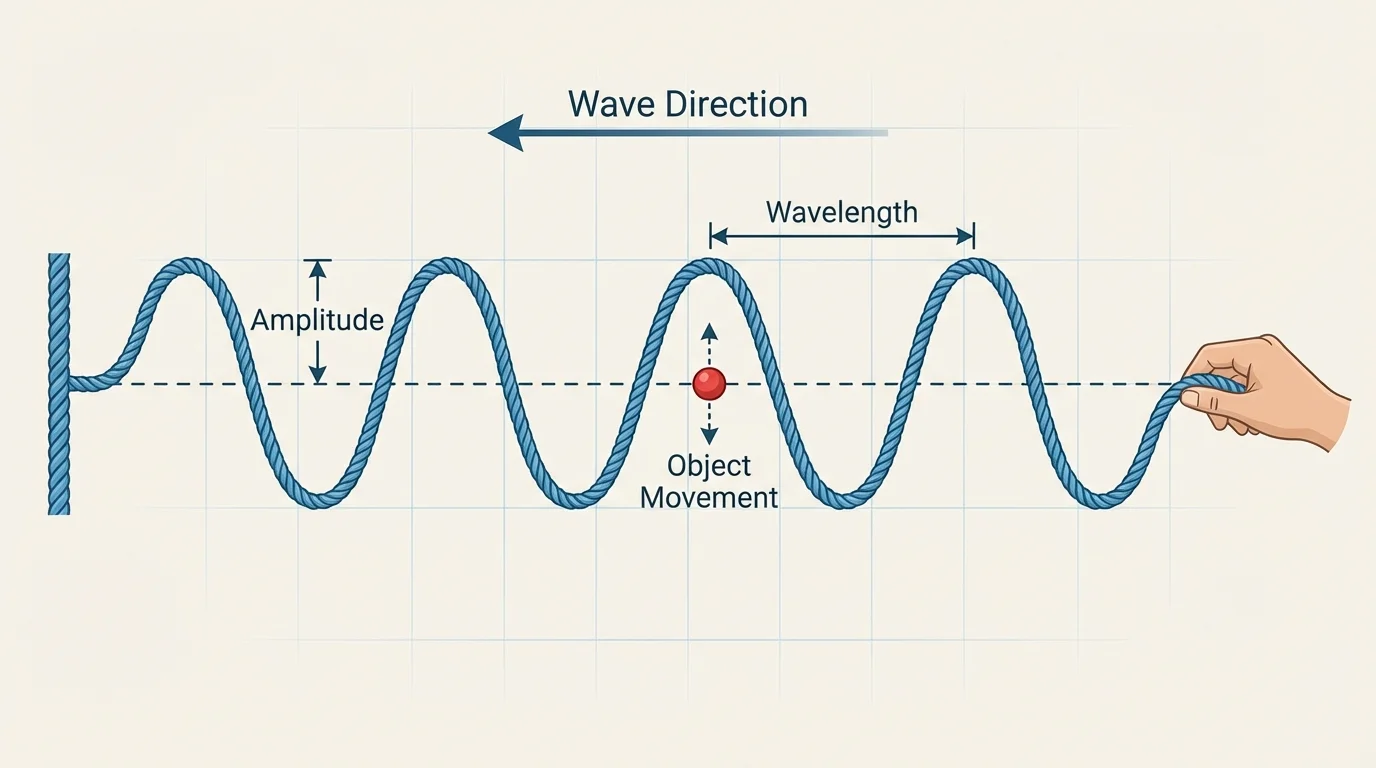
[Figure 2] shows how a rope model makes wave motion especially easy to study. A model helps us focus on the important pattern without getting confused by extra details. If one end of a rope is moved up and down, a repeating pattern travels along the rope.
In this model, the rope itself is the medium being disturbed. Each part of the rope moves mostly up and down, while the wave pattern moves from one side to the other. This helps show that waves transfer energy even when the material is not traveling along with the wave.
A drawing is also a model. In a drawing, arrows can show amplitude and wavelength. This lets us compare waves without needing exact numbers. In this context, it is enough to say whether the amplitude is larger or smaller and whether the wavelength is longer or shorter.
Water can be used as a model too. If you tap the surface of water in a tray again and again, ripples spread outward in a repeating pattern. By looking at the ripples, you can notice how big they are and how far apart they are.
Models are not perfect copies of the real world. A rope wave and a water wave are not exactly the same, but both can help us understand repeated motion, amplitude, wavelength, and energy transfer.
A wave in a stadium is a human-made model of a wave pattern. The people do not run around the stadium, but the pattern of standing and sitting moves around the seats.
The stadium example is useful because it shows the same big idea: the pattern travels, but each person only moves a little in one place. That is similar to how many waves work.
Amplitude is about how much motion there is away from the rest position. A wave with larger amplitude has taller crests and deeper troughs than a wave with smaller amplitude.
In many everyday situations, a larger amplitude wave can make objects move more strongly. A gentle wave in water may only make a leaf wiggle. A larger wave may make the same leaf bob much more. On a rope, a bigger shake usually creates a bigger wave pattern.
This does not mean you need to calculate exact amounts. It is enough to notice the pattern: larger amplitude often means stronger motion or a bigger effect on objects. Smaller amplitude often means gentler motion.
Comparing two water waves
Step 1: Look at Wave A and Wave B.
Wave A has taller crests and deeper troughs. Wave B is flatter.
Step 2: Compare the amplitude.
Wave A has a larger amplitude because it moves farther from the rest position.
Step 3: Predict the effect on a floating object.
A toy floating in Wave A will likely move up and down more than in Wave B.
This shows how amplitude helps us describe how strong a wave's motion looks.
If you remember the rope model from [Figure 2], you can picture that a stronger hand motion makes a larger up-and-down pattern in the rope. The energy transfer becomes more noticeable because the movement is larger.
Wavelength is about the spacing of the repeating pattern. If the crests are far apart, the wavelength is longer. If the crests are close together, the wavelength is shorter.
You can think of wavelength as the distance needed for one full repeat of the wave shape. On a drawing, this is often shown from one crest to the next crest. In water waves, it can be noticed by looking at how far apart the crests are.
Wavelength helps us compare waves that may have similar amplitudes but different spacing. Two waves might both be small in height, yet one may have crowded crests while the other has wide spacing.
Comparing two rope waves
Step 1: Observe the pattern.
In Wave C, the bumps on the rope are close together. In Wave D, the bumps are farther apart.
Step 2: Compare the wavelength.
Wave C has a shorter wavelength. Wave D has a longer wavelength.
Step 3: Describe what changed.
The spacing changed, not necessarily the height of the wave.
This shows that wavelength and amplitude describe different features of a wave.
Sometimes students confuse amplitude and wavelength because both describe the wave. A good way to separate them is this: amplitude is measured from the middle to a crest or trough, while wavelength is measured across the pattern from one matching point to the next.
[Figure 3] shows one of the most important ideas about waves: they can cause objects to move. A floating toy on water rises and falls as a wave passes under it. The toy moves because the wave transfers energy to it.
Waves can also move sand on a beach, shake tree branches, rattle windows, or make a drum surface vibrate. In each case, energy carried by a wave causes motion in an object.
Sound is another example of motion caused by waves. When a drum is hit, the drumhead vibrates. That vibration makes the air move in a wave pattern. When the sound reaches your ear, it causes tiny parts inside your ear to move. That motion helps your brain detect sound.
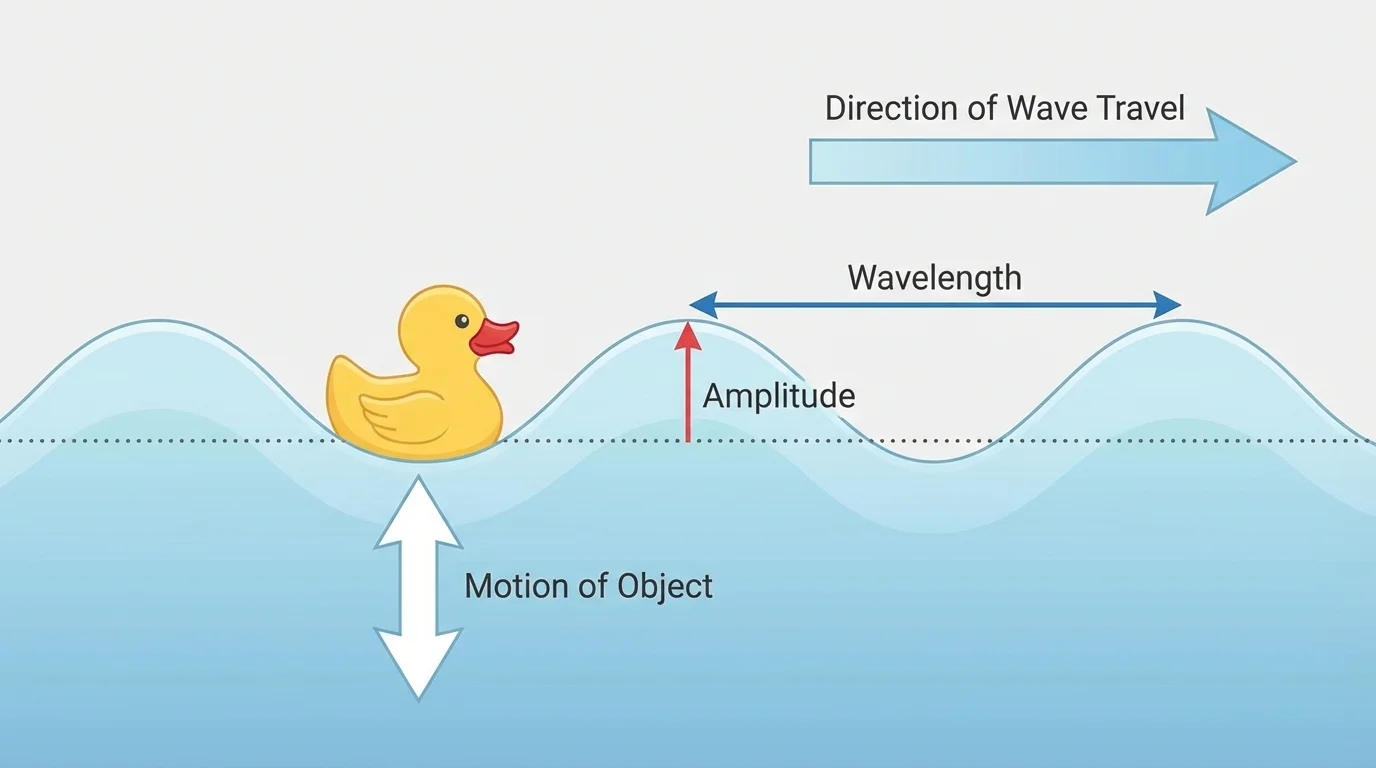
Notice that the wave does not need to pick up the object and carry it far away in order to have an effect. The important idea is that the wave transfers energy, and that energy can make something move.
The floating toy in the figure is a good reminder that the motion of an object caused by a wave may be up and down, back and forth, or another repeated movement. The exact motion depends on the kind of wave and the object involved.
Energy transfer without overall travel of matter
Many waves move energy through a material while the material itself only moves a little around its own position. This is why a wave can affect an object far away from where the wave started. The energy travels through the pattern and reaches the object.
This idea explains why a speaker across the room can make a paper near it flutter, or why ripples from one side of a pond can make a leaf on the other side move. The wave is a way for energy to travel.
Waves are part of daily life. At the beach, wave patterns can lift and lower a swimmer. In music, plucked strings vibrate and create waves that travel through the air. On a playground, a jump rope shows visible wave patterns when one end is moved.
Even earthquakes generate seismic waves in the ground. The shaking can cause buildings, roads, and objects to move. For this topic, the key idea is simple: waves can transfer energy and cause motion.
People also use wave models in engineering and safety. Builders want to know how shaking waves might affect a bridge or building. Designers of musical instruments care about vibrations because these wave patterns create sound.
You already know that pushes and pulls can change motion. A wave is one way that energy from a push or pull can spread through a material and then affect another object later.
This connection to earlier science ideas is helpful. Instead of thinking of waves as something completely new, you can think of them as organized patterns of motion that keep carrying energy onward.
Scientists often compare patterns carefully. With waves, we can compare what we see instead of using difficult calculations. We might ask: Which wave has the greater amplitude? Which wave has the longer wavelength? Which wave causes a stronger motion in an object?
The table below shows simple ways to compare wave observations.
| Wave feature | What to look for | What it may affect |
|---|---|---|
| Amplitude | How tall the wave is from the middle position | How strongly an object may move |
| Wavelength | How far apart matching parts are | The spacing of the repeating pattern |
| Repeating pattern | Whether the motion happens again and again in a regular way | Whether it can be recognized as a wave |
Table 1. A simple comparison of major wave features students can observe.
Suppose one tray of water shows big ripples that are spaced far apart, while another tray shows small ripples that are close together. The first has larger amplitude and longer wavelength. The second has smaller amplitude and shorter wavelength.
Using observations to describe a wave
Step 1: Watch a ripple in water.
Notice whether the floating object moves a little or a lot.
Step 2: Look at the spacing.
Check whether the wave tops are close together or far apart.
Step 3: Describe the wave.
You might say, "This wave has a large amplitude and a short wavelength," or "This wave has a small amplitude and a long wavelength."
Careful observation is one of the best tools in science.
Describing a wave in words is part of building a scientific model. The model does not need to include complicated equations to be useful. A clear drawing and accurate description can explain a lot.
You can observe waves safely with common classroom materials. A shallow tray of water, a rope, or a slinky can all show repeating patterns of motion. Students can notice what happens when the motion is gentle or strong, and when the pattern is spread out or close together.
When using water, it is important to keep the tray shallow and clean up spills. When using ropes or slinkies, there should be enough space so no one gets hit. Good science includes safe observation.
As you study waves, keep asking two big questions: What pattern repeats? and How does the wave affect objects? Those questions help connect the shape of the wave to the energy it carries.