Have you ever looked out a car window and noticed that the ground is not flat everywhere? Some places have tall hills, some have low land, and some have water moving or resting in different shapes. Earth is full of places that look different from one another. A sandy beach, a grassy field, a winding river, and a rocky hill are all part of our changing planet. Scientists and students use models to help them look closely at these places and understand what they are like.
When we study an area, we look at the shape of the land and the kinds of water there. An area might have high places, low places, and places where water collects or flows. It can be hard to carry a whole park, neighborhood, or shoreline into a classroom, so people build a smaller version of it. This helps them see the important parts more clearly.
A place can have many features at once. There may be land rising up into a hill, land dipping down into a valley, and water moving through the middle in a stream. Learning to notice these features is the first step in making a model that matches a real place.
Land is the solid part of Earth that we walk on, and water can cover, flow through, or collect on that land. You may already know that rain, rivers, and waves can move water from one place to another.
When we build a model, we are not making a toy. We are making something that helps us think and learn. A model lets us show what is high, what is low, where the water is, and how the parts fit together.
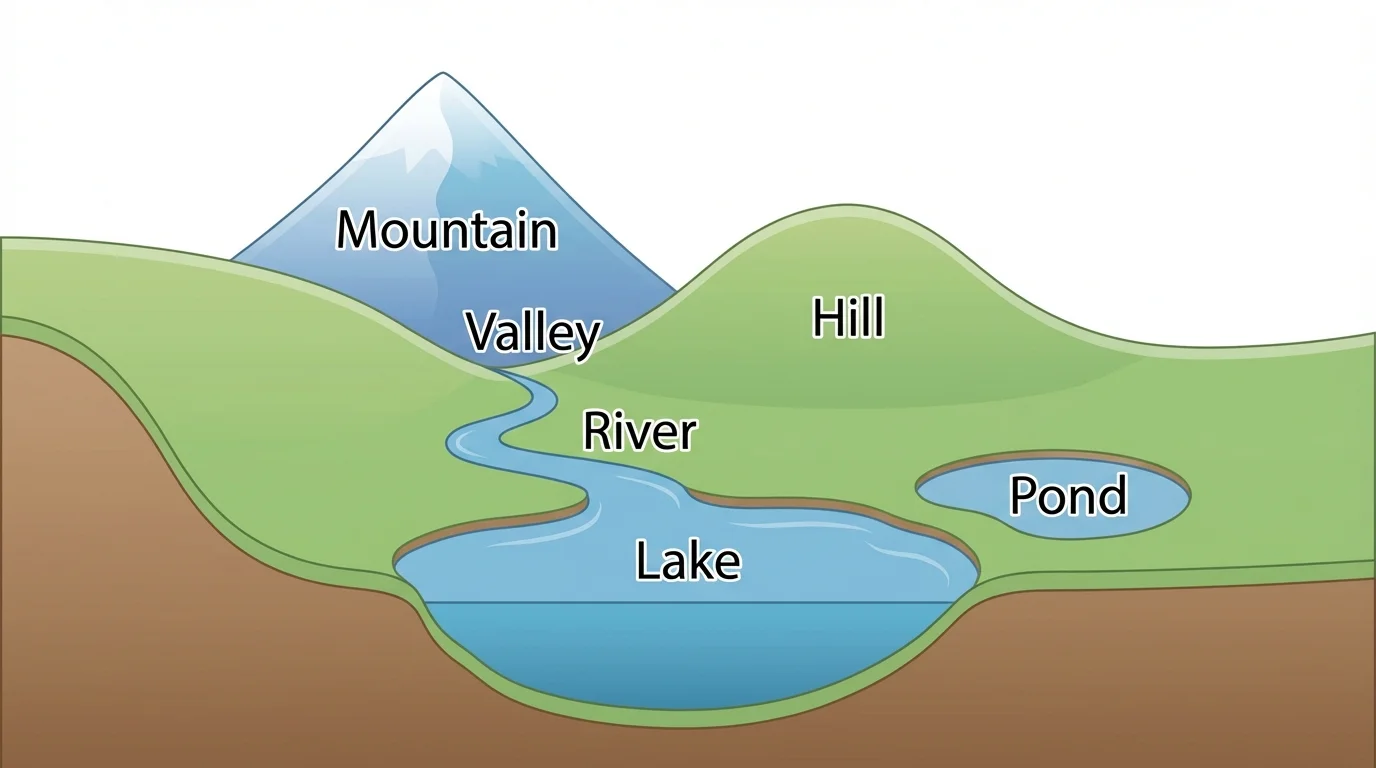
[Figure 1] Some Earth features have special names. A landform is a natural shape of the land. A hill is land that rises gently. A mountain is much taller and steeper. A valley is low land between higher places. A plain is a large area of mostly flat land. These landforms help make each place look different.
Areas also include water features. A body of water is water that gathers or moves in a place. A river flows across the land. A stream is usually smaller than a river. A lake is surrounded by land. A pond is often smaller than a lake. An ocean is a very large body of salt water. These features can be seen clearly in one scene.
Each kind of land or water has its own shape. Hills rise up. Valleys dip down. Rivers curve and move. Lakes spread out and stay in one place unless water flows in or out. When students study an area, they learn to notice these shapes, because shape is one of the most important things a model must show.
Sometimes one feature is connected to another. For example, a river may flow through a valley. A pond may sit at the bottom of low land after rain. A beach may lie beside an ocean. Looking for these connections helps students build better models.
Landform means a natural shape of Earth's land, such as a hill, mountain, valley, or plain.
Body of water means water found in a place, such as a pond, lake, river, or ocean.
Area means a place being studied, such as a park, schoolyard, beach, or neighborhood.
Even small places can have different features. A schoolyard might have flat ground, a small slope, and a puddle after rain. A park might have a hill, a path beside a pond, and low muddy ground. These are all examples of shapes and water in an area.
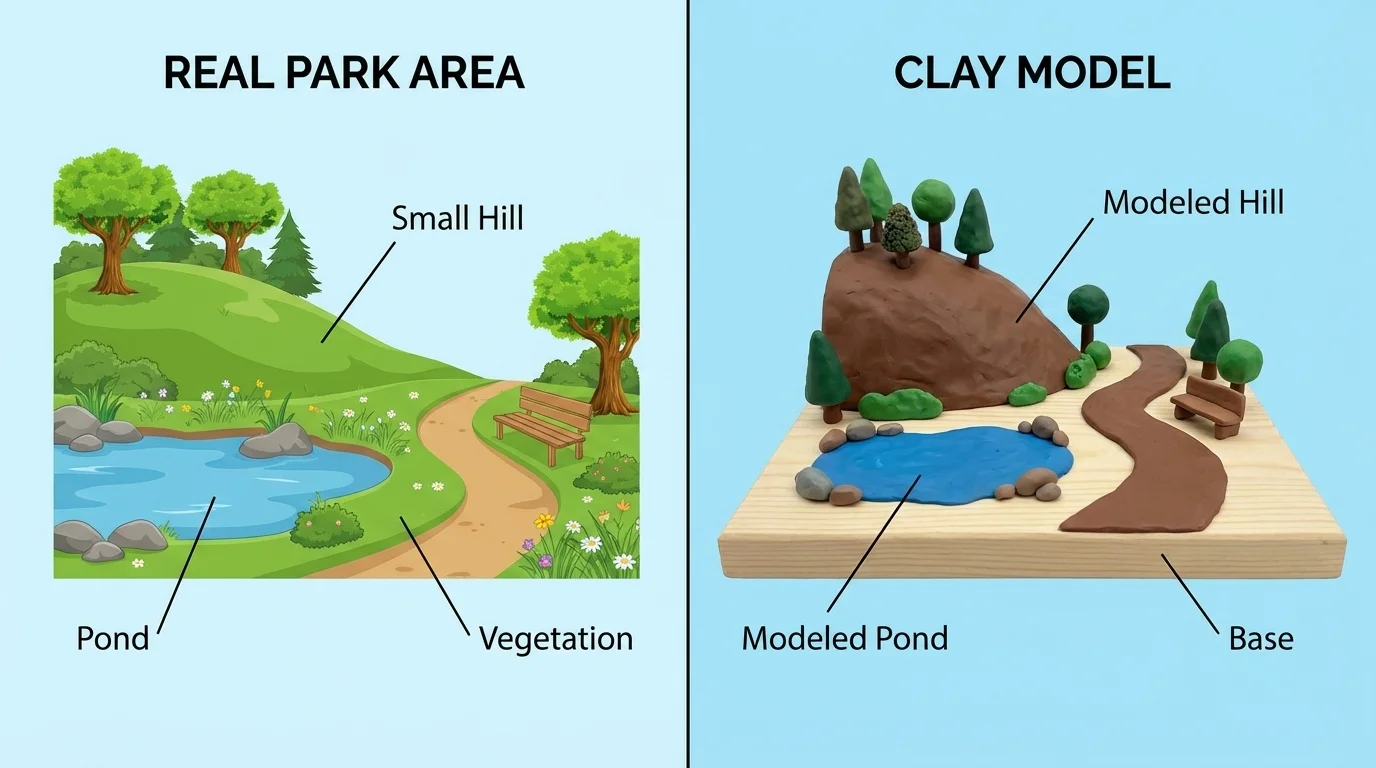
[Figure 2] A model is something that stands for a real object or place. In Earth science, a model can be made from clay, paper, sand, blocks, or other materials. It shows important parts of a real area. The real place and the classroom model match in the main features: the raised land, the low land, and the water.
A model does not have to include every tiny detail. It should focus on the most important parts. If a park has one hill, one pond, and one flat grassy area, a model can show those three main features clearly. It does not need to show every blade of grass or every pebble.
Models are useful because they help us see things that may be hard to notice in the real place. Looking down at a model from above can help us understand where the river is compared with the hill or where the lake sits compared with the plain.
Models can also be touched and observed from different sides. Students can point to a hilltop, trace a river path, or show where low land collects water. This makes learning more active and easier to understand.
Some scientists and engineers use models before building roads, bridges, or parks. A model helps them study the land first so they can make smart choices.
A good model helps answer questions such as: Where is the water? Which part of the land is high? Which part is low? What kind of landforms are in this area? These questions guide the work of building and studying the model.
A useful model should show shape, kind, and location. Shape means whether the land rises, dips, or stays flat. Kind means whether the feature is a hill, valley, river, pond, or another type. Location means where each feature is compared with the others.
Color can help make features easier to see. Blue may be used for water, green or brown for land, and tan for sand. Labels can help identify each part. For example, a label might say hill, river, lake, or plain. Labels do not change the model itself, but they help the viewer understand what each part represents.
Different materials can represent different surfaces. Clay can be shaped into hills and valleys. Sand can show a beach or riverbank. Paper can be cut and layered to show higher and lower land. The important goal is not making the model fancy. The important goal is making the model clear.
Example: Modeling a park
A student wants to make a model of a small park that has a hill, a pond, and a flat field.
Step 1: Identify the main features.
The student notices one raised hill, one round pond, and one broad flat field.
Step 2: Choose materials.
Clay can make the hill, blue paper can show the pond, and flat cardboard can show the field.
Step 3: Put each feature in the correct place.
The hill goes on one side, the pond near the middle, and the field around them.
The finished model helps show both the kinds of features and where they are in the park.
If a model shows the hill as low and flat, then it does not match the real place well. If it leaves out the pond, then an important body of water is missing. Careful observing helps make the model more accurate.
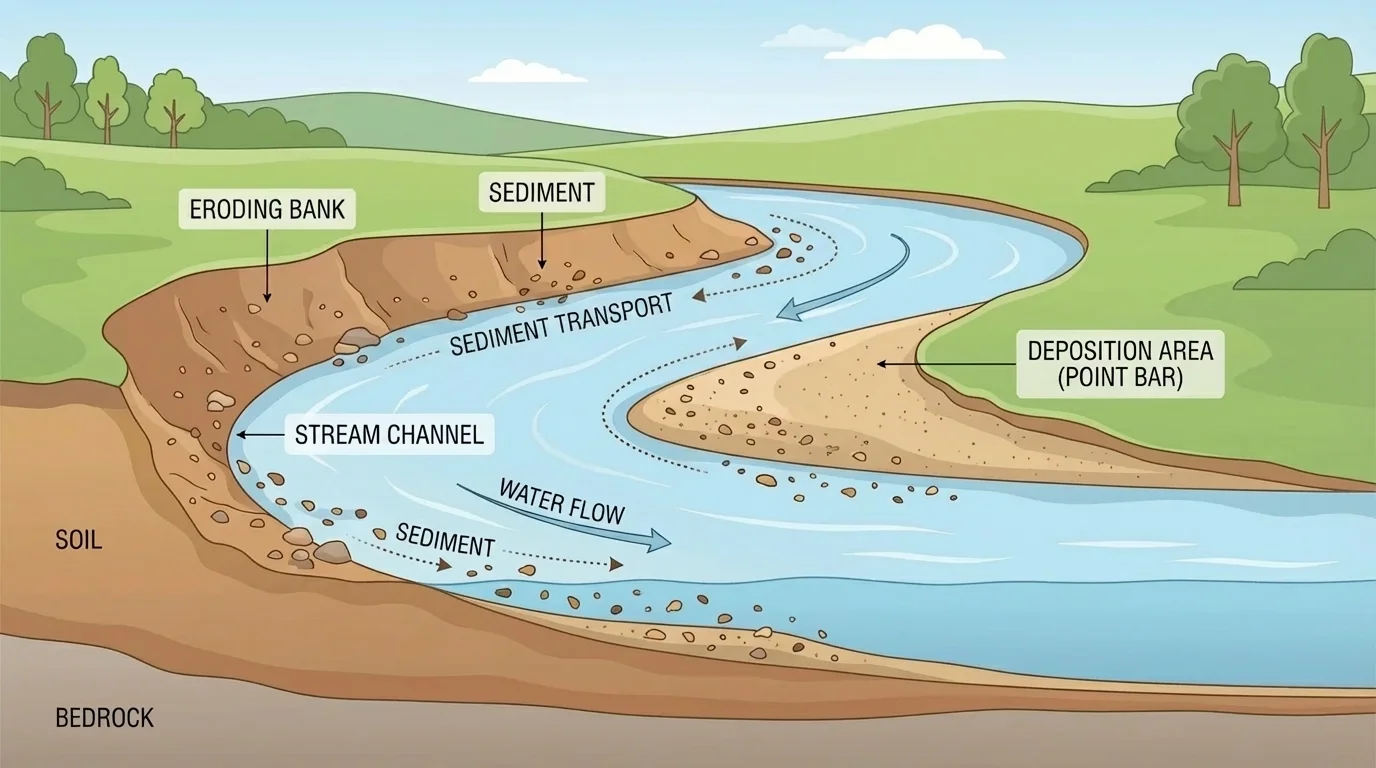
[Figure 3] Earth does not stay exactly the same. Wind and moving water can slowly change the shape of the land. This process is called erosion. Erosion happens when wind or water wears away soil, sand, or rock and carries it to another place. Flowing water can cut into a riverbank and move bits of earth downstream.
Water can change land in many ways. Rain can wash dirt downhill. A stream can wear away the edge of a bank. Ocean waves can move sand along a beach. Even a puddle overflowing after a storm can move tiny bits of soil from one place to another.
Wind can also change land. In dry places, wind can blow sand and loose soil. Over time, this can make some places smoother and move sand into piles. Wind often works slowly, but it can still change how land looks.
Sometimes the moved earth is dropped in a new place. This is called deposition. If water carries sand and then slows down, the sand may settle. That is why some places gain new sand or mud while other places lose it. Erosion removes material, and deposition places material somewhere else.
Models can show these changes. One model may show a riverbank before strong rain. Another model may show the same riverbank after some soil has washed away. The models help students see that land can change shape over time.
How models help us show change
A model can represent a place at one moment, or it can help compare the same place at two different times. When students make one model of an area before wind or water acts on it and another after the change, they can clearly see what was worn away and where material collected.
The changes may be slow in nature, but they are still important. A river may bend a little more over time. A beach may become wider in one spot and narrower in another. Remembering the riverbank in [Figure 3] helps us understand that moving water is one of the strongest shapers of land.
You may have seen real examples of land and water changes. After heavy rain, water may carve tiny paths through soil on the playground. At the beach, waves may smooth the sand or make ridges. Near a creek, the water may make one side muddy and steep while building up sand on another side.
Farmers, builders, and park workers pay attention to these changes. If water keeps washing soil away, plants may be added to help hold the ground in place. If a path is always muddy because it lies in low land, people may change where they walk. Understanding land and water helps people take care of places wisely.
Example: A rainy schoolyard
Suppose a schoolyard has a gentle slope and a low spot near the fence.
Step 1: Observe the area.
Rain falls, and water runs down the slope.
Step 2: Notice where the water goes.
The water collects in the low spot and forms a puddle.
Step 3: Build a model.
The model shows the higher ground, the lower ground, and the puddle area.
This model helps explain why the puddle forms in one place and not another.
Real-world models are used in many jobs. People planning a garden, a road, or a playground need to know where the land rises and where water may gather. Even though young students make simple classroom models, they are using the same kind of thinking as real problem-solvers.
Sometimes one model is not enough. If we want to show how an area changes, we can compare two models. The first model can show the place before wind or water changes it. The second model can show the place after some sand, soil, or rock has moved.
For example, a stream bank may begin with firm soil along the edge. After many days of flowing water, the edge may wear away. Farther downstream, some of that soil may settle. Two models can make this easier to see than words alone.
Another example is a beach after a windy day. Before the wind, the sand may look smooth. After the wind, small ridges or piles may appear. A model can help students show these new shapes. The model does not need exact measurements. It only needs to clearly show that the land changed and how it changed.
"Earth's surface can change, even when the changes are small at first."
Using more than one model helps students think like scientists. They observe carefully, notice patterns, and explain what changed. This is an important part of science: using evidence to describe the world.
After building a model, it is important to compare it with the real area. Does the model include the main landforms? Does it show the bodies of water? Are the high and low parts in the right places? These questions help us decide whether the model is useful.
No model is perfect. A model is simpler than the real world. It may leave out small details so the main features stand out. That is acceptable as long as the important shapes and kinds of land and water are clear.
Think again about the landscape in [Figure 1]. If a student copied only the river and forgot the valley around it, the model would miss an important part of the area. Think also about the park model in [Figure 2]. If the pond were placed on top of the hill, the model would not match the real place. Matching the features to the area is what makes the model helpful.
When students build and compare models, they learn more than names. They learn to see how Earth is shaped and how it changes. They also learn that places around them, even familiar places, have patterns that can be studied and understood.