Have you ever looked out of a car window and noticed how many different things fit into one place? A river might flow beside a road. Houses might sit near trees. A school might be close to a park. A map helps us see all of these things from above, almost like a bird flying over the land. When we read a map carefully, we can describe what an area is like and understand how natural features and human-built features work together.
A map is a representation of a place seen from above. It helps us find out what is in an area and where things are located. Some maps show a whole country, and some show a small neighborhood. Even a small map can tell a big story about a place.
When we study one area on a map, we look for its features. Features are parts of a place that we can see and describe. A feature might be a mountain, a lake, a road, a bridge, a school, or a playground. Learning to describe features helps us become strong map readers and better observers of the world around us.
Natural features are parts of Earth that are made by nature, not built by people. Examples include rivers, hills, lakes, forests, beaches, and mountains.
Man-made features are things people build or change. Examples include roads, houses, bridges, farms, schools, parks, and stores.
Maps are useful because they let us compare places. One area might have many trees and streams. Another might have many streets and buildings. By reading a map, we can tell whether a place is mostly natural, mostly built by people, or a mix of both.
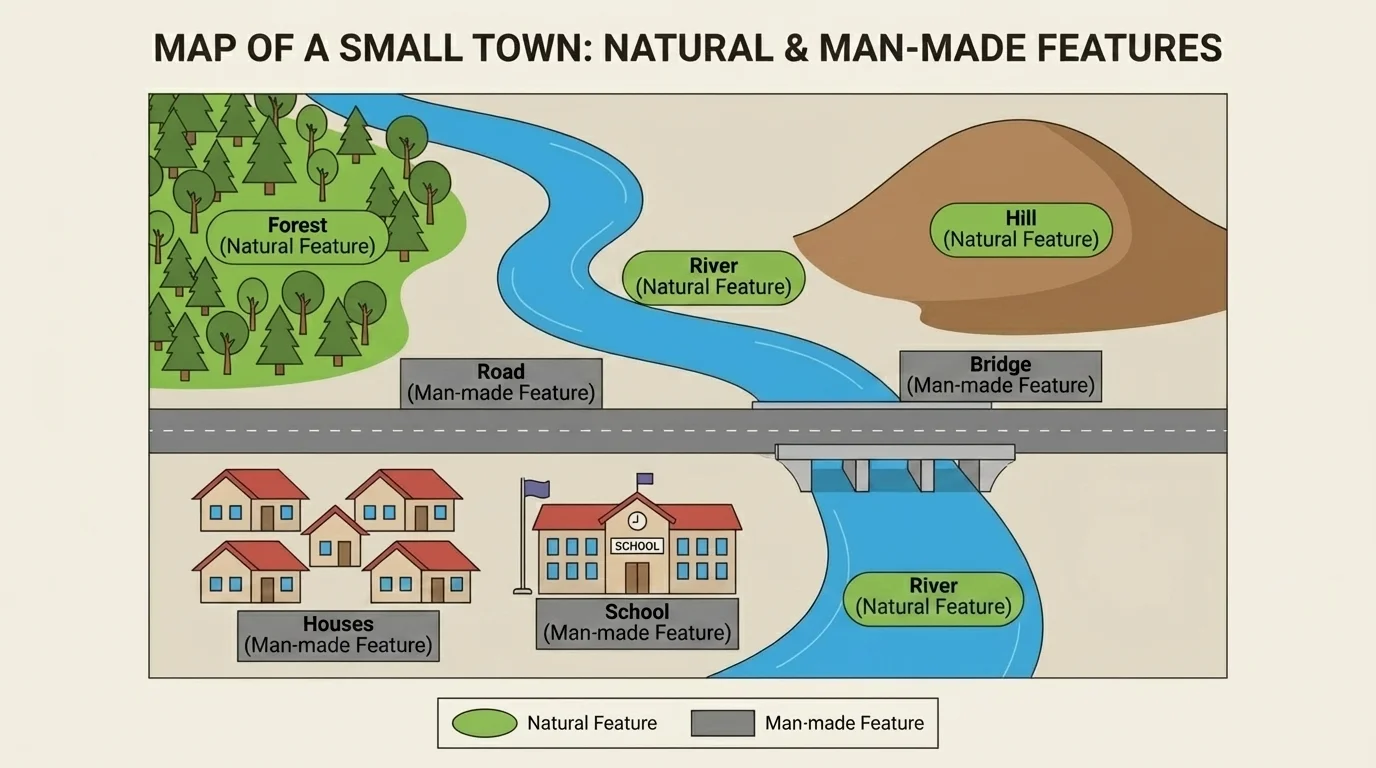
Every area has its own combination of natural and human-built parts. On a map, natural features often include shapes of land and water, while man-made features include places where people live, work, travel, and gather. In [Figure 1], one small area includes both kinds of features, which helps us compare them clearly.
A river is a natural feature because people do not build rivers. A hill is natural because it is part of the land itself. A forest is natural because trees grow there as part of nature. But a road is man-made because people build it to travel. A bridge is man-made because people construct it to cross water or land. A school is man-made because people design and build it for learning.
Some places can seem tricky at first. For example, a park may include grass and trees, which are natural things, but the park itself is often a man-made feature because people planned it, shaped it, and may have added paths, benches, or playgrounds. A farm also changes natural land for human use, so it is usually described as a man-made feature on a map.
Knowing the difference between these two kinds of features helps us describe a place more clearly. We can say, for example, that an area has a river and a forest as natural features, and a road and a neighborhood as man-made features. That gives a fuller picture of what the area is like.
Many towns first grew near natural features such as rivers, harbors, or flat land. People often built homes and roads where nature made travel, farming, or trade easier.
That is why maps are not just about naming places. They are also about noticing how people use the land and how the land shapes what people build.
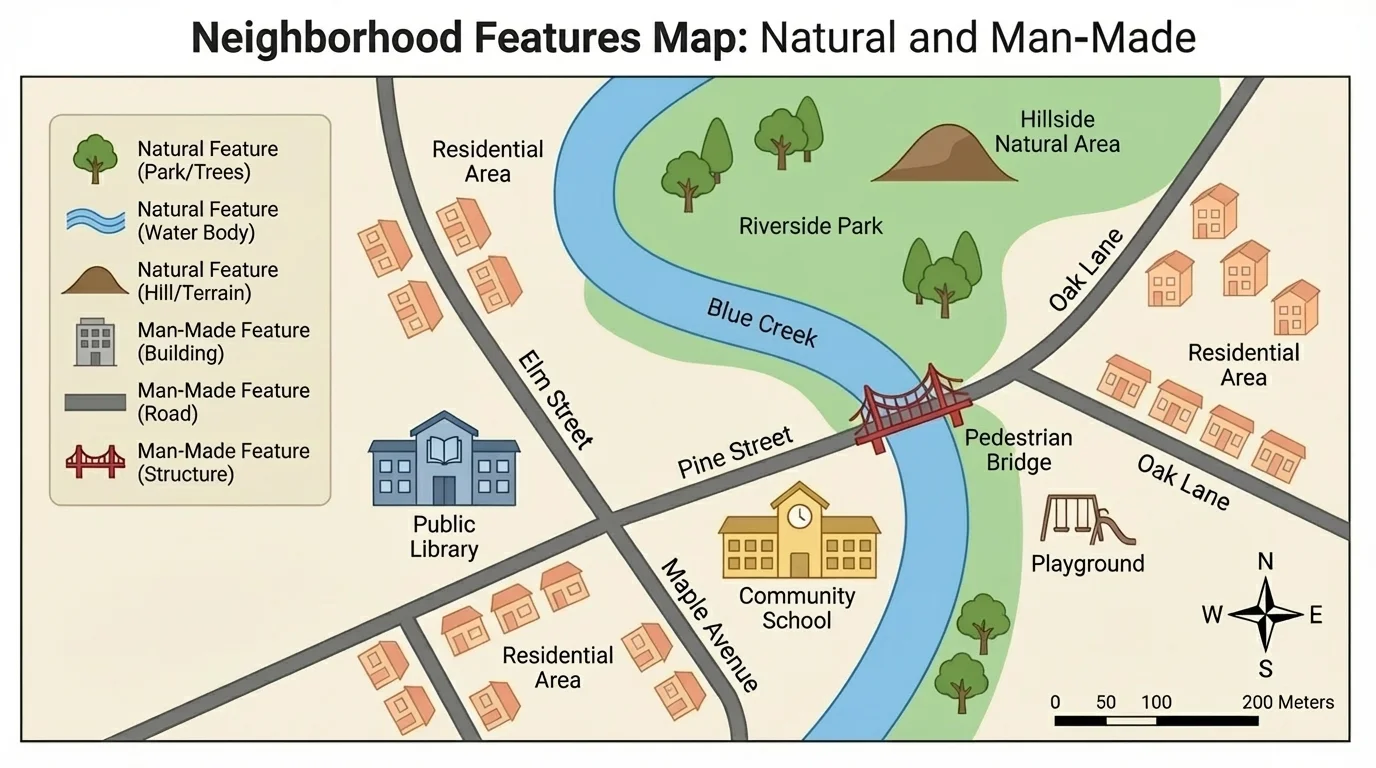
A good map gives clues that help us understand it. These clues are map tools. As [Figure 2] shows, map tools help us identify what the symbols mean and where things are located.
One important tool is the legend, also called a key. A legend explains what symbols on the map stand for. A blue wavy line might mean a river. A small black line might mean a road. A tiny house shape might stand for homes. Without a legend, map symbols can be confusing.
Another helpful tool is the compass rose. It shows directions such as north, south, east, and west. These direction words help us describe where things are. A map may also have labels, which are words that name places, and a title, which tells what area the map shows.
Some maps include a scale. A scale tells how map distance matches real distance. For third grade, the most important idea is that maps are smaller than real places, so a short line on a map can stand for a much longer distance in real life.
When you use all of these tools together, a map becomes easier to read. You can tell what the symbols mean, which direction features lie in, and what area the map is showing. Later, when we describe a specific area, these tools make our descriptions much more accurate.
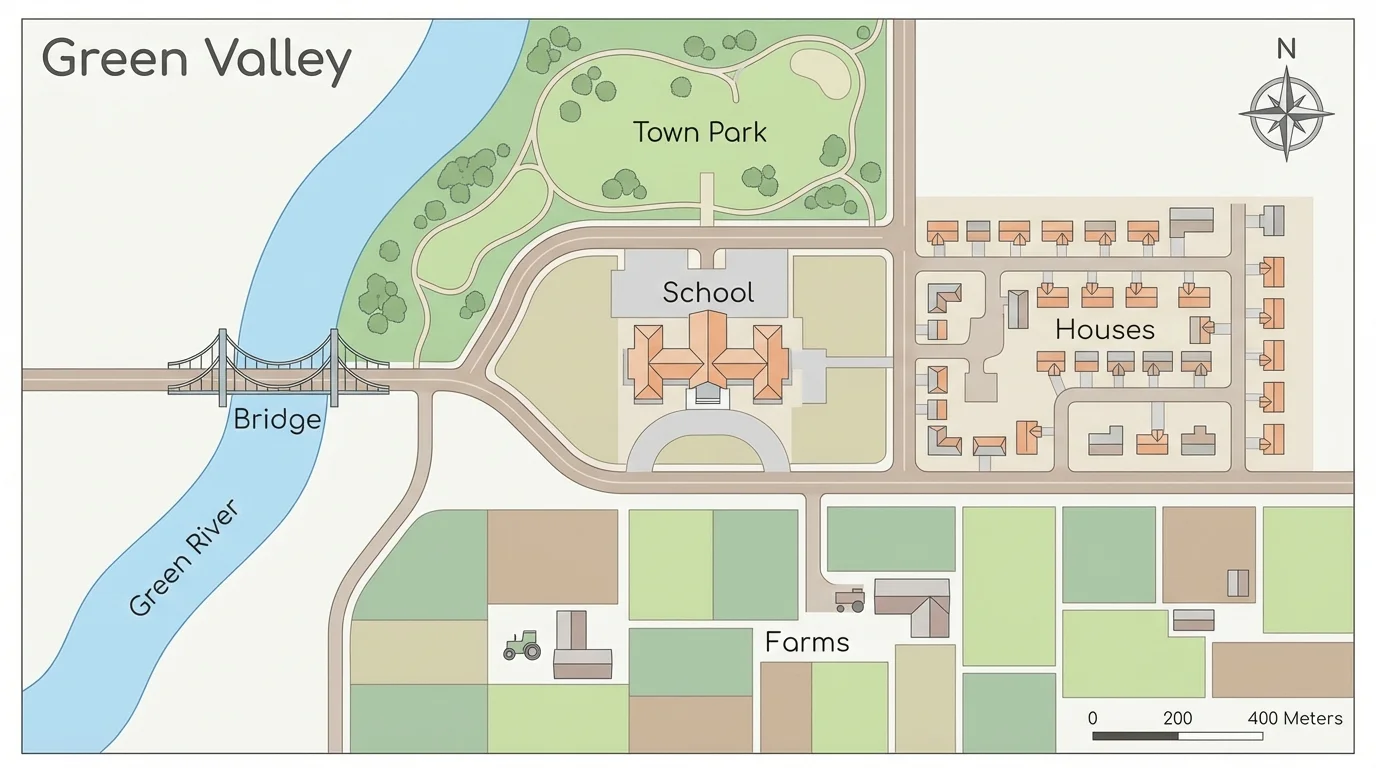
Let us study a pretend place called Green Valley. In [Figure 3], Green Valley has a river, a bridge, a school, a park, houses, roads, and farms. This is a good example because it includes both natural and man-made features in one area.
The river is a natural feature. It runs along the west side of the area. The park is in the north part of Green Valley. The school is near the center. Houses are east of the school. Farms are south of the town center. A bridge crosses the river so that people can travel from one side to the other.
Now we can describe this area with clear map language. We might say, "Green Valley has a river on the west side and farms in the south." We might also say, "The school is near the center of the map, and houses are to the east of it." These kinds of sentences tell both what is in the area and where it is.
Notice that a full description usually includes more than one feature. Instead of saying only "There is a river," a stronger description says, "There is a river on the west side, and a bridge crosses it near the town." This helps the listener or reader picture the place better.
Case study: describing Green Valley
Step 1: Name the feature.
Example: river, school, bridge, park, houses, farms.
Step 2: Tell whether it is natural or man-made.
The river is natural. The school and bridge are man-made.
Step 3: Describe where it is.
The river is on the west side. The park is north of the school. The farms are south of the center.
Step 4: Put the ideas into a complete sentence.
"Green Valley has a river on the west side and farms in the south."
This careful way of observing helps students move from simple naming to detailed geographic description. It is not enough to point to a symbol. A strong map reader explains what the symbol means and how it relates to other parts of the area.
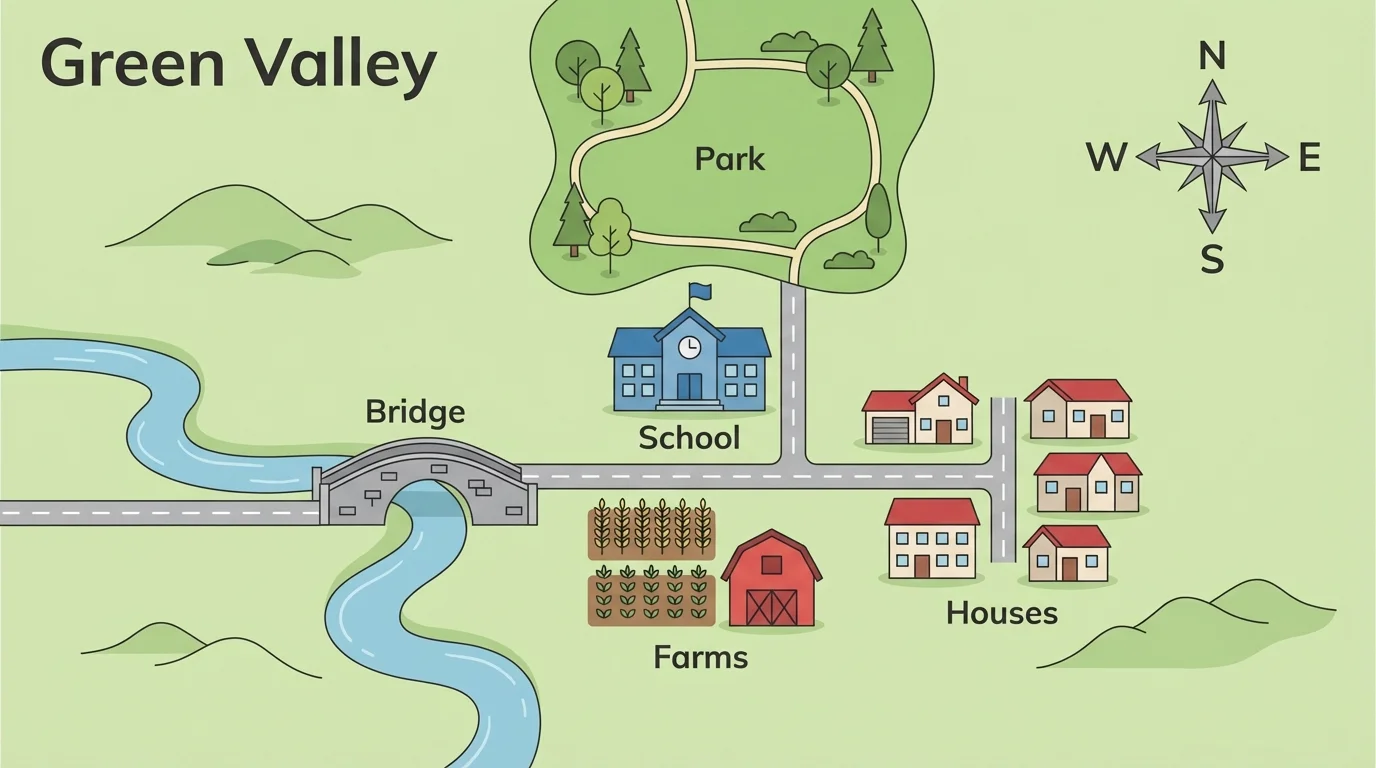
Maps help us explain location by using direction words. In [Figure 4], arrows show north, south, east, and west, which are called cardinal directions. These words help us say exactly where one feature is compared with another.
If the park is above the school on a map that has north at the top, then the park is north of the school. If the houses are to the right of the school, then the houses are east of the school. If the farms are below the school, then the farms are south of the school. If the bridge is left of the houses, then the bridge is west of the houses.
We also use position words such as near, far, next to, between, and across from. We might say the school is near the road. We might say the bridge is across the river. We might say the park is north of the school and near the river. These words make our descriptions more exact.
Using direction words is one of the most important spatial thinking skills in geography. Spatial thinking means understanding where things are and how they are arranged in space. When we compare the park, school, river, and houses in Green Valley, we are practicing spatial thinking.
How direction words improve map descriptions
A description becomes stronger when it tells both the type of feature and its location. Saying "There is a bridge" gives some information. Saying "There is a bridge west of the houses, crossing the river" gives much more information because it explains the feature's place and purpose.
Later, the same skill can help with larger maps too. Students can describe where states, countries, mountains, or oceans are by using the same direction words they use on a town map.
Map features matter because they affect daily life. A river may provide water, attract animals, or create a place for fishing and boating. Flat land may be easier for building houses, schools, and roads. A mountain may make travel harder but can also be a place for hiking or enjoying views.
Man-made features show how people change an area to meet their needs. Roads help people travel. Bridges help them cross rivers. Schools give places for learning. Farms grow food. Neighborhoods show where many people live. When we look again at Green Valley, as seen earlier in [Figure 3], we can understand why the bridge matters so much: it connects parts of the community on both sides of the river.
Natural and man-made features often work together. People may build homes near water but above places that flood easily. They may place roads through flat land instead of steep hills. They may build parks where there are trees and open space. A map helps us see these choices.
From earlier map skills, remember that symbols stand for real places and objects. Reading a map means turning symbols, labels, and directions into a picture of the real world.
When students describe a map, they are doing more than naming objects. They are explaining how a place is organized and how people use that place.
Not every map looks the same because not every place is the same. A city map may show many streets, tall buildings, schools, and stores. A rural map may show fields, barns, small roads, rivers, and forests. A coastal map may show beaches, bays, and harbors. A mountain map may show peaks, valleys, and winding roads.
The table below compares examples of natural and man-made features in several kinds of areas.
| Type of area | Natural features | Man-made features |
|---|---|---|
| City | River, hill, trees | Streets, buildings, bridges, schools |
| Farm area | Soil, stream, flat land | Fields, barns, fences, roads |
| Beach area | Ocean, sand, dunes | Piers, roads, homes, shops |
| Forest area | Trees, hills, lakes | Trails, cabins, campsites |
Table 1. Examples of natural and man-made features in different kinds of mapped areas.
This comparison shows that one area may have many natural features, while another may have many built features. Most real places have both. That is why map readers need to notice all the parts of an area, not just one type.
Some maps use colors to help readers notice features quickly. Blue often marks water, green often marks parks or forests, and black or red may mark roads or buildings.
Color, symbols, and labels work together to make maps easier to understand. These tools help us describe a place clearly even if we have never visited it in person.
A careful map reader looks slowly and notices details. First, identify the area shown by the title. Next, use the legend to find out what symbols mean. Then look for natural and man-made features. After that, use directions and position words to describe where those features are located.
For example, a strong description might sound like this: "This area has a forest in the north, a lake near the center, and a road that runs east to west. A group of houses is south of the lake, and a bridge crosses the stream on the west side." That kind of description uses evidence from the map.
Compare that to a weak description like "There are some things on the map." A weak description does not name features, does not tell where they are, and does not help someone understand the place. Good geography uses clear words and map details.
As shown earlier in [Figure 1], one of the best ways to describe an area is to sort what you see into natural features and man-made features first. Then, as in [Figure 4], you can add direction words to explain where each feature is located. This turns simple observation into strong geographic thinking.
When you can describe the natural and man-made features of a specific area on a map, you are using geography to understand space, place, and how humans live on Earth. That is a powerful skill because maps are everywhere: in books, on phones, in weather reports, in travel, and in community planning.