In a real emergency, the difference between help and harm is often a few calm decisions made in the first minute. Most people do not fail because they do not care. They fail because they panic, freeze, or rush in without a plan. Emergency response skills give you that plan. They help you protect yourself, get the right help fast, and do the most useful thing instead of the loudest thing.
If you are at home with a younger sibling, at a park with friends, working a part-time job, riding with family, or volunteering in your community, you could be the first person on the scene. Knowing CPR, basic first aid, choking relief, and accident-scene protocols does not turn you into a doctor. It turns you into someone who can keep a bad situation from getting worse.
The goal is simple: stay safe, call for help, and give the best care you can with the training and supplies you have. You are not expected to diagnose everything. You are expected to notice danger, respond quickly, and avoid risky mistakes.
Emergency response means the immediate actions taken when someone is injured or suddenly becomes seriously ill. First aid is the early care given before professional medical help takes over. CPR, or cardiopulmonary resuscitation, is an emergency procedure that uses chest compressions, and sometimes rescue breaths, to keep blood and oxygen moving when the heart has stopped or the person is not breathing normally. An AED, or automated external defibrillator, is a device that can analyze heart rhythm and deliver a shock if needed.
One important truth: helping starts with your own safety. If you run into traffic, touch a live wire, or enter a room full of smoke, you may add another victim to the scene. That is why emergency response always begins with the same question: Is it safe for me to help? The scene-check sequence in [Figure 1] builds on this idea.
Many emergencies look smaller than they are. A person who "just fainted" may not be breathing normally. Someone who is "just choking a little" may stop getting air in seconds. A bad cut in the kitchen can lead to dangerous blood loss much faster than people expect. Early action matters because oxygen, circulation, and severe bleeding are time-critical problems.
Doing the right thing also includes knowing your limits. You should not give medicine unless you are instructed to by emergency services or a trusted adult and you know it is safe. You should not move someone with a possible neck, back, or head injury unless there is immediate danger, such as fire or rising water. Smart helping is careful helping.
Brain damage can begin within minutes when a person is not breathing and blood is not circulating well. That is why quick CPR and fast access to an AED can be life-saving.
In everyday life, emergency response is less about heroic drama and more about doing the basics correctly: calling emergency services, unlocking the front door for responders, sending someone to get an AED, applying pressure to a wound, or staying with a person having a seizure until it ends.
There is a reliable order to follow in almost any emergency: check the scene, check the person, call for help, then give care. This order keeps you focused when your emotions are pushing you to rush.
Step 1: Check the scene for danger. Look for traffic, fire, broken glass, weapons, aggressive animals, smoke, electrical hazards, deep water, or chemical spills. If the area is unsafe, do not go in. Call emergency services and describe the danger clearly.
Step 2: Check the person. Try to get a response. Speak loudly: "Are you okay?" Tap the shoulder if it is safe to do so. If the person responds, ask what happened and where they hurt. If the person does not respond, the situation is more urgent.
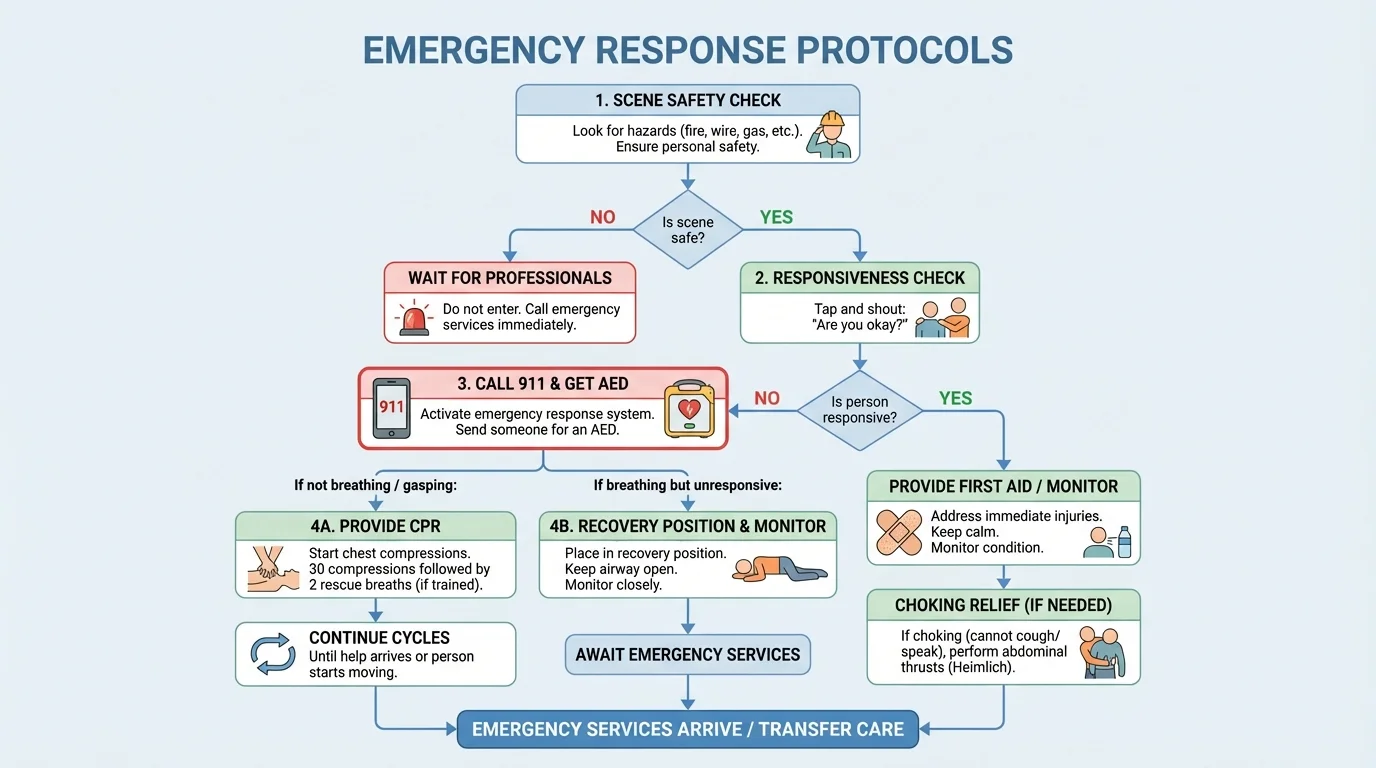
Step 3: Call emergency services. If you are alone and have a phone, call right away. Put the phone on speaker so your hands stay free. If other people are nearby, point to one specific person and give a direct instruction like, "You in the black jacket, call emergency services now," or "You, get the AED from the lobby." Specific instructions work better than yelling, "Somebody help!"
Step 4: Get consent if the person is awake. If a person is conscious, tell them who you are and ask if you can help. If they are unconscious or too confused to answer, emergency care is usually assumed to be okay because a reasonable person would want help.
Step 5: Give the care you know how to give. Focus on the biggest immediate threat first: not breathing, severe bleeding, choking, or an unsafe environment.
When you speak to emergency services, stay clear and short. Give your exact location, what happened, how many people are hurt, whether the person is breathing, and any major dangers. Do not hang up until they tell you to. This matters just as much as hands-on care, and the action order in [Figure 1] helps you remember it under stress.
If a person is unresponsive and not breathing normally, or only gasping, start CPR. Gasping is not normal breathing. Those occasional, strange breaths can fool people into waiting too long.
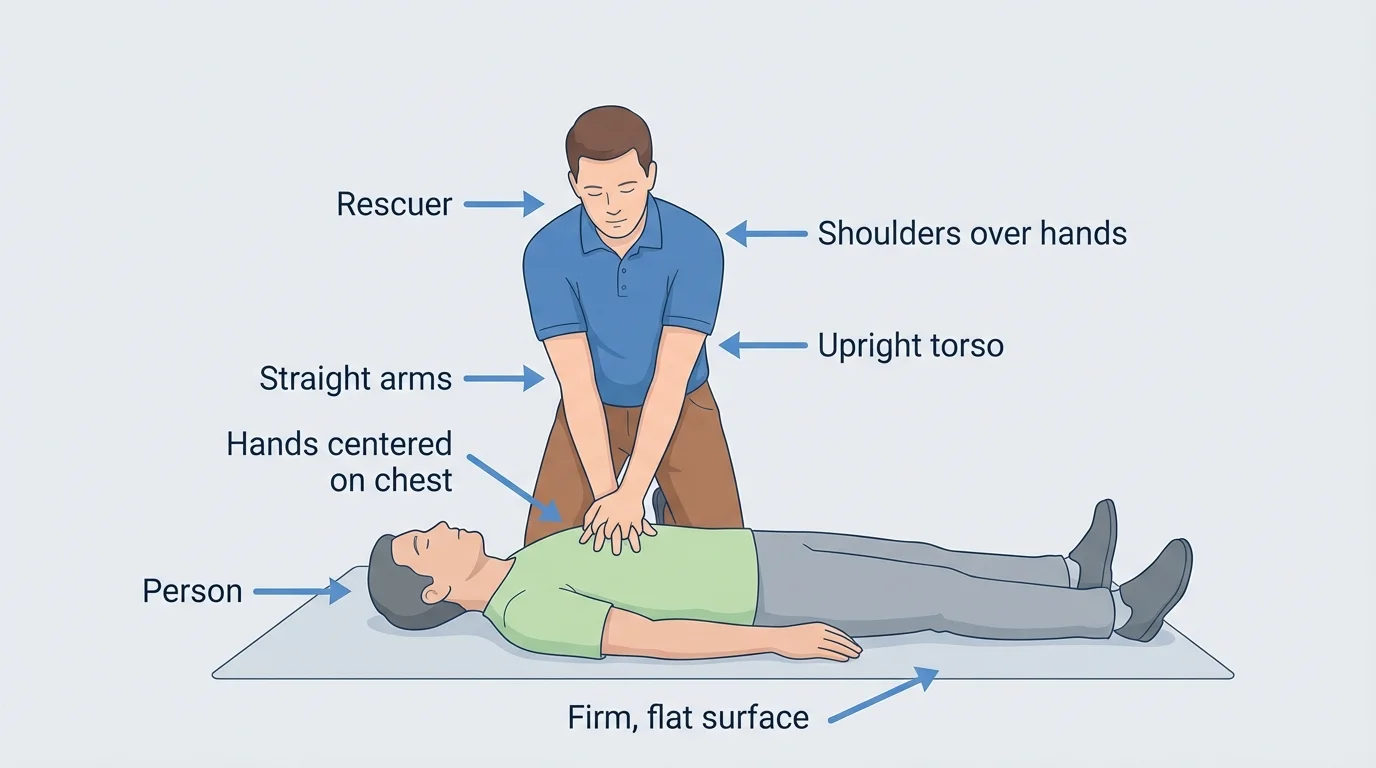
Good body position matters, as [Figure 2] illustrates. Place the person flat on their back on a firm surface. Kneel beside their chest. Put the heel of one hand in the center of the chest, with the other hand on top. Keep your arms straight and your shoulders directly over your hands so you use your body weight, not just your arm strength.
Chest compressions are the core of CPR. Push hard and fast in the center of the chest. Let the chest rise fully between compressions. Try not to stop unless you must use an AED, the person starts breathing normally, another trained rescuer takes over, or emergency responders tell you to stop.
For most teens and adults, the target compression rate is about \(100\) to \(120\) compressions per minute. A useful way to picture that is a steady quick beat, not a frantic slam. The depth should be about \(2\) inches, or about \(5\) centimeters, for an average teen or adult chest. Full recoil matters because the heart refills between compressions.
If you are not trained in rescue breaths, or you do not feel safe giving them, use hands-only CPR: continuous chest compressions until help arrives or an AED is ready. If you are trained and willing to give breaths, the common pattern is \(30\) compressions followed by \(2\) breaths.
How to perform CPR step by step
Step 1: Confirm the emergency.
The person is unresponsive and not breathing normally.
Step 2: Call emergency services and get an AED.
If others are nearby, assign one person to call and another to bring the AED.
Step 3: Start compressions.
Hands in the center of the chest, arms straight, shoulders above hands.
Step 4: Push at the right pace and depth.
Use about \(100\) to \(120\) compressions each minute and press about \(2\) inches deep.
Step 5: Add breaths only if trained and willing.
After \(30\) compressions, give \(2\) breaths, then return to compressions.
Step 6: Use the AED as soon as it arrives.
Turn it on and follow the voice prompts immediately.
An AED is designed to be used by ordinary people, not just professionals. Turn it on, attach the pads as shown on the pads, and follow the voice instructions. Make sure no one is touching the person when the AED analyzes the heart rhythm or says to deliver a shock. Then resume CPR right away if instructed.
Do not place AED pads over large metal jewelry, medication patches, or a soaked chest if you can quickly dry it. On a teen, adult pads are usually appropriate. The device gives instructions, and modern AEDs are built to prevent a shock when one is not advised.
Later, if you review your actions, remember that perfect CPR is not required to help. Fast action is what matters most. The hand placement and posture in [Figure 2] are useful because correct mechanics help you keep compressions strong even when you get tired.
Choking can turn serious very quickly, and the first key skill is recognizing whether it is mild or severe. If the person can cough forcefully or speak, air is still moving. If they cannot speak, cannot breathe, make weak sounds, or turn blue or gray, that is severe choking.
For mild choking, encourage the person to keep coughing. Do not hit them on the back if they are coughing strongly and moving air well. The cough is their best tool.
For severe choking, call emergency services or tell someone specific to call. If you are trained, give back blows and abdominal thrusts according to current first aid guidance in your region. Stand behind the person, support them, and act quickly but carefully.
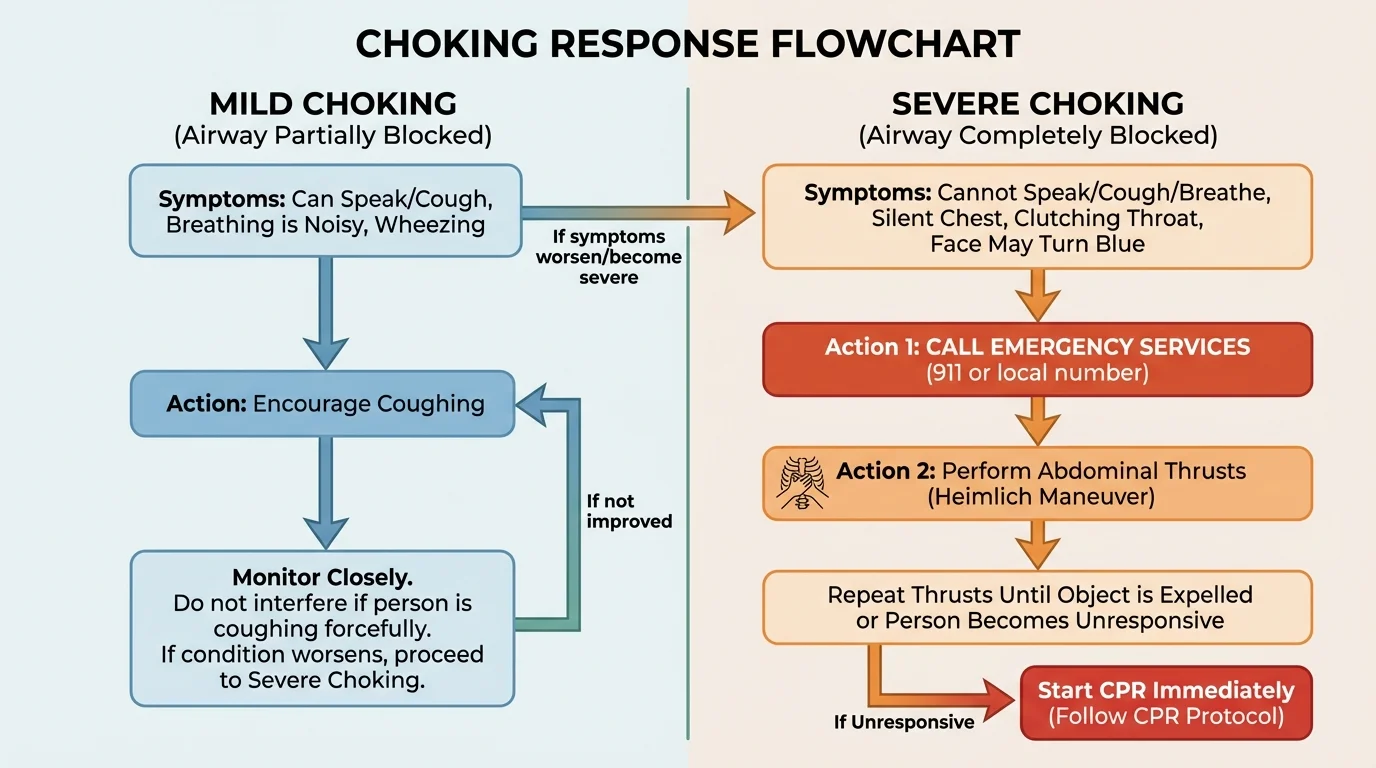
If the person becomes unresponsive, lower them to the ground carefully, call emergency services if that has not already happened, and begin CPR. Each time you open the airway to give breaths, look in the mouth. If you see an object clearly, remove it carefully. Do not blindly sweep with your fingers, because that can push the object deeper.
If you are choking and alone, call emergency services if possible. You can try forceful self-abdominal thrusts or press your upper abdomen against the back of a firm chair or counter edge to create pressure. This is an emergency, so speed matters.
Why coughing is treated differently from silent choking
A strong cough means the airway is only partly blocked, so the body may still clear it on its own. Silent choking is much more dangerous because little or no air is moving. That is why a person who cannot speak or breathe needs immediate action, not encouragement to "just relax."
A common mistake is assuming a choking person will always make loud sounds. Severe choking is often quiet. The decision path in [Figure 3] helps you focus on the real sign: whether air is moving.
When breathing and choking are not the main problem, first aid often becomes about controlling damage until professionals arrive. Severe bleeding is one of the biggest priorities, and firm direct pressure is the basic response.
Severe bleeding: Put on gloves if available. Use a clean cloth, dressing, or even a shirt if nothing else is available. Press directly on the wound and keep pressure steady. If blood soaks through, add more material on top instead of removing the first layer. If possible, keep the injured person still and have them lie down.
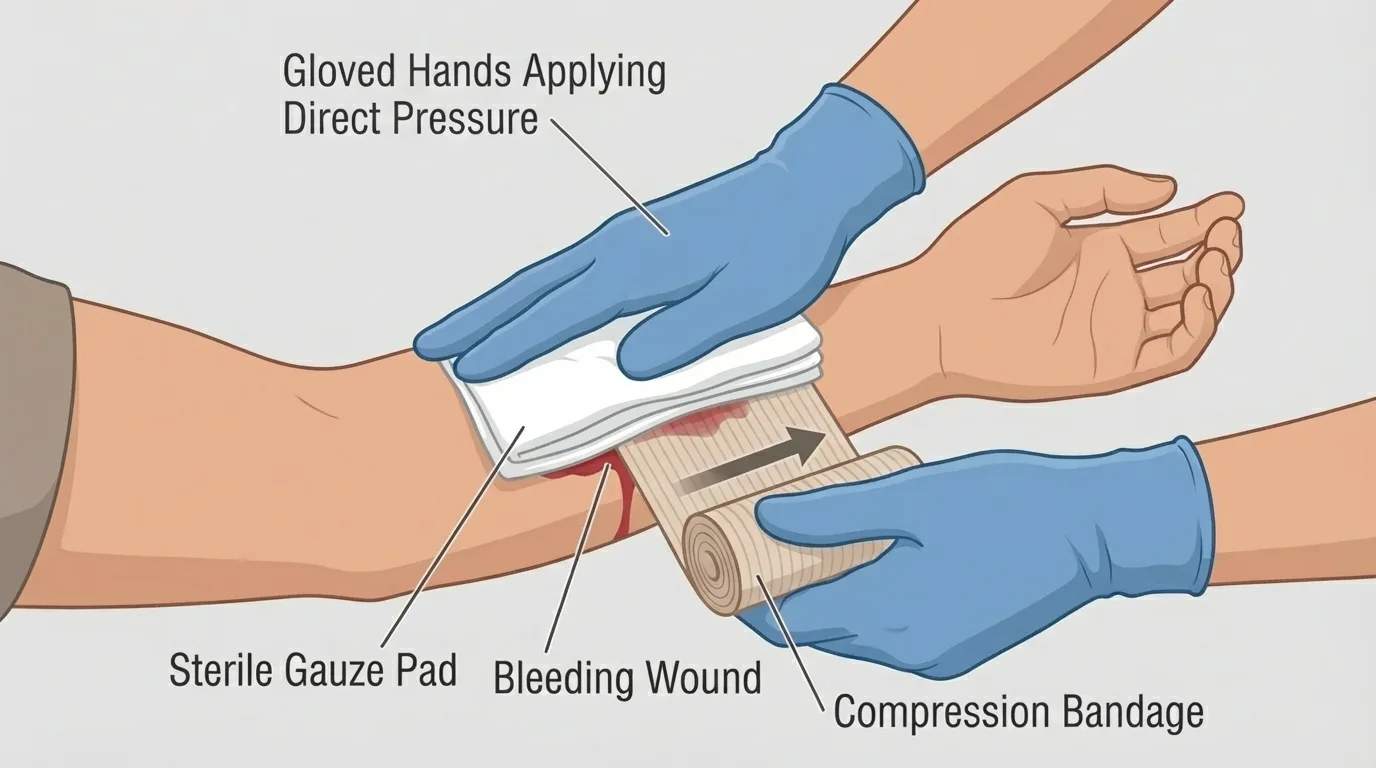
Shock: Shock is a life-threatening condition where the body is not getting enough blood flow. The person may look pale, feel cool, seem weak, confused, restless, or very thirsty. Call emergency services, keep them lying down if possible, and keep them warm with a blanket or jacket. Do not give food or drink. The wound-pressure method shown in [Figure 4] is one example of how first aid can reduce immediate danger while waiting for professional care.
Burns: Cool a minor burn with cool running water for at least \(10\) to \(20\) minutes. Do not use ice, butter, toothpaste, or oily products. Cover with a clean non-stick dressing or loose cloth. For large burns, burns on the face, hands, feet, genitals, or airway, or burns from electricity or chemicals, seek emergency help immediately.
Sprains, strains, and possible fractures: Rest the injured area, limit movement, and use a cold pack wrapped in cloth for short periods. If the limb looks deformed, the pain is severe, or the person cannot bear weight, treat it as a possible fracture. Do not try to "pop it back." Support it and get medical help.
Nosebleeds: Have the person sit up and lean slightly forward, not backward. Pinch the soft part of the nose steadily. Leaning back can send blood into the throat, which may cause coughing or vomiting.
Seizures: Protect the person from nearby hazards, cushion their head, and time the seizure if you can. Do not hold them down. Do not put anything in their mouth. When the seizure ends, roll them onto their side if they are breathing.
Poisoning: If someone swallows, inhales, or gets a harmful substance on their skin, call emergency services or poison control right away. Keep the container nearby so you can report exactly what was involved. Do not force vomiting unless a medical professional tells you to.
Heat illness: For heat exhaustion, move the person to a cooler place, loosen clothing, offer cool fluids if they are awake and not vomiting, and cool the body with damp cloths. For heat stroke, call emergency services immediately. Heat stroke is a medical emergency.
| Emergency | Main signs | Best first action | Important warning |
|---|---|---|---|
| Severe bleeding | Heavy blood loss, soaked clothing, pooling blood | Direct pressure on wound | Do not remove the first dressing layer |
| Burn | Red, blistered, charred, or painful skin | Cool with running water | Do not use ice or greasy home remedies |
| Seizure | Shaking, loss of awareness, stiff body | Protect from injury | Do not put anything in the mouth |
| Nosebleed | Bleeding from nostril | Lean forward and pinch nose | Do not tilt head back |
| Possible fracture | Pain, swelling, deformity, inability to move | Support and limit movement | Do not force straightening |
Table 1. Common emergencies, their signs, first actions, and mistakes to avoid.
These situations can overlap. A person in a bike crash might have bleeding, shock, and a broken wrist at the same time. In that case, deal with the most dangerous issue first. Breathing and major bleeding always come before smaller injuries. The wound-pressure technique in [Figure 4] stays relevant even when the overall scene is chaotic.
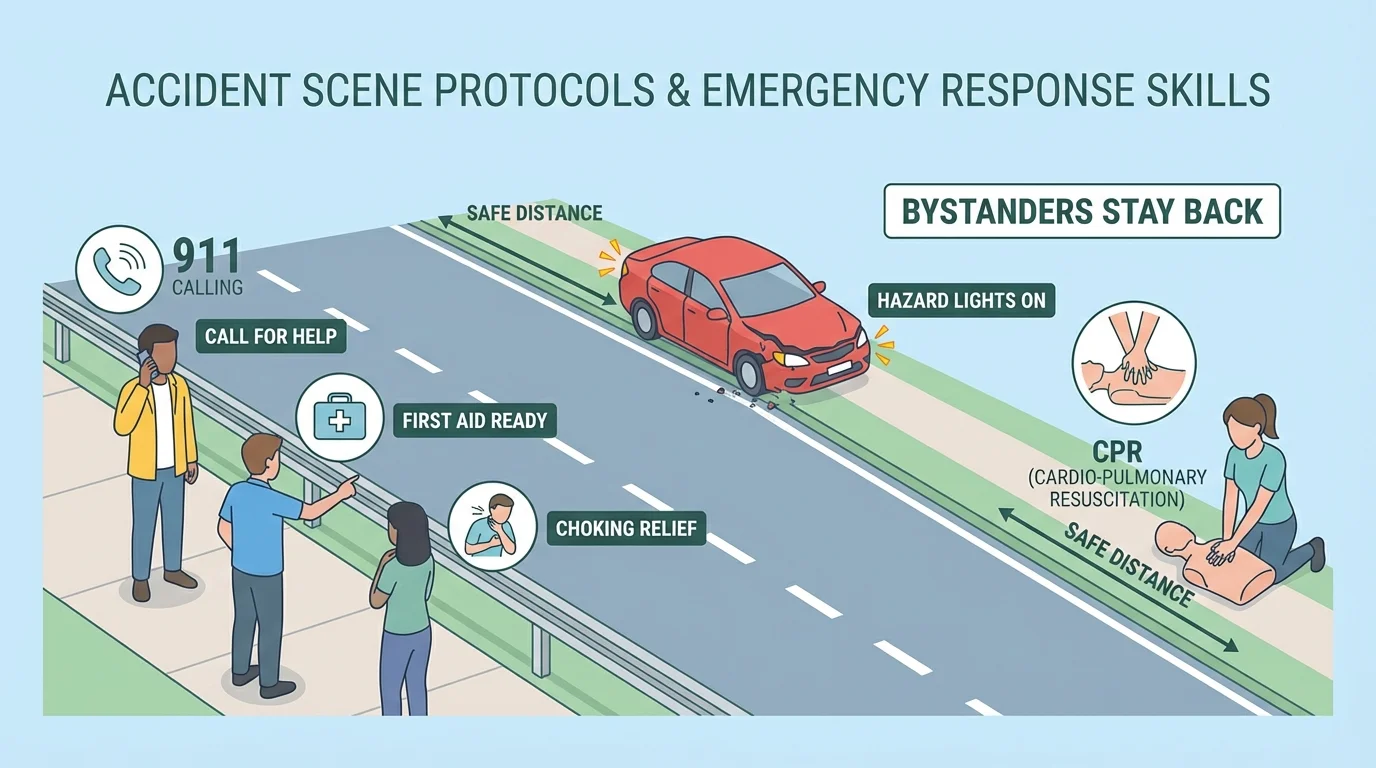
Accidents are messy. People shout, bystanders crowd in, and everyone wants to do something. Protocols matter because they create order. At a roadside crash, the safest pattern is to stay out of traffic, use hazard lights, keep bystanders back, and call emergency services before touching anything.
Car crash: If you are in a safe location, turn on hazard lights and stay clear of moving traffic. Do not stand between damaged vehicles. Do not remove a helmet from an injured motorcyclist unless there is an immediate life-threatening reason. If someone may have a head, neck, or back injury, encourage them to stay still. Only move them if there is immediate danger. The roadside setup in [Figure 5] reinforces these priorities.
Sports or recreation injury: Stop the activity. Do not press someone to "walk it off" if they may have a concussion, fracture, or severe sprain. If they were hit in the head and seem confused, nauseated, unusually sleepy, or sensitive to light, they need adult supervision and medical evaluation.
Kitchen accident: Turn off heat sources if safe. For knife cuts, apply direct pressure. For burns, cool with water. If someone has been electrocuted, do not touch them until the power source is off or the area is declared safe.
Outdoor emergency: Watch for weather, unstable ground, water hazards, or animal threats. In remote areas, location details become even more important. Share landmarks, trail names, or phone map coordinates if you have them.
What to say when calling emergency services
Step 1: State the location first.
Example: "We are at 245 Oak Street, in the backyard near the garage."
Step 2: Say what happened.
Example: "A person collapsed and is not responding."
Step 3: Report the biggest danger signs.
Example: "They are not breathing normally," or "There is heavy bleeding from the leg."
Step 4: Answer questions and follow instructions.
Keep the phone on speaker if possible.
What not to do: Do not crowd the person. Do not post photos or videos of the scene. Do not give food, drink, or random medications. Do not assume someone else has called for help. Do not leave the person alone unless you must go to safety or get urgent help.
Good accident-scene behavior also means communication. One person calls. One person gets supplies. One person stays with the injured person. This prevents confusion. The roadside setup in [Figure 5] is a strong reminder that bystander control is part of emergency care, not separate from it.
The best emergency response starts before the emergency. Keep a basic first aid kit at home and know where it is. A useful kit includes gloves, gauze, adhesive bandages, tape, a roller bandage, antiseptic wipes, a cold pack, scissors, tweezers, and emergency contact information.
Save important numbers in your phone and also write them down somewhere visible. In a crisis, phones die, screens crack, and stress makes people forget simple things. It helps to know your home address, the names of nearby streets, and any medical conditions or allergies in your household.
If you have ever learned how to stay calm before a test, game, or performance, you already know a useful emergency skill: slowing down your thoughts enough to follow steps. The same self-control helps you notice hazards, give clear information, and avoid panic decisions.
The most effective next step is formal training. A certified CPR and first aid course gives you supervised practice with manikins, AED trainers, and realistic scenarios. Reading helps, but hands-on repetition builds speed and confidence.
Try This: Learn where the nearest AED is located in the places you spend time most often, such as your gym, community center, workplace, apartment building, or sports field. Also check whether adults around you know where the first aid kit is kept.
Try This: Build a one-minute emergency script and practice saying it clearly: your name, exact location, what happened, how many people are injured, and whether the person is breathing. The more familiar that script feels, the easier it is to use under pressure.
Try This: Restock a first aid kit at home. Check expired items, replace missing gloves or bandages, and add a card with emergency contacts. Preparedness is not dramatic, but it is powerful.
"The first step in an emergency is not panic. It is purpose."
Emergency response is really a set of habits: notice danger, protect yourself, call early, act on the biggest threat, and stay with the person until help takes over. Those habits make you more dependable not only in a crisis, but in everyday life.