One missed deadline can change your options for months or even years. That sounds dramatic, but it is true: many students do not struggle because they lack ability. They struggle because they wait too long, forget a requirement, or make a big decision without a real plan. Planning is not about being perfect. It is about making your future easier to manage.
As a Grade 10 student, you do not need to have your entire life mapped out. You do need to start building the habits that help you handle applications, track deadlines, and make smart transition decisions. Whether you are thinking about college, trade school, certificate programs, military service, apprenticeships, or going straight into work while training, the same core skill matters: organized planning.
Planning gives you control over something that can feel overwhelming. When you break a big future goal into smaller actions, it becomes less stressful and more realistic. Instead of thinking, "I have to figure out everything," you can think, "This week I will research two programs and write down their deadlines." That is a task you can actually do.
Good planning also protects you from rushed decisions. If you wait until the last minute, you are more likely to choose based on panic, convenience, or pressure from other people. If you plan ahead, you can compare options, ask questions, and notice what fits your goals, your learning style, and your life.
Application means the process of formally requesting admission, enrollment, or consideration for a program, school, job, or opportunity.
Timeline means a sequence of tasks and deadlines arranged in the order they need to happen.
Transition decision means a choice about your next step, such as where to apply, when to commit, what support you need, and how you will adjust to a new routine.
These skills are practical, not just academic. You use them when you apply for jobs, sign up for training, prepare for interviews, and decide how to manage time, transportation, money, and responsibilities. Planning is a life skill that keeps helping you long after one application season ends.
Post-secondary readiness is not just about getting accepted somewhere. It includes understanding your options, preparing materials, meeting deadlines, and choosing a path you can realistically follow. You are planning for both the entry process and the life change that comes after it.
That means asking practical questions. What type of program fits your interests? What grades or experiences will you need? What will it cost? Will you study online, commute, move, or work at the same time? What support will help you stay successful once you begin?
There is no single "best" option for everyone. A strong plan helps you find a good fit for you. Someone who wants hands-on learning may prefer a trade or technical program. Someone aiming for a specific career may choose a two-year or four-year college path. Someone else may start with work experience and short-term certifications. Planning helps you match your next step to your real goals instead of copying someone else's path.
A post-secondary pathway becomes clearer when you move from broad ideas to specific actions. Start with what you know about yourself, then narrow your options, then choose your first actions. This order matters because random searching wastes time.
[Figure 1] Step 1: List your interests, strengths, and needs. You might enjoy design, health care, coding, mechanics, business, teaching, or skilled trades. You might also know that you learn best with structure, prefer flexible scheduling, or need to stay close to home.
Step 2: Turn those observations into possible pathways. For example, if you enjoy problem-solving and technology, your list might include computer science, information technology, cybersecurity, or digital media. If you like helping people and working directly with them, your list might include nursing, education, counseling, or emergency services.
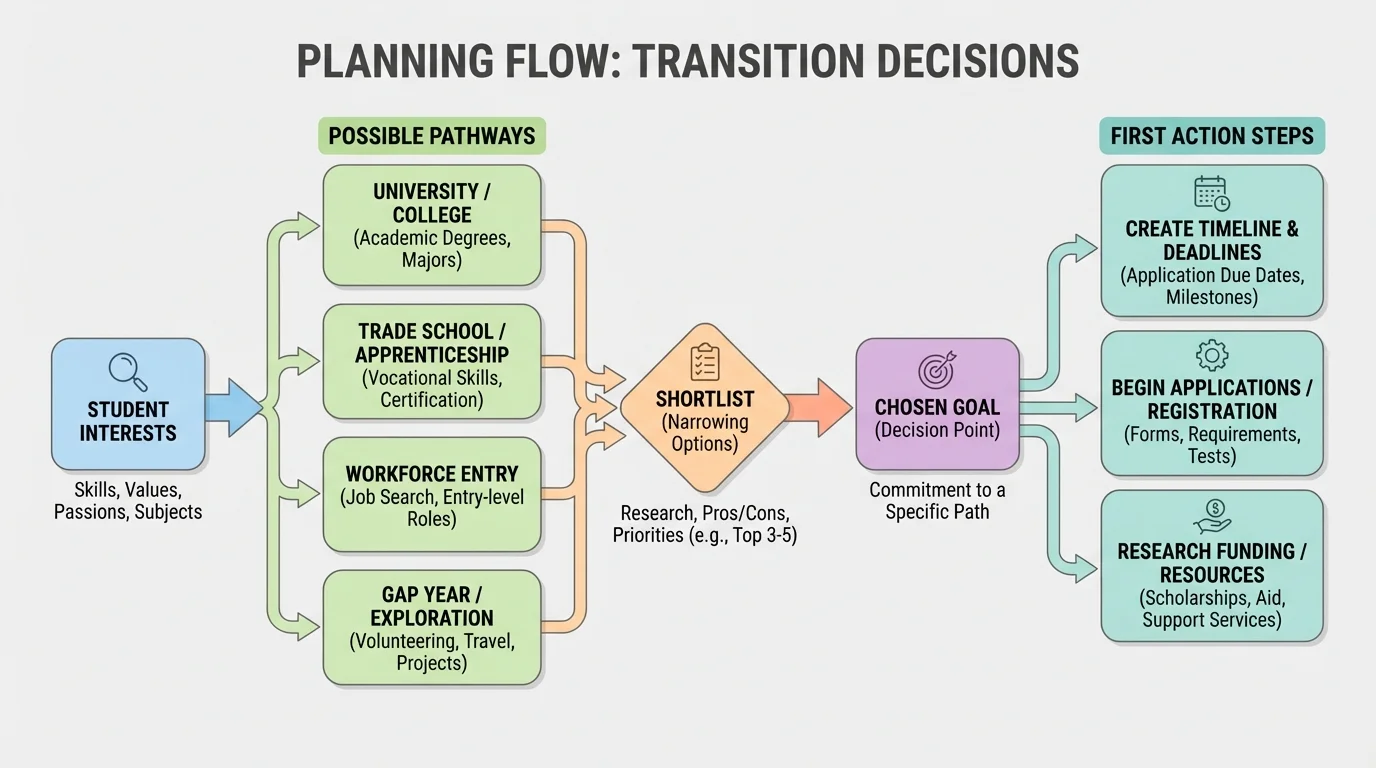
Step 3: Make a shortlist. Pick about three to five realistic options instead of trying to track everything. Too many choices can make you freeze. A shortlist gives you focus without locking you in too early.
Step 4: Write what each option requires. Look for admission expectations, deadlines, essays, forms, test requirements if any, fees, financial aid steps, and whether extra materials are needed. The earlier narrowing process in [Figure 1] matters here because each option now turns into a manageable checklist instead of a giant pile of possibilities.
Planning from the future backward
Strong planning often starts with a future goal and works backward to today. If your goal is to submit an application by a certain month, you identify everything that must happen before that date: researching programs, drafting responses, asking for recommendations, gathering documents, and checking details. This method keeps you from discovering too late that one small missing task blocks everything else.
Step 5: Choose one main goal and at least one backup plan. This is not being negative. It is being smart. A backup plan can protect you if your first choice changes, costs too much, or no longer fits your goals.
Many students know what they want to do but still feel lost because they do not know when to do each step. Backward planning solves that problem by starting with the final deadline and moving backward through earlier tasks, and the sequence in [Figure 2] shows how that works in practice.
Suppose an application is due on November 1. If you wait until late October, you may discover that you still need a transcript, a personal statement, and a recommendation request. That creates pressure and lowers the quality of your work. If you plan backward, you decide that the final draft of your essay should be done earlier, recommendation requests should be sent weeks before that, and program research should happen even earlier.
A strong timeline includes task dates, buffer time, and checkpoints. Buffer time means extra time for problems, delays, or changes. Checkpoints are short review moments where you ask, "Am I still on track?" Without checkpoints, it is easy to think you are making progress when you are actually avoiding the hardest steps.
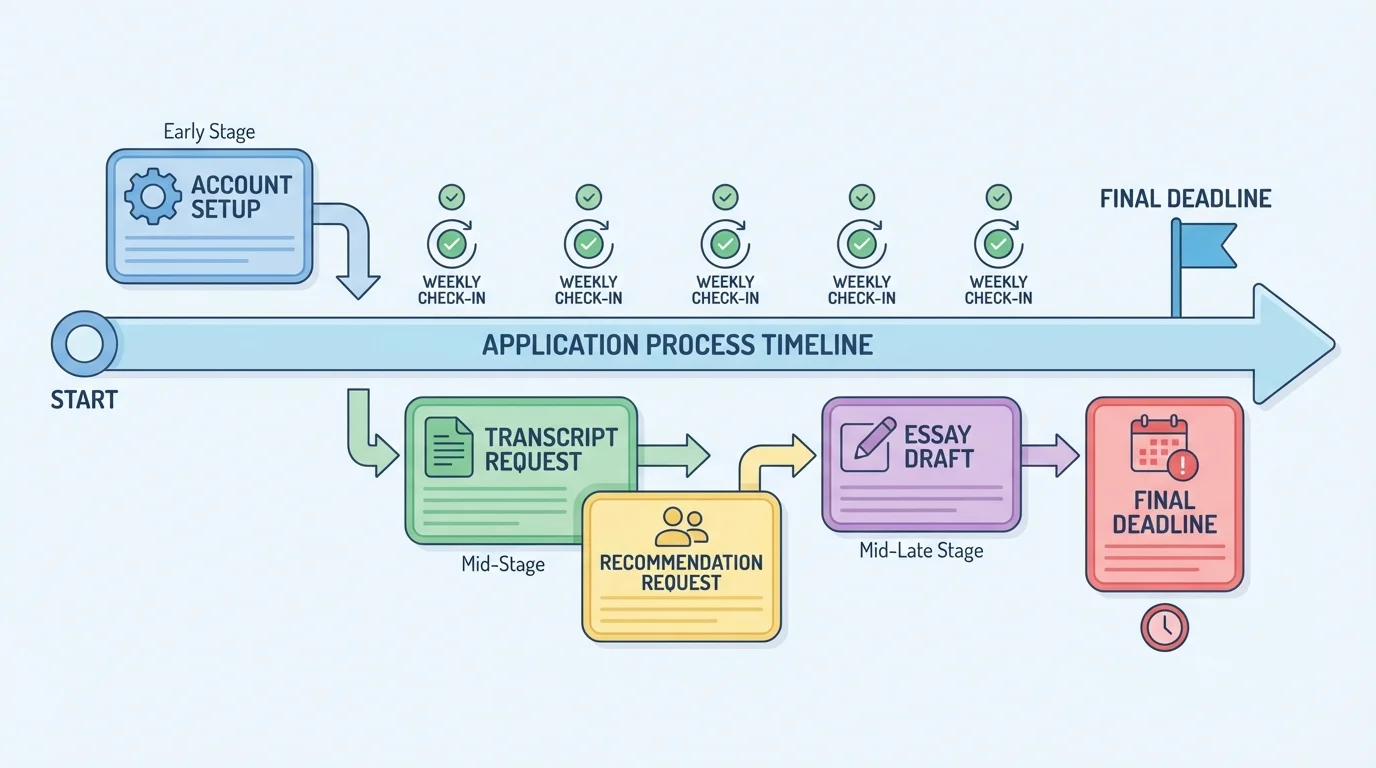
Here is a simple way to build your timeline:
Step 1: Write the final deadline.
Step 2: List every task required before that deadline.
Step 3: Estimate how long each task will take.
Step 4: Add extra time for delays.
Step 5: Put the tasks on a calendar in reverse order.
Step 6: Set weekly reminders to review progress.
Example: planning backward from one deadline
A student has a scholarship application due in 8 weeks.
Step 1: Start with the full time available.
\(8\) weeks is the total window.
Step 2: Reserve time for reviewing and fixing problems.
Set aside 2 weeks as buffer time. That leaves \(8 - 2 = 6\) weeks for the main tasks.
Step 3: Divide the remaining weeks by task group.
If there are 3 major task groups—research, writing, and document collection—then \(6 \div 3 = 2\) weeks can be assigned to each group.
Step 4: Put dates on the calendar.
Weeks \(1\) to \(2\): research. Weeks \(3\) to \(4\): writing. Weeks \(5\) to \(6\): collect and upload documents. Weeks \(7\) to \(8\): review, fix, and submit early.
The student now has a realistic schedule instead of a vague intention.
Your timeline should fit your real life. If you work part-time, help care for siblings, play a sport, or manage health responsibilities, your schedule needs to reflect that. A plan only works if it matches reality.
When you are choosing between programs or next steps, a decision matrix can make the choice clearer. A side-by-side comparison reduces emotional guesswork, as [Figure 3] shows, and helps you focus on what matters most in daily life.
Choose comparison categories that actually affect your future. Useful categories include program quality, cost, location, transportation, flexibility, support services, internship or training opportunities, graduation outcomes, and how strongly the option matches your career goal.
If two options look similar, ask deeper questions. Which one gives you stronger support if you struggle? Which one allows you to keep working if needed? Which one has fewer hidden costs? Which one fits your energy, focus, and routine? A decision is not only about the name of the program. It is about whether you can succeed there.
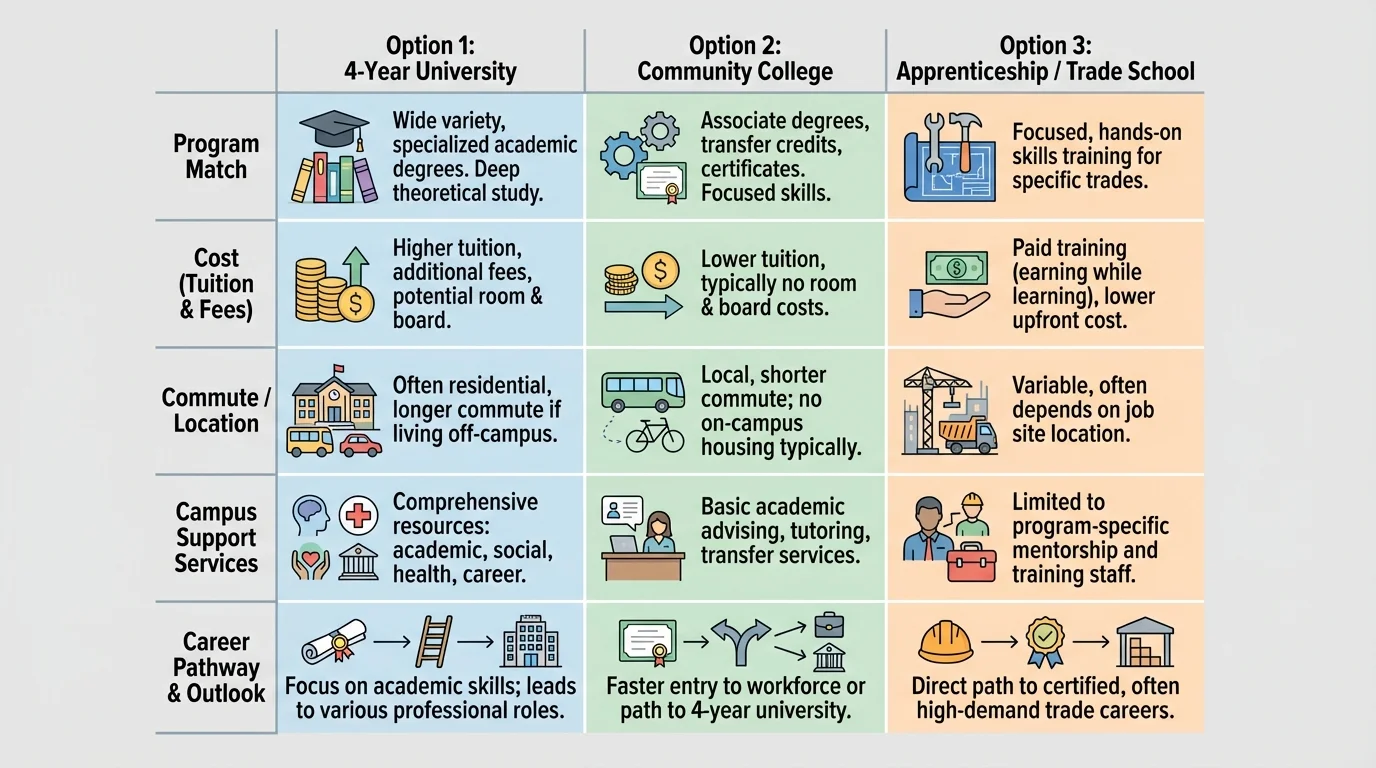
| Option | Strong Match to Goal | Affordable | Commute or Move | Support Services | Flexibility |
|---|---|---|---|---|---|
| Community college | Yes | Often more affordable | Usually commute | Often strong advising | Moderate to high |
| Four-year college | Depends on major | Can cost more | Commute or move | Varies | Moderate |
| Trade/technical program | High for specific careers | Varies | Usually local or regional | Career-focused support | Often structured |
Table 1. Comparison of common post-secondary options using practical decision criteria.
You do not have to score every category with numbers, but some students find it useful. For example, if you rate five categories on a scale from \(1\) to \(5\), one option might total \(22\) points while another totals \(18\). That does not decide for you automatically, but it helps you see patterns more clearly.
Example: choosing between two realistic options
Jordan wants to study health care and is comparing a local community college program with a more expensive program farther away.
Step 1: Identify top priorities.
Jordan chooses cost, program quality, commute time, and available tutoring support.
Step 2: Score each option from \(1\) to \(5\).
Local program: cost \(5\), quality \(4\), commute \(5\), support \(4\). Total: \(5 + 4 + 5 + 4 = 18\).
Distant program: cost \(2\), quality \(5\), commute \(2\), support \(3\). Total: \(2 + 5 + 2 + 3 = 12\).
Step 3: Look beyond the score.
Jordan notices the distant program has a slightly stronger reputation, but the local option is far more affordable and easier to manage day to day.
Jordan may still apply to both, but the comparison makes the likely best fit much clearer.
The comparison chart in [Figure 3] also reminds you that "best" does not always mean "most impressive." It means the choice that matches your goals and your reality.
Treat each application as a project with parts, deadlines, and quality checks. That mindset helps you avoid careless mistakes. A project plan is more effective than hoping you will "get to it later."
Start by making a separate checklist for each application. Include account creation, personal information, required documents, essay prompts, recommendation requests, fee information, and confirmation after submission. Keep all login information stored securely. Losing track of passwords or email messages can create unnecessary delays.
When you write essays or short responses, do not wait for the perfect draft. Start with a rough version. Then revise. Strong writing usually comes from editing, not from getting everything right on the first try. Also, make sure your responses actually answer the question being asked. A polished response that misses the prompt still hurts your application.
Many application problems are not big dramatic mistakes. They are small preventable ones: the wrong file uploaded, an unchecked email account, a missing signature, or a recommendation request sent too late.
If someone needs to send a recommendation or other supporting document for you, ask early and communicate clearly. Give them the deadline, the purpose, and enough time to respond. Then follow up politely. This is part of professional communication, and it matters in both education and work settings.
Before submitting anything, review it in a calm, focused way. Check names, dates, spelling, contact information, file formats, and whether every section is complete. One careful review can save you from preventable setbacks.
Getting accepted is not the finish line. The transition plan begins when you ask what needs to happen next. A smooth transition depends on preparation, not just excitement.
[Figure 4] You may need to decide about transportation, technology, schedules, finances, work hours, housing, or support services. If your next step is online, you need reliable internet, a quiet workspace, and a routine. If you are commuting, you need travel time built into your day. If you are working while studying, you need a schedule that protects your energy.

Transitions also involve emotional adjustment. New routines can feel exciting and stressful at the same time. You might worry about fitting in, keeping up, or making the right choice. Those feelings are normal. Planning helps by turning unknowns into tasks you can handle.
Make a transition checklist that covers the first month, not just the first day. Include account setup, orientation or onboarding tasks, class or training schedules, payment deadlines, supplies, transportation, and who to contact if something goes wrong. The connected categories in [Figure 4] matter because one missing piece, like technology access or transportation, can affect everything else.
"You do not rise to the level of your goals. You fall to the level of your systems."
— James Clear
This idea fits transition planning perfectly. Big goals matter, but systems are what help you follow through when your schedule gets busy or your motivation drops.
One common mistake is confusing interest with commitment. You might say you are interested in a program, but unless you have researched requirements, saved deadlines, and started the application process, you are not yet acting on that interest.
Another mistake is relying on memory instead of a system. Deadlines should live in a calendar, planner, or digital task app, not only in your head. If it is important, write it down and set reminders.
A third mistake is making decisions based only on image or pressure. Maybe one option sounds impressive online, or maybe family members strongly prefer a certain path. Their opinions may matter, but your final decision should be based on fit, cost, goals, and your ability to succeed there.
You already use planning skills in everyday life when you manage assignments, work shifts, appointments, practices, or personal goals. Post-secondary planning uses the same core habits: break tasks down, track deadlines, communicate clearly, and review your progress.
Finally, do not ignore backup plans. A backup does not weaken your main goal. It gives you stability. Strong planners stay hopeful and flexible at the same time.
If you want to begin now, focus on progress, not perfection. The next 30 days can move you from "I should probably think about this" to "I have a real plan."
Week 1: Write down your interests, strengths, needs, and three possible pathways. Create one place to keep all future-planning notes.
Week 2: Research at least three programs or options. Record requirements, deadlines, costs, and questions you still have.
Week 3: Build a calendar with major deadlines and mini-deadlines. Add reminders and at least one buffer week before each important due date.
Week 4: Compare your top choices, identify a main goal and a backup plan, and make a transition checklist for what comes after acceptance or enrollment.
Example: turning a vague goal into a real plan
Goal: "I want to do something in technology after high school."
Step 1: Make the goal more specific.
Change it to: "I want to explore two technology-related programs and one certification option by the end of the month."
Step 2: Add measurable tasks.
Research \(3\) options, save \(3\) deadlines, and list \(3\) admission requirements for each one.
Step 3: Add time limits.
If the month has \(4\) weeks, then complete one major task each week. That is \(1\) pathway step per week instead of trying to do everything at once.
Step 4: Add a follow-up decision.
At the end of the month, choose one preferred option and one backup option.
The original goal was vague. The revised goal is trackable and much more likely to happen.
Planning works best when it becomes a habit. You do not need all the answers today. You need a system that helps you ask the right questions, take the next step, and adjust when needed.