Have you ever started a project thinking, "I have plenty of time," and then suddenly the deadline felt very close? That happens to a lot of people. A longer project can seem easy at first because you do not have to finish it right away. But that is exactly why you need a plan. When you learn how to prioritize and organize, you make big jobs feel smaller, calmer, and much easier to finish well.
Longer projects show up in real life all the time. You might create a digital slideshow, make a poster at home, record a video report, clean and organize your room over several days, plan a family recipe project, or work on a hobby that takes time. In online school, you also need to manage your own space and time more often. That means these skills are not just for one assignment. They help you in everyday life too.
A short task is simple: you do it, and it is done. A longer project is different. It has many parts, takes more than one day, and often needs planning, supplies, and careful checking. If you try to hold the whole project in your mind at once, it can feel confusing or stressful.
Sometimes students put off a long project because they are not sure where to begin. Sometimes they spend too much time on one small part and forget the rest. Sometimes they lose files, forget directions, or wait too long to ask for help. These problems are common, but they can be fixed with strong habits.
Prioritizing means deciding what is most important and what should happen first.
Organizing means putting things in order so you can find what you need and follow your plan.
Deadline means the date or time when something must be finished.
When you prioritize, you choose the order of your tasks. When you organize, you set up your materials, time, and steps. These two skills work together. If you only prioritize but do not organize, you may know what matters but still lose papers or forget steps. If you only organize but do not prioritize, you may keep everything neat but spend time on the wrong thing.
Before you begin, stop and look at the whole job. Read all the directions slowly. If your teacher posted instructions online, open them and check them more than once. Find the goal of the project. Ask yourself: What am I making? When is it due? What parts does it need? What supplies or digital tools do I need?
This is the moment to notice important details. Maybe your slideshow needs at least five slides. Maybe your video must be within a certain length. Maybe you need to include pictures and your own writing. If you miss these details at the start, you might have to redo work later.
Start with the finish line. A smart way to begin is to picture the finished project. Think about what "done" looks like. When you know the finish line, it becomes easier to plan the steps that lead there.
You can make a quick project map by writing down four things: the final product, the deadline, the required parts, and the tools you need. This takes only a few minutes, but it saves a lot of confusion later.
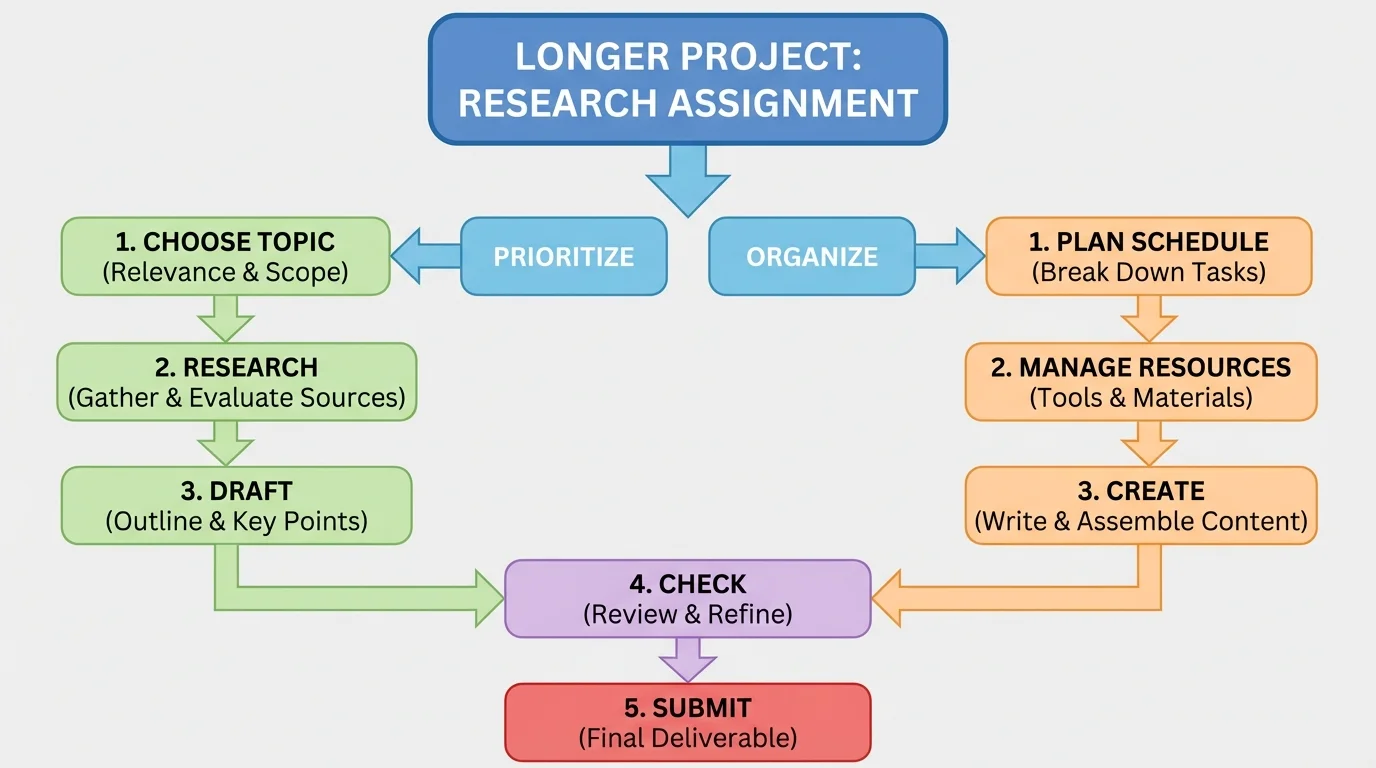
As [Figure 1] shows, a long project becomes easier when you use chunking, which means breaking one large job into smaller pieces. One big project can be turned into clear steps that you can actually finish one at a time. Instead of thinking, "I have to do the whole thing," you can think, "Today I only need to finish one small part."
For example, if your project is a digital slideshow about sea turtles, your steps might be: choose your topic, find facts, write notes, make slides, add pictures, check spelling, and submit. Each step is much smaller than the whole project.
Small steps help your brain focus. They also help you feel successful more often. Every time you finish one step, you can check it off. That builds momentum, which is the sense of progress that helps you keep going.
Try to make your steps clear and specific. "Work on project" is too big and too fuzzy. "Write three facts for slide two" is much better. Specific steps tell you exactly what to do next.
Turning a big task into smaller tasks
Big task: Make a book review video.
Step 1: Read the directions and write down what the video must include.
Step 2: Choose the book and gather your notes.
Step 3: Write a short script with an introduction, favorite part, and recommendation.
Step 4: Practice reading the script out loud.
Step 5: Record the video.
Step 6: Watch the video, fix mistakes if needed, and submit it.
Notice how each step is something you can do and finish.
Later, when you feel stuck, look back at [Figure 1]. It reminds you that a project is not one giant mountain. It is a path made of small steps.
Once you have the steps, you need to decide their order. This is where prioritizing becomes important. Some tasks are priorities because other tasks depend on them. You cannot make slides before you gather facts. You cannot bake cupcakes before you check whether you have ingredients. You cannot submit a project before you review it.
A good question is: What must happen first so the next step can happen? That helps you place tasks in a smart order. Another useful question is: What is most important for the final result? For example, neat colors on a title slide might be nice, but correct information is more important.
You can sort tasks into three simple groups:
This helps when you feel like doing the easiest part first, even if it is not the most important part. Many students want to decorate first because it is fun. But if the facts are missing, the project is not ready. Prioritizing means doing what matters most, not only what feels fun in the moment.
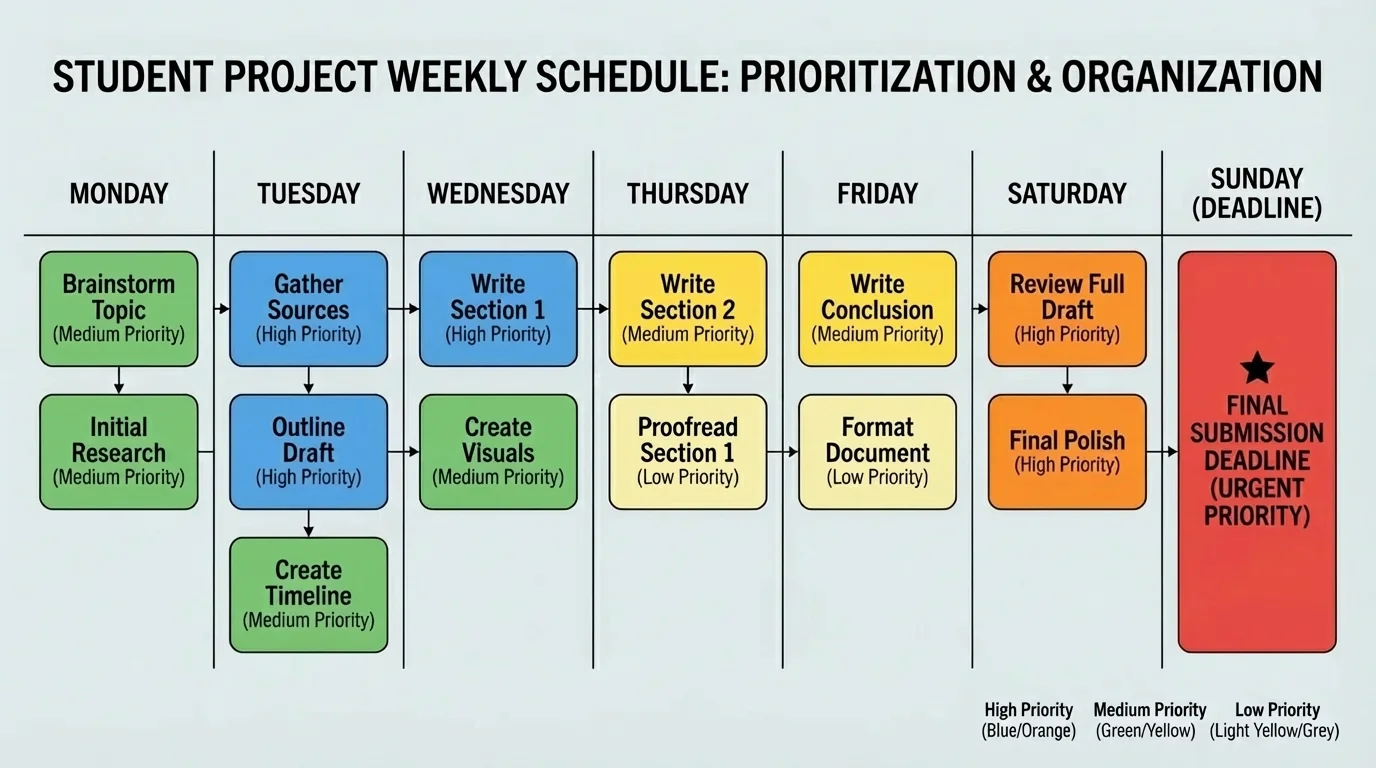
As [Figure 2] illustrates, a timeline is a plan that shows when you will do each part of a project. In a longer project, a timeline keeps you from leaving everything until the last day. When tasks are spread across several days, the project feels more manageable and less stressful.
Start with the deadline, then count backward. If the project is due on Friday, maybe you need your final check on Thursday, your main creation on Wednesday, your notes on Tuesday, and your research on Monday. Counting backward helps you save time for fixing mistakes.
It also helps to add small checkpoints. A checkpoint is a moment when you pause and ask, "Am I where I planned to be?" For example, by the end of Tuesday, maybe you want all your facts collected. By the end of Wednesday, maybe you want your first draft done.
If you use a digital calendar, a paper planner, or a sticky note checklist, the tool matters less than the habit. The important part is seeing your plan clearly. A visible plan helps you remember what to do each day.
A timeline should be realistic. If one step normally takes thirty minutes, do not give it five minutes. If you know your afternoons are busy with family activities, sports, or chores, plan around that. A realistic plan is stronger than a wish.
People often feel less stressed when they can see a plan. Even if the work is still big, a clear schedule helps the brain feel more in control.
You can even estimate time for each task. For example, research might take about \(20 + 20 = 40\) minutes across two days. Slide design might take \(15 + 15 = 30\) minutes. These are not perfect guesses, but they help you avoid surprises.
As [Figure 3] shows, your project plan works better when your space is ready. In online learning, your home study space matters a lot. Both your desk and your computer can be organized so you waste less time searching for things. When your materials are easy to find, it is easier to stay focused.
Physical organization means keeping your notebook, pencil, directions, charger, and any project supplies in one place. Digital organization means making folders, naming files clearly, and saving work in the right spot. A file called "project_final_reallyfinal2" is confusing. A file called "Animal_Slideshow_Draft_1" is much clearer.

Good file names can save you from panic later. If you have more than one version, label them in order. For example: "Space_Report_Notes," "Space_Report_Draft," and "Space_Report_Final." This way, you know which file to open.
You can also keep a simple checklist nearby. A checklist might include items like directions read, topic chosen, notes finished, draft completed, final check done, and submitted. Looking at a checklist is much easier than trying to remember everything in your head.
| Problem | Helpful organization move |
|---|---|
| Losing digital work | Save in one project folder every time |
| Forgetting steps | Use a checklist |
| Mixing up versions | Name files clearly |
| Getting distracted | Keep only project materials nearby |
| Running out of time | Use a timeline with checkpoints |
Table 1. Common project problems and organization strategies that help solve them.
Later, when you need to review your work, [Figure 3] still matters. A tidy setup does not just look nice. It helps you think more clearly and work more smoothly.
Even with a good plan, longer projects can feel tiring. That is normal. One way to keep going is to work in short focus times. You might choose one task and work on it for a short period, then take a quick break. Small focus times can help you start, and starting is often the hardest part.
Another smart habit is to stop at a good place. If you finish one section and write yourself a note like "Next: add picture to slide three," it is easier to begin again later. You do not have to waste time figuring out where you left off.
"A little progress each day adds up to big results."
Sometimes a project does not go as planned. Maybe a website is not working. Maybe you cannot find a fact you need. Maybe your first draft is weaker than you hoped. That does not mean you failed. It means you need to adjust. People working on projects do not expect everything to be perfect on the first try. They make changes and keep moving.
If you are stuck, ask for help early. In online school, that might mean sending a message to your teacher, joining office hours, checking an announcement page, or asking a family member to help you reread the directions. Waiting too long can turn a small problem into a big one.
At checkpoints, pause and ask yourself a few questions. Did I finish the step I planned? Am I using my time well? Do I still understand the directions? Is anything missing? These questions help you notice problems while there is still time to fix them.
This is also the time for revision. Revision means improving your work after looking at it again. You might fix spelling, add details, move ideas into a better order, or replace a blurry picture. Strong projects usually go through more than one draft.
Checking your work is not only for tests. It is also an everyday success habit. Athletes review plays, cooks taste food before serving it, and video creators watch their edits before posting. Projects work the same way.
Use a final review before you submit. Compare your project to the directions. If the directions asked for five facts, count them. If it needed three pictures, check for three. If it asked for your own words, make sure you did not copy. A final review protects all the hard work you already did.
Let's put everything together with a realistic example. Suppose you have one week to create a digital slideshow about a favorite animal. You need six slides, facts in your own words, and at least two pictures.
Sample project plan
Step 1: Understand the job.
Read the directions and write the goal: make a six-slide slideshow about one animal, with facts, pictures, and your own writing.
Step 2: Break it into parts.
Choose animal, find facts, write notes, draft slides, add pictures, check spelling, submit.
Step 3: Prioritize.
Choose animal and research come first because the slideshow cannot be built without information.
Step 4: Make a timeline.
Monday: choose animal and find \(3\) facts. Tuesday: find \(3\) more facts. Wednesday: draft slides. Thursday: add pictures and design. Friday: revise and submit.
Step 5: Organize materials.
Create one folder called "Animal Slideshow," save notes there, and keep a checklist beside your computer.
Step 6: Review.
Check that there are \(6\) slides, at least \(2\) pictures, and facts in your own words.
This plan turns a week-long project into daily actions you can actually do.
Notice that the student does not try to finish everything in one day. The plan spreads the work out, keeps the most important tasks first, and leaves time for revision. That is what strong executive functioning looks like in action: planning, ordering, remembering, and adjusting.
One common mistake is starting with the most fun part instead of the most important part. Another is forgetting to check directions after the first day. Another is making a plan but never looking at it again. Good plans only help if you actually use them.
Here are some smart fixes:
These strategies work in many parts of life, not only school projects. You can use them to plan a birthday card project, clean a closet over several days, practice for a music performance, or prepare for a family event. Any time a job is big and takes more than one sitting, prioritizing and organizing can help.