A lot of people do not realize how fast a normal day can turn into a transportation crisis. You might be driving to work, heading to a volunteer shift, or going to a community event when a tire goes flat or the battery dies. If you know what to do, the problem is stressful but manageable. If you do not, you can lose hours, spend unnecessary money, or put yourself in danger. Basic car maintenance skills are not about becoming a mechanic. They are about staying mobile, safe, and capable.
When you can handle a flat tire, a dead battery, or a quick safety check, you gain more than convenience. You gain independence. That matters when you rely on a vehicle for school, remote coursework, a part-time job, appointments, family responsibilities, or social plans in your community. These are practical life skills: repeatable, useful, and valuable when real life does not go as planned.
Why automotive basics matter
A vehicle is a tool that carries risk as well as freedom. Small problems, like low tire pressure or weak battery connections, can grow into larger and more expensive problems when ignored. Basic maintenance helps you spot issues early, avoid dangerous breakdowns, and make smarter choices about when to drive, delay, or call for help.
You do not need to memorize everything at once. What you do need is a calm process, the right safety habits, and enough confidence to follow the steps carefully.
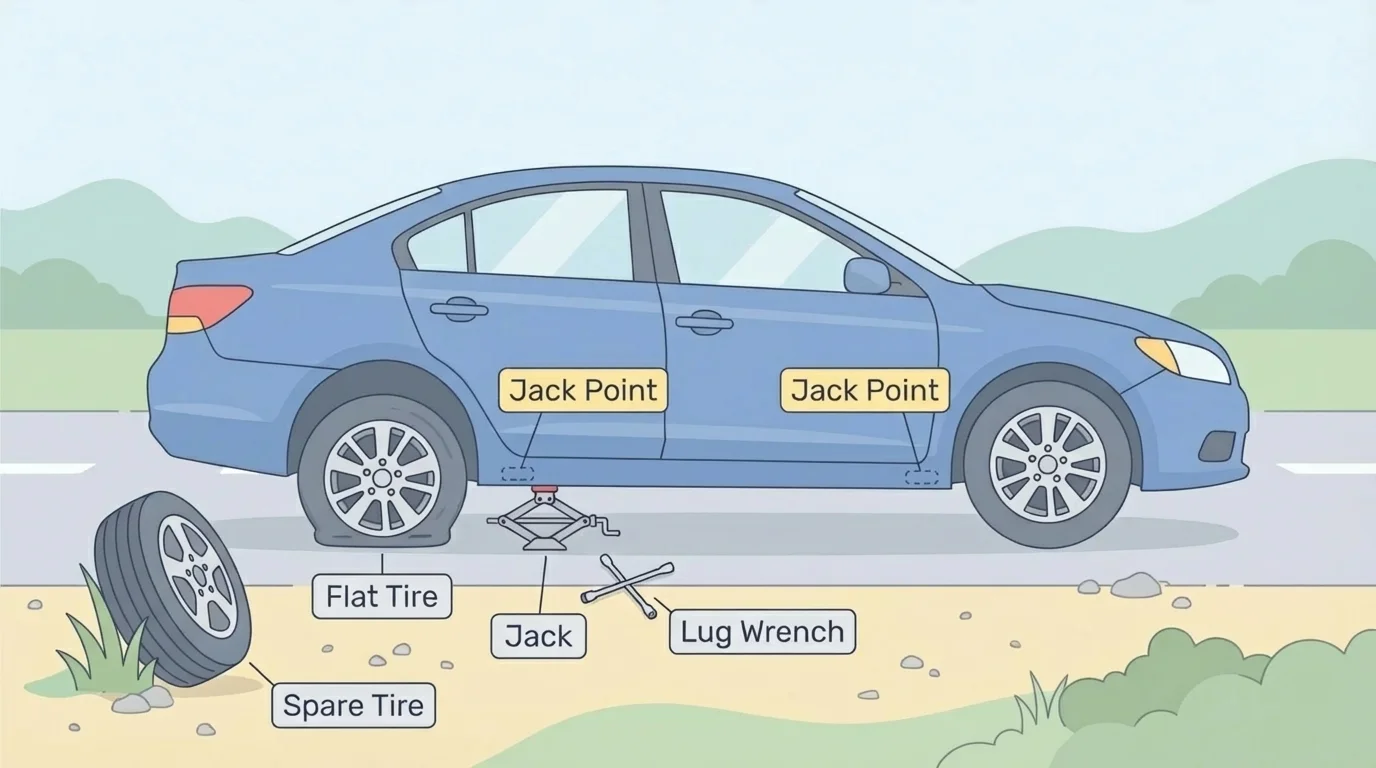
Before anything goes wrong, learn the layout of your own car. Open the trunk or rear cargo area and check whether your vehicle has a spare tire, a jack, and a lug wrench. Some cars include a full-size spare. Others have a compact temporary spare, sometimes informally called a "donut," which is only meant for short-distance, low-speed driving. Some newer cars do not include a spare at all and instead come with a tire repair kit.
Find your owner's manual and keep it in the vehicle or download a digital copy to your phone. The manual tells you where the approved jack points are, what tire size your car uses, what tire pressure is recommended, and what warning lights mean. It also tells you whether your battery has any special precautions.
Look at the sticker inside the driver-side door frame. It usually lists the recommended tire pressure for the front and rear tires. That number is usually different from the maximum pressure printed on the tire itself. Use the door sticker as your main guide.
Spare tire is the backup tire kept in the vehicle for emergencies. Jack point is the reinforced spot on the vehicle frame where a jack can safely lift the car. Lug nut is the metal fastener that holds the wheel onto the vehicle hub.
Also make sure you know where your hazard light button is. In a stressful moment, simple things suddenly become harder to find. If you already know your car, you lose less time and make fewer mistakes.
A flat tire is not always a dramatic blowout. Sometimes it is a slow leak from a nail, worn tread, or a damaged valve stem. Sometimes you notice the steering feels off, the car pulls to one side, or you hear a repeating flapping noise. Other times a tire pressure warning light appears on the dashboard.
Your tires affect braking, turning, fuel use, and traction in rain. A tire with low pressure has more surface contact with the road, which increases heat and wear. A tire with very low tread has less grip and can slide more easily on wet pavement. If one tire is visibly damaged, badly underinflated, or shredded, do not keep driving "just to get there." That can destroy the wheel and make the situation much more dangerous.
A tire can look almost normal and still be seriously underinflated. Visual checks help, but a pressure gauge gives a much more reliable answer.
You should also know the warning signs that mean a tire should be replaced rather than repaired: sidewall bulges, cracks, cords showing through the rubber, repeated pressure loss, or tread worn down close to the wear bars. If a tire is damaged on the sidewall, it usually cannot be patched safely.
A simple tread-depth check can be done with a coin, but if you are unsure, a tire shop can inspect it quickly. The important life skill is not pretending you know when you do not. Good judgment is part of maintenance.
If you get a flat, your first job is not changing the tire. Your first job is making the situation safe. Turn on your hazard lights, slow down gradually, and pull over to a flat, firm location away from traffic. A parking lot is much better than a narrow shoulder. If the road is unsafe, stay in the vehicle with your seat belt on and call roadside assistance.
As [Figure 1] shows, once you are in a safe place, put the vehicle in park. Set the parking brake. The tire change can be done safely only if the car is parked on stable ground and the jack is placed at the correct lifting point. If you have wheel chocks, place them against the tire opposite the flat to reduce rolling. Take out the spare tire, jack, and lug wrench before lifting the vehicle so you are not searching for tools mid-process.
Now follow a careful order.
Step 1: Remove the hubcap or wheel cover if necessary.
Step 2: Loosen the lug nuts slightly while the tire is still on the ground. Turn them counterclockwise. Do not remove them yet. This is easier before the wheel is lifted because the tire is not spinning.
Step 3: Position the jack under the correct jack point listed in your manual. If the jack is in the wrong spot, it can slip or damage the vehicle.
Step 4: Raise the vehicle until the flat tire is off the ground by a small amount.
Step 5: Remove the loosened lug nuts and place them somewhere they will not roll away.
Step 6: Pull the flat tire straight off and set it aside.
Step 7: Line up the spare tire with the wheel studs and push it onto the hub.
Step 8: Hand-tighten the lug nuts first. This helps prevent cross-threading.
Step 9: Lower the vehicle until the tire touches the ground and will not spin freely.
Step 10: Tighten the lug nuts firmly in a crisscross or star pattern, not in a circle. This helps the wheel seat evenly.
Step 11: Fully lower the car and remove the jack.
Step 12: Recheck the lug nuts for tightness and put the damaged tire and tools back in the vehicle.
Roadside tire-change decision
You notice the front right tire is flat in a grocery store parking lot at night.
Step 1: Check the environment.
The parking lot is lit, level, and away from traffic, so changing the tire there is safer than trying to drive farther.
Step 2: Confirm you have the needed equipment.
You locate the spare tire, jack, and lug wrench before starting.
Step 3: Use the correct sequence.
You loosen the lug nuts before lifting, place the jack at the correct jack point, install the spare, and tighten the lug nuts in a star pattern.
The result is a controlled repair instead of a rushed and risky one.
After a spare is installed, do not treat it like a normal tire unless it is a full-size spare. Many compact spares have low speed and distance limits. A common guideline is to keep your speed below about \(50 \textrm{ mph}\) and drive only as far as needed for proper repair or replacement, but always follow the label on the spare and your vehicle manual.
Later, when you think back to the setup shown in [Figure 1], the key idea is that safety and order matter more than speed. A rushed tire change is where injuries and mistakes happen.
A dead battery often happens at the worst possible time: cold weather, a forgotten interior light, or a car that has been sitting too long. Jumpstarting can solve the problem, but only if you do it carefully. Polarity matters. Connecting jumper cables in the wrong order can create sparks, damage electronics, or injure you.
Before doing anything, check for cracks, leaking battery fluid, or severe corrosion. If the battery is damaged, do not jumpstart it yourself. Also make sure both vehicles are off, in park, and not touching each other. Set the parking brakes.
The red cable connects to positive terminals. The black cable connects to negative or a safe ground point. Follow this order exactly.
Step 1: Connect one red clamp to the positive terminal of the dead battery.
Step 2: Connect the other red clamp to the positive terminal of the donor battery.
Step 3: Connect one black clamp to the negative terminal of the donor battery.
Step 4: Connect the last black clamp to an unpainted metal surface on the engine block or frame of the disabled vehicle, away from the battery.
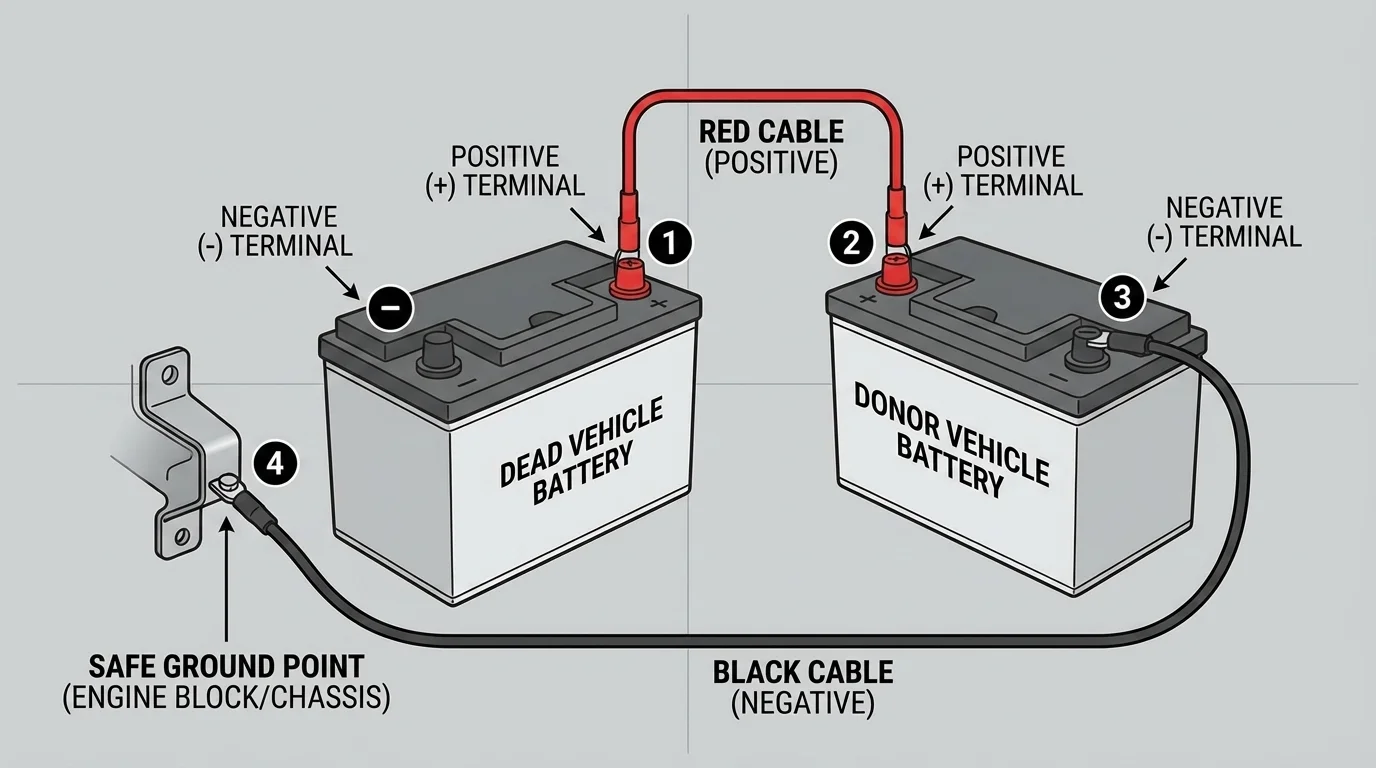
As [Figure 2] illustrates, once the cables are connected, start the donor vehicle and let it run for a minute or two. Then try starting the disabled vehicle. If it does not start right away, wait a little longer and try again. Do not crank the engine over and over without pauses.
If the disabled car starts, leave it running. Remove the cables in reverse order.
Step 5: Remove the black clamp from the grounded metal point on the revived vehicle.
Step 6: Remove the black clamp from the donor battery.
Step 7: Remove the red clamp from the donor battery.
Step 8: Remove the red clamp from the revived vehicle.
If you ever feel unsure about positive and negative battery terminals, stop and identify them clearly before attaching anything. Positive is usually marked with a plus sign, and negative is usually marked with a minus sign.
After a successful jump, drive the vehicle long enough to let the charging system help restore the battery. A rough rule is at least \(20–30\) minutes of driving, but if the battery is old or the alternator is weak, the vehicle may still need service. If the car dies again soon after, the issue may not be "just the battery." It could be charging-system trouble, battery age, or a parasitic drain.
The cable arrangement in [Figure 2] also highlights an important safety habit: the final black clamp goes to a grounded metal point, not directly to the dead battery's negative terminal in many standard setups. That reduces spark risk near the battery.
When jumpstarting is not the right choice
You open the hood and notice the battery case is cracked and there is white and blue buildup around the terminals.
Step 1: Identify the hazard.
A cracked battery can leak acid and may be unsafe to jumpstart.
Step 2: Do not force a fix.
Instead of trying to connect cables anyway, you stop and call for professional assistance.
Step 3: Protect yourself.
You avoid touching residue with bare hands and keep your face away from the battery area.
Knowing when not to act is part of being responsible and safe.
If you do not have another vehicle available, a portable jump starter can be a smart tool to keep in your trunk. It still requires careful instruction-following, but it gives you more independence and does not rely on another driver being nearby.
Most breakdowns give warning signs before they become emergencies. As [Figure 3] shows, a quick routine inspection can catch low tires, dead lights, low washer fluid, or obvious leaks before you head out. Think of this as your vehicle version of checking that your phone is charged before leaving home.
A good safety check takes only a couple of minutes. Walk around the vehicle. Look for flat-looking tires, broken lights, fluid under the car, or anything hanging loose. Check that your windows and mirrors are clear. Make sure your license plate is visible and not blocked by dirt or damage.

Inside the car, turn the key or start the engine and look at the dashboard. Warning lights should come on briefly and then go off. If a warning light stays on, do not ignore it. Some alerts mean "schedule service soon," while others mean "stop driving as soon as safely possible." Learn the major ones in your owner's manual: oil pressure, engine temperature, battery/charging, brake system, and tire pressure.
Under the hood, you should know how to check a few basics when the engine is cool. Windshield washer fluid is easy to refill. Engine oil is checked with a dipstick in many vehicles. Coolant should be checked only according to the vehicle instructions, since hot systems can be dangerous to open.
| Check | What to Look For | Why It Matters |
|---|---|---|
| Tires | Low pressure, cracks, nails, uneven wear | Reduces blowout risk and improves traction |
| Lights | Headlights, brake lights, turn signals working | Helps you see and be seen |
| Wipers | Streaking, skipping, torn rubber | Maintains visibility in rain |
| Fluids | Low washer fluid, low oil, visible leaks | Prevents engine damage and poor visibility |
| Brakes | Squealing, grinding, soft pedal, pulling | Affects stopping ability and safety |
Table 1. Basic vehicle safety checks and the reasons each one matters.
Pay attention to how the vehicle feels while driving. Vibrations, pulling, delayed braking, unusual smells, or new sounds are all information. A grinding sound when braking is not something to "wait and see" about for weeks. A sweet smell under the hood might suggest a coolant issue. A rotten-egg smell may point to a battery or exhaust-related problem. You are not expected to diagnose everything perfectly, but you are expected to notice changes and respond wisely.
"Take care of your car in the garage, and the car will take care of you on the road."
Your safety kit matters too. Keep a flashlight, reflective triangles or flares if legal and safe in your area, a phone charger, bottled water, basic gloves, and weather-appropriate supplies. In cold climates, add a blanket. In hot climates, extra water matters more. The exact kit varies, but the principle is simple: prepare for delay, darkness, and weather.
When you return to the walk-around shown in [Figure 3], notice that most checks are visual and fast. They do not require advanced tools, just attention and consistency.
Knowing the procedure is useful. Knowing when not to do the procedure yourself is just as important. If you have a flat tire on a narrow shoulder next to fast traffic, changing it yourself may be more dangerous than waiting for roadside help. If a battery is leaking, jumpstarting is not the right move. If the engine is overheating and steam is coming out, do not open the radiator cap while it is hot.
Use a simple decision framework: safe location, right tools, clear problem, personal confidence. If even one of those is missing, it may be smarter to call for help. That is not weakness. That is judgment.
Independent transportation includes knowing your limits
Real independence is not doing everything alone no matter what. It is making smart choices that protect your time, money, and safety. Sometimes that means changing the tire yourself. Sometimes it means using roadside assistance, calling a trusted adult, or scheduling professional service before a small issue becomes a breakdown.
Weather changes your plan too. Rain reduces traction and visibility. Extreme heat makes roadside work more physically stressful. Cold weather affects batteries and can make metal tools painful to handle. At night, visibility drops and your personal safety matters even more. A smart driver adjusts to conditions instead of pretending every situation is the same.
The easiest emergency to handle is the one you prevent. Create a simple routine you can actually keep. You do not need a complicated spreadsheet. A basic note on your phone works fine.
Each week, do a quick walk-around. Each month, check tire pressure, washer fluid, and the condition of your wipers. Before longer drives, check fuel level, tires, lights, and whether your phone is charged and your emergency supplies are present. If you drive a lot, keep track of oil changes and tire rotations according to your vehicle's maintenance schedule.
Simple monthly routine
Step 1: Pick a repeat date.
Choose the first Saturday of each month or another date you will remember.
Step 2: Do a 10-minute check.
Inspect tires, test lights, refill washer fluid, and look for warning lights.
Step 3: Record what you notice.
Write down low tread, weak battery performance, or upcoming service needs.
Step 4: Act early.
Schedule service before the problem turns into a missed shift, canceled plan, or unsafe drive.
Small routines save money because emergency repairs usually cost more than planned maintenance.
If you pay for your own gas, repairs, or insurance, this matters financially too. Replacing a badly worn tire after a breakdown may cost more than handling the issue earlier. Missing work because your battery dies can cost you money in a different way. Reliable transportation supports the rest of your life.
You do not have to know every part under the hood. You do need to know how to stay calm, follow safety steps, and recognize what deserves immediate action. That is the level of skill that turns a driver into a responsible vehicle owner.