A paper bridge can hold more weight than you might think, a plastic bottle can help clean dirty water, and a small change in shape can make a parachute fall more slowly. These are not magic tricks. They happen because people use science to understand how the world works, and then use that understanding to design solutions.
People design objects, tools, processes, and systems when they want to solve a problem or make something work better. An engineer is a person who designs solutions to problems. Engineers often use ideas from science. Scientists try to explain natural events and find patterns in the world. Engineers use those explanations and patterns to build things that are useful.
A problem can be simple, like keeping a lunch cold, or bigger, like helping a town save water. Sometimes the solution is an object, such as a stronger backpack zipper. Sometimes it is a tool, such as a device for picking up trash safely. Sometimes it is a process, such as a set of steps for sorting recycling. Sometimes it is a system, such as a school garden watering setup with containers, tubes, and timers working together.
Good design starts with a clear question: What problem needs to be solved? If the problem is not clear, the solution may not work well. For example, "make a better umbrella" is too broad. "Make an umbrella that is easy for a child to carry and does not flip inside out in wind" is much clearer.
Design means planning and making something to solve a problem. Criteria are the things a solution should do well. Constraints are the limits, such as cost, time, size, or materials. Evidence is information from observations and tests that helps us decide if an explanation or design is good.
When students learn to apply scientific ideas, they are doing both science and engineering. They are using what they know about materials, forces, energy, living things, and Earth to create solutions that can be tested and improved.
Science gives us principles we can use in design. A principle is an important idea or rule about how something works. For example, if you know that rough surfaces create more friction than smooth ones, you can design shoes that grip the ground better.
Some designs use ideas about forces. Pushes and pulls affect motion. A scooter helmet is shaped and padded to reduce harm when forces act on the head. A kite is designed so air pushes on it in a way that helps it rise.
Other designs use ideas about materials. Materials have properties such as hardness, flexibility, transparency, and water resistance. A raincoat needs material that does not let much water pass through. A window needs a material that lets light through. A spoon should be stiff enough that it does not bend easily during use.
Designs also use ideas about energy. Light energy from the Sun can warm objects. Electrical energy can power a fan. Sound energy can be reduced by soft materials that absorb vibrations. If a class wants a cooler outdoor rest area, they can compare dark and light surfaces because light colors usually absorb less sunlight and stay cooler.
Life science helps with design too. Gardeners may design barriers to protect plants from insects, or create tools that move pollen from flower to flower. Earth science matters when people design walls to slow erosion, roofs to shed rain, or containers to save water during dry weather.
Some burrs from plants stick to animal fur because they have tiny hooks. This natural idea inspired the invention of hook-and-loop fasteners, showing that nature can give engineers useful design clues.
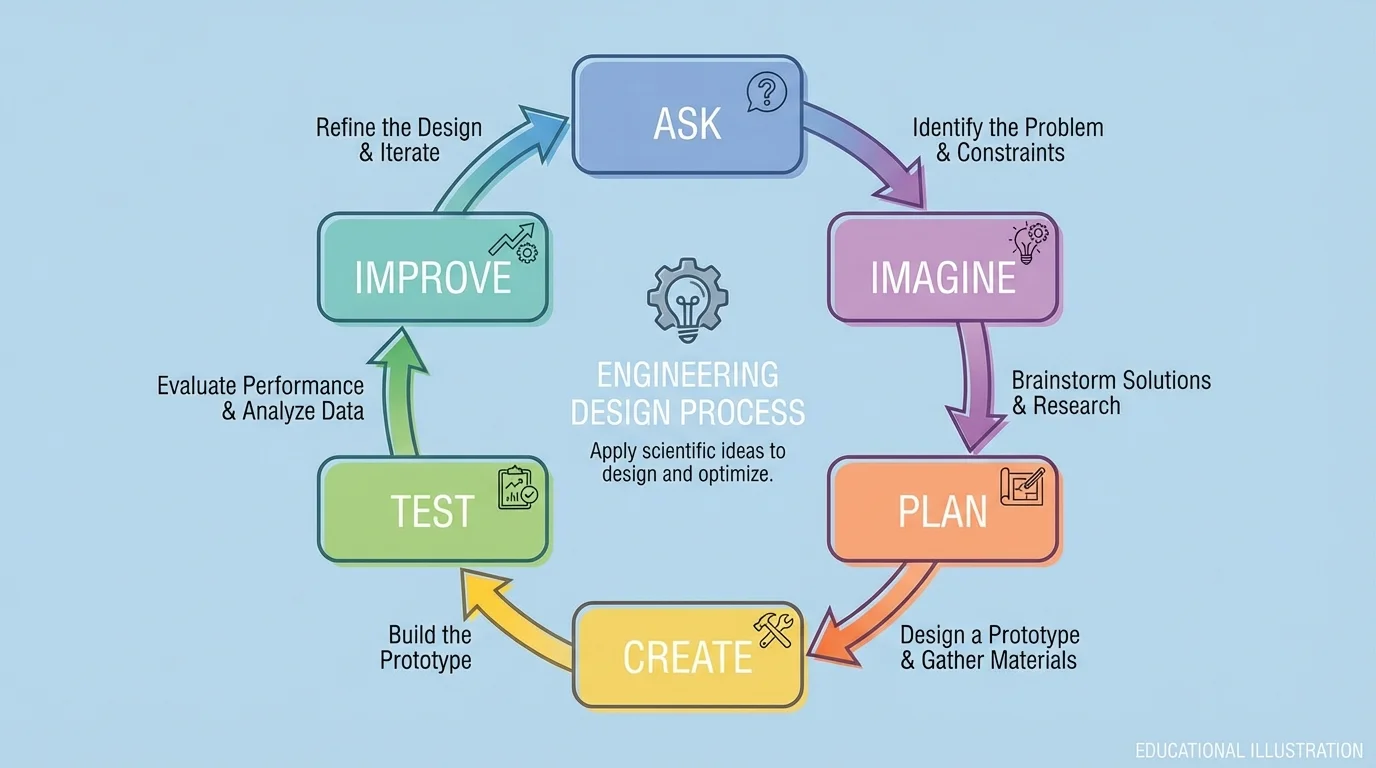
When a person uses scientific ideas in design, they do not just guess. They ask, "What science idea explains why this should work?" That question connects designing solutions to constructing explanations, and the repeated cycle shown in [Figure 1] helps explain how ideas are tested and improved.
Design usually follows a series of steps. A first design is rarely perfect. Engineers ask questions, imagine ideas, plan, create, test, and improve.
The process begins by understanding the need. Then a designer thinks of several possible ideas instead of only one. Next comes a plan, which may be a drawing, a list of materials, or a model. After that, the design is built or carried out. Then it is tested, and the results are studied. If the design does not fully meet the goal, it is changed and tested again.
This repeated process is important because testing gives new information. Suppose students design a paper airplane that should fly far. If it dives quickly, they can explain that the wing shape or balance may not be right. Then they can change one part and test again.
Notice that design is not random. It uses thinking, observations, and evidence. A sketch, a model, and a test result are all useful parts of the work. Designs become better when people learn from mistakes instead of ignoring them.
Constructing explanations and designing solutions are closely connected. In science, students explain why something happens by using evidence and scientific ideas. In engineering, students design a solution by using the same scientific ideas and then test whether the design works. If a design fails, students explain why it failed and use that explanation to improve it.
That is why good designers are also good thinkers. They do not only ask, "Did it work?" They also ask, "Why did it work?" and "Why did it not work?"
Every design problem has goals and limits. The goals are the criteria. The limits are the constraints. A strong bridge made from expensive metal may work well, but it would not fit a challenge that says to use only paper and tape.
Imagine a class designing a device to keep an ice cube from melting quickly. The criteria might be that the ice stays solid for at least 20 minutes and that the device is easy to carry. The constraints might be that the device must fit inside a box of width less than 15 centimeters, use only classroom materials, and be built in 30 minutes.
Designers must pay attention to both. A design that meets one criterion but breaks a constraint is not the best solution. This is why engineering involves choices. A larger shade structure may cool more area, but it may also cost more materials and be harder to build.
| Part of the problem | What it means | Example |
|---|---|---|
| Criteria | What the design should do | Filter water better, move faster, stay dry |
| Constraints | Limits on the design | Only 3 materials, low cost, small size |
| Evidence | What tests and observations show | How much water passed through, how long it lasted |
Table 1. A comparison of criteria, constraints, and evidence in a design problem.
Thinking clearly about criteria and constraints helps students decide between ideas. It also helps them explain why one solution is better than another.
In science, an explanation should match observations. In engineering, evidence from tests helps explain a design's success or failure. If a tower made from straws falls, students should not just say, "It was bad." They should explain what happened, such as the base being too narrow or the joints bending too easily.
A variable is something that can change in a test. In a parachute experiment, the size of the parachute is a variable. So is the type of material. If both size and material change at the same time, it becomes hard to know which change caused the result. Fair tests usually change one variable at a time.
Measurement also matters. Instead of saying, "This one fell slower," students can time the drop. If one parachute takes 4 seconds and another takes 6 seconds, the evidence is clearer. We can compare the times with a subtraction: \(6 - 4 = 2\). The second parachute takes 2 more seconds to fall, so it falls more slowly.
Example: Explaining a parachute test
Two parachutes are dropped from the same height. Parachute A falls in 4 seconds. Parachute B falls in 6 seconds.
Step 1: Compare the times.
Calculate the difference: \(6 - 4 = 2\).
Step 2: Use the evidence.
Parachute B stays in the air 2 seconds longer.
Step 3: Construct an explanation.
If Parachute B has a larger canopy, the larger surface catches more air, which helps slow the fall.
The explanation connects the test result to the science idea that air pushes against the parachute.
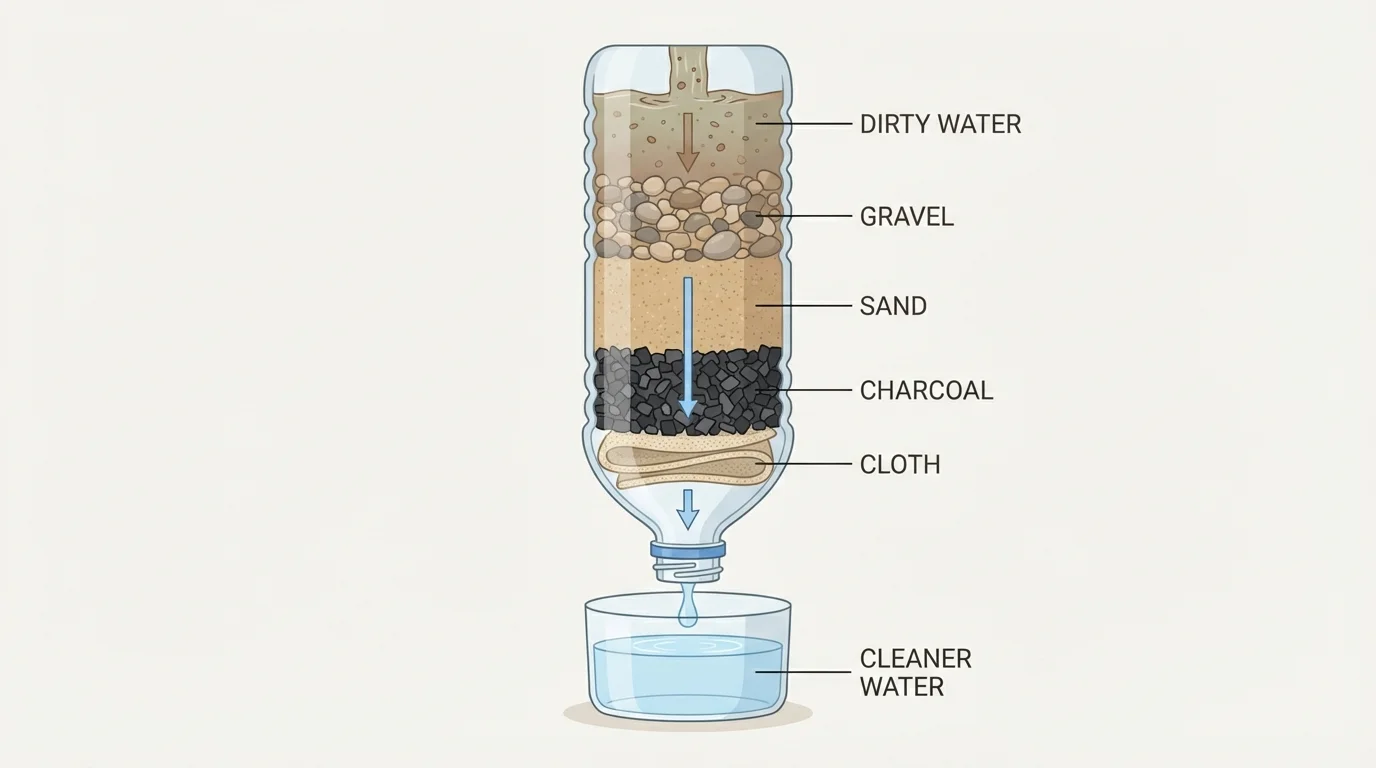
This kind of reasoning is stronger than a guess. It uses observed data and a scientific principle together. The layered filter in [Figure 2] is another example of how scientific ideas guide a design.
One useful example is a simple water filter. Different materials can trap different kinds of dirt, and layers such as gravel, sand, charcoal, and cloth each do a different job as water moves downward. The scientific idea is that materials have different properties, including particle size and how easily water passes through them.
If dirty water goes through large gravel first, some bigger pieces are caught. Sand can trap smaller bits. Cloth can block other particles. A filter may make water look cleaner, but that does not always mean it is safe to drink, because some tiny living things may still be present. This is an important reminder that a design can improve one problem while not completely solving everything.
Another example is a shade structure for a playground. Designers can use what they know about sunlight and materials. A larger top gives more shade. Light-colored fabric may stay cooler in direct sunlight. The shape must also be strong enough to handle wind.
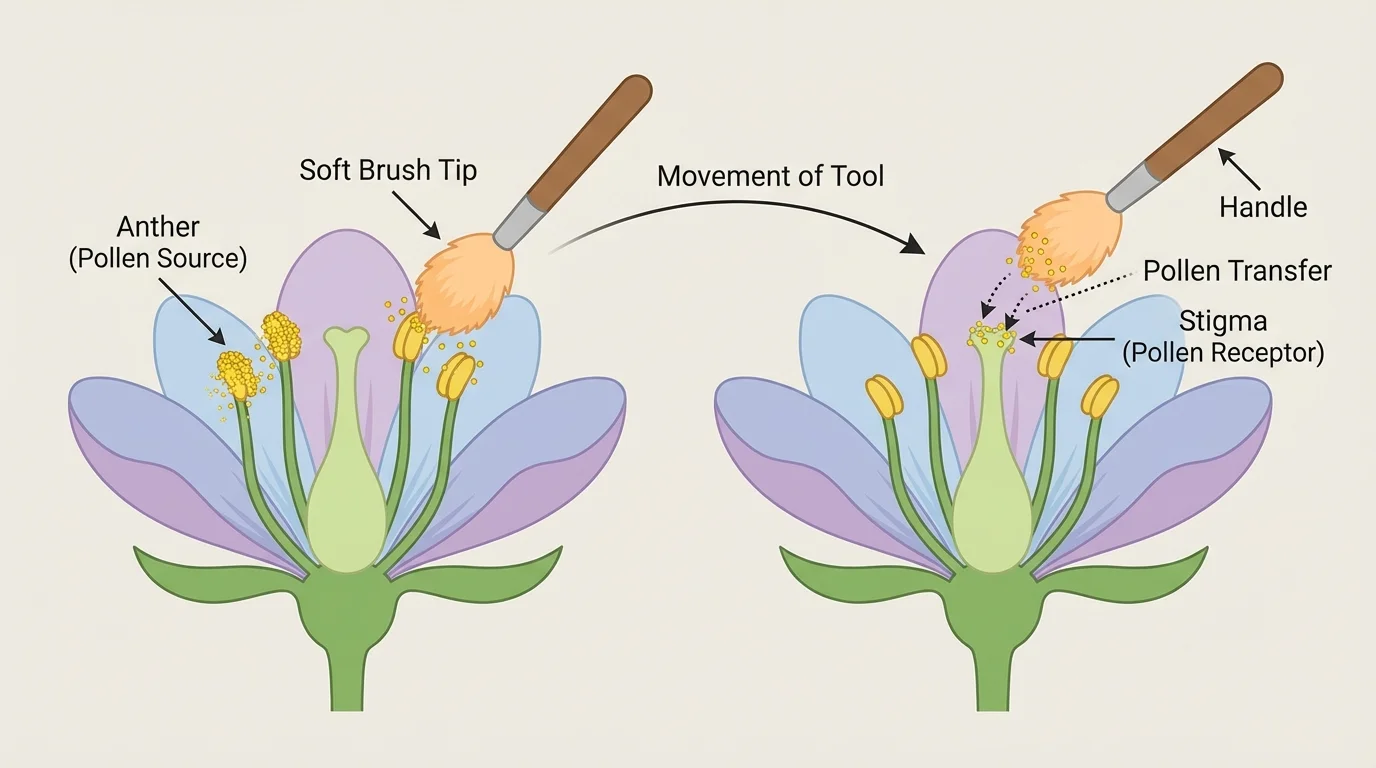
A third example is a hand pollinator for a school garden. Some flowers need pollen moved from one place to another. A soft brush tool can help do this without harming the flower. The science idea comes from plant reproduction. The tool must be gentle, easy to hold, and able to collect and place pollen.
Students can also design a process instead of a physical object. A classroom recycling process might include labeled bins, rules for sorting, and a weekly check. The scientific principle is that different materials have different properties and can often be reused in different ways. A good process reduces waste and helps materials go to the right place.
Example: Choosing the best material for a lunch bag
A class wants a lunch bag that keeps food cool and does not leak.
Step 1: Identify the criteria.
The bag should slow warming and keep liquids inside.
Step 2: Think about science ideas.
Thicker materials may slow heat transfer better. Waterproof materials stop liquid from passing through.
Step 3: Make a decision.
A designer might choose an insulated inner layer and a waterproof outer layer because each material has a useful property.
The final choice is based on scientific properties, not on looks alone.
These examples show that designs can be small or large, simple or complicated. What matters is that the design uses scientific thinking to solve a real problem.
Testing is where ideas meet reality. The cycle we saw earlier in [Figure 1] matters here because improving a design depends on what testing reveals. A fair test keeps most conditions the same and changes only the variable being studied. In the same way, [Figure 3] helps show how parts of a system work together.
Suppose students design paper bridges. They test how many coins each bridge can hold before bending too much. If one bridge uses thicker folded sides and another uses flat paper, students should keep the paper type, bridge length, and number placement the same. Then the effect of shape becomes clearer.
Numbers can help compare results. If Bridge A holds 18 coins and Bridge B holds 25 coins, the increase is \(25 - 18 = 7\). Bridge B holds 7 more coins. Students can explain that folded shapes are often stiffer than flat ones, so the bridge resists bending better.
After testing, students should improve the design in a thoughtful way. If a bridge failed because the middle sagged, they might add folds there or shorten the span. If a water filter let too much dirt through, they might change the order of layers or use finer material. Good improvements come from evidence.
When comparing designs, keep the test fair. Use the same starting conditions whenever possible, change one main variable, and record what you observe. This makes your evidence more trustworthy.
Fair tests also help students avoid false conclusions. If one seedling grows better, it may be because of more sunlight rather than a different pot shape. Careful testing helps us know which cause is most likely.
A system has parts that interact, and changing one part can affect how the whole design works. A school garden watering system might include a container, tubes, holes, supports, and water. If the holes are too large, too much water may flow out. If the container is too low, gravity may not move the water as needed.
A hand pollination system can also be thought of as connected parts: a handle, a soft brush tip, the flower, and the movement of pollen. The parts work together toward one job. If the brush is too rough, it can damage the flower. If it is too smooth, it may not pick up enough pollen.
Thinking in systems helps designers notice connections. A change that helps one part may hurt another part. A larger water container may last longer, but it may also be heavier and harder to carry. Designers balance these effects.
Systems can include living and nonliving parts. In a garden design, the system includes soil, water, sunlight, insects, plants, and tools. This is why science knowledge is so useful. It helps the designer understand how parts affect each other.
Later, when students study more complex machines or environmental solutions, this systems thinking becomes even more important. The same idea applies to the filter example from [Figure 2]: each layer works as one part of the whole filtering system.
A successful design should be useful, but it should also be safe and responsible. If a tool is hard to hold, some people may not be able to use it easily. If a process creates a lot of waste, it may solve one problem while causing another.
Designers often think about who will use the solution. A younger child may need a larger handle or simpler steps. Someone carrying groceries may need a bag with stronger straps. A class making a bird feeder should think about weather, animal safety, and where the feeder will be placed.
Designers also think about the environment. Reusing materials, reducing waste, and saving water are important choices. A process for collecting rainwater for a garden can help plants while using less fresh water from taps. The design should be checked so water stays covered and does not become a place where insects breed.
"The best solutions solve a problem without creating a bigger one."
Science helps here too. Knowledge about habitats, weather, materials, and living things helps designers make wiser decisions. A strong design is not just one that works today. It is one that works well and fits the world around it.
When students apply science to design, they are learning to think carefully. They observe patterns, ask questions, test ideas, and explain results. They learn that evidence matters. They learn that failure can teach something useful. They learn that a solution can always be improved.
For example, a student designing a mini greenhouse might use clear plastic because light must enter, dark soil because it absorbs warmth, and small vents because too much heat could build up inside. Each choice comes from a science idea. If the plants wilt, the student can test whether the cause is too much heat, too little water, or not enough air flow.
This is exactly what science and engineering do together. Science explains the world. Engineering uses those explanations to change the world in helpful ways. When students design with scientific ideas, they become problem-solvers who can make thoughtful choices based on evidence.